background image

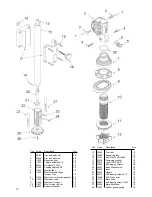
Pos. Code

Description                              

Q.ty

1

05799

Arm locking dowel 

2,0

2

07446 

Arm locking screw

2,0

3

11200

Reduction gear

1,0

4

11805

Trilobed screws 5X12

3,0

5

03244

OR Gasket XPG 9

1,0

6

07956

Fairlead skintop PG9

1,0

7

11524

Mast gasket

1,0

8

11523

Mast inclinable flange
for pass tube

1,0

9

11526

Mast conic inclination adapter

1,0

10

11525

Mast pass tube

1,0

11

11528

Mast conic ring nut

1,0

12

11527

Mast locking ring nut

1,0

13

10983

Adjustment shaft

1,0

Pos. Code

Description                              Q.ty

14

03605

Tear rivet

1,0

15

10968

Supporting tube

1,0

16

02125

Nut- M6x1,5 UNI 5588 

1,0

17

02354

Fastening bracket

1,0

18

02018

Lock UNIT KNOB

1,0

19

02083

Self-tapping screws

4,0

20

06391

Index Plastic screw

1,0

21

06390

Index

1,0

22

03647

Handle

1,0

23

02075

Self-tapping screw 4x10

1,0

24

12986

F50 F connector

1,0

25

10110

Black knob

1,0

26

02087

Self-tapping screw 3,9x13

1,0

27

06495

Elevation sticker

1,0

28

12030

Rubber gasket spring

1,0

13

Summary of Contents for VoyagerG3 65

Page 1: ...INSTALLATION GUIDE AND USER MANUAL UK...

Page 2: ...nd terrestrial antennas against any material and or construction fault and defect The warranty offered by TELECO is limited to the free of charge replacement or repairing of any parts that are deemed...

Page 3: ...page 14 Using a dia 42 cutter drill the inside wall first Caution Mount the antenna away from the vehicle roof edge to avoid overhanding the roof line when travelling The Voyager G3 antenna must be i...

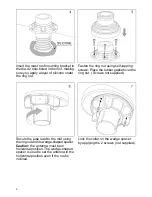
Page 4: ...ws Place the rubber gasket over the ring nut Screws not supplied Secure the pipe lead to the roof using the ring nut and its wedge shaped spacer Caution the antenna must be in horizontal position The...

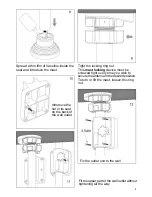
Page 5: ...device must be screwed tight every time you wish to secure the antenna in the desired position To turn or lift the mast loosen this ring nut Spread a thin film of Vaseline inside the seal and introduc...

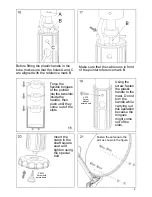
Page 6: ...Caution Extend the dish mast all the way as shown in the figure Tighten the indicator screw hard to the end of the thread as shown in the figure Insert the cable in the plastic handle hole 5...

Page 7: ...o slots inside the handle then push until they come out of the slots Make sure that the cable runs in front of the pointer reference mark B Using the screw fasten the plastic handle to the mast Do not...

Page 8: ...utely installed according to fig 23 i e the disc must be bent to the rear of the vehicle Before starting the vehicle the antenna must be compulsorily lowered and positioned properly according to fig 2...

Page 9: ...cute fine adjustment of both the elevation angle crank and the azimuth mast INSTRUCTIONS FOR USE USEFUL TIPS FOR BETTER SATELLITE SEARCH Should you be unable to find the signal by following the proced...

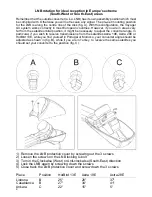
Page 10: ...ngle In particular if you wish to receive transmissions from the satellites Astra 19E Astra 28E or HotBird 13E while you find yourself in Portugal or Morocco your converter angle should be adjusted as...

Page 11: ...lly important to incline the dish to the correct angle Check your position on the map then set your dish elevation angle to the value in degrees read on the map for your required satellite The grey se...

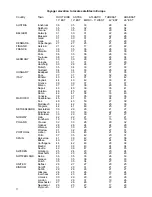
Page 12: ...35 41 Palermo 46 45 42 37 44 Roma 42 41 38 33 40 Venezia 38 37 35 30 36 MAROCCO Casablanca 45 41 51 24 37 Fes 46 43 50 27 39 Marrakech 46 42 53 25 38 Tangiers 44 41 48 25 37 NETHERLANDS Amsterdam 30 2...

Page 13: ...Flat washer D 6 4 0 Pos Code Description Q ty 1 03676 Parabolic antenna D 650 mm 1 0 1 07364 Parabolic antenna D 850 mm 1 0 2 10910 Screw M6X12 UNI 7687 4 0 3 03684 Self locking nut M6 UNI 7474 4 0 4...

Page 14: ...ast conic ring nut 1 0 12 11527 Mast locking ring nut 1 0 13 10983 Adjustment shaft 1 0 Pos Code Description Q ty 14 03605 Tear rivet 1 0 15 10968 Supporting tube 1 0 16 02125 Nut M6x1 5 UNI 5588 1 0...

Page 15: ...ibility that the following products VOYAGER G3 50 which are the subject of this certificate conform to the following norms EN 60065 2002 EN 55013 2001 A1 2003 EN 61000 3 2 2000 A2 2005 EN 61000 3 3 19...

Page 16: ...26 09 2014...
Reviews: