25
www.behnke-online.com
Instructions Secure Ethernet Adapter / Secure Door Adapter
Secure Door Adapter
GB
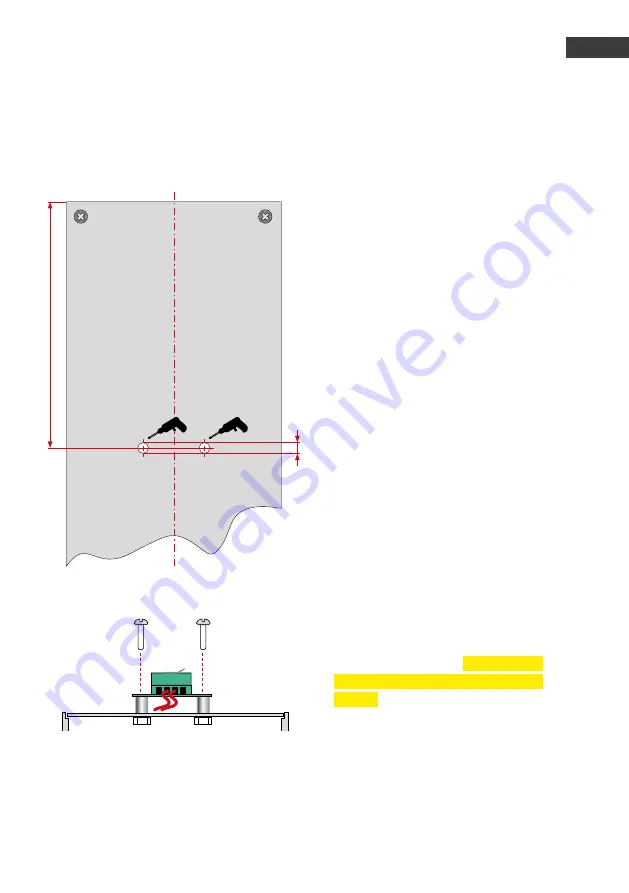
Mounting sabotage contact
Up
80
Lid electronics box
Drillings for
Sabotage contact
Sabotage contact
Nuts
ø3
Dimensions in mm
Installation inside the Behnke in-wall housing
Mounting material provided:
▸
2 x rollers 5 mm
▸
2 x Phillips screws M2,5 x 10 mm V2A
▸
2 x nuts M2,5 V2A
▸
1 x Sabotage contact
1. First, fix the sabotage contact of your Secure
Door Adapter to the lid of the basic electron-
ics using the two Phillips screws
M3 x 10 mm. To maintain the necessary dis-
tance from the lid of the electronics box and
the sabotage contact, mount the two rollers
(5 mm) in between the sabotage contact and
the top of the lid (cf. drawing).
2. Now, please insert the two Phillips screws
M3 x 10 mm into the two holes drilled into
the sabotage contact.
3. Place the two rollers (5 mm) onto the two
Phillips screws.
4. Insert the two screws on the sabotage
contact into the two holes drilled into the lid.
5. Secure the sabotage contact in position
using the two nuts M3.
6. Now, please perform a function test on the
sabotage contact with a multimeter. When
you insert the sabotage contact into the
in-wall housing, the sabotage contact will
be activated and closed. Do not connect
the sabotage contact to the Secure Door
Adapter. With the sensing device activated,
you should be able to measure a resist-
ance of 5.1 kΩ on the screw terminals. After
testing, please connect the sabotage contact
to the Secure Ethernet Adapter inside the
building.


