TIENet™ 360 LaserFlow™ Velocity Sensor
Section 2 Preparation and Installation
2-27
14. Using the bubble level on top of the sensor as a guide,
adjust the carrier by loosening the appropriate bolts in the
sensor carrier clamp such that the bubble in the level falls
within the concentric rings.
15. Turn the laser on to make final adjustments so that the
laser beam hits the flow stream at the exact center of the
pipe (refer to Section 3.4 for Signature or Section 4.3 for
2160).
16. Following final adjustments, ensure that all mounting
bracket fasteners are tightened.
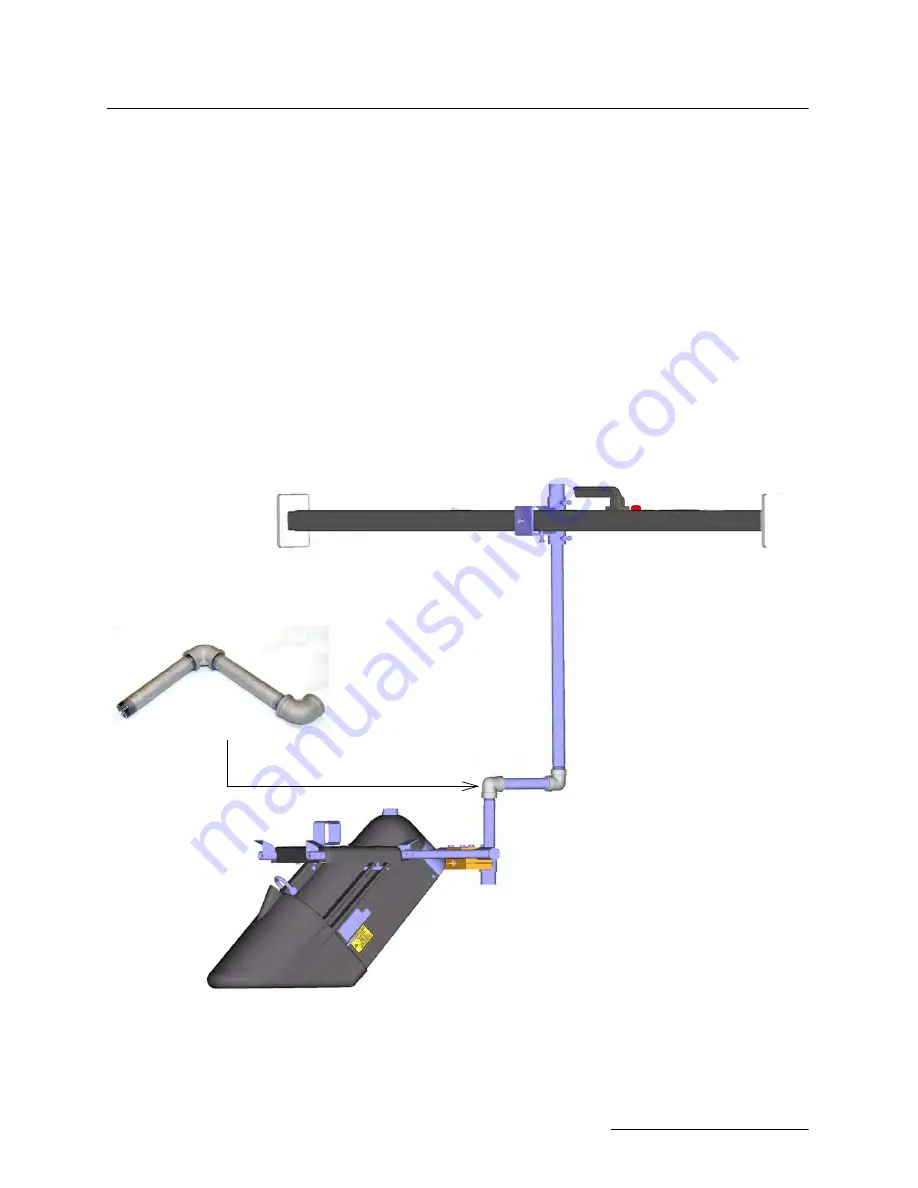
2.7.2 Offset Carrier from
Cargo Bar
For installations where the temporary mount assembly alone
cannot suspend the sensor directly over the center of the flow, an
optional elbow pipe is available to create an offset of 6" from the
cargo arm.
Simply install it between the 24" pipe and the knuckle, as shown
below.
Figure 2-31 Temporary Mount: Optional elbow pipe for
offset
Summary of Contents for TIENet 360 LaserFlow Ex
Page 2: ......
Page 4: ......
Page 10: ...TIENet 360 LaserFlow Velocity Sensor Safety viii ...
Page 54: ...TIENet 360 LaserFlow Velocity Sensor Section 2 Preparation and Installation 2 32 ...
Page 90: ...TIENet 360 LaserFlow Velocity Sensor Section 4 Setup with 2160 LaserFlow Module 4 20 ...
Page 102: ...TIENet 360 LaserFlow Velocity Sensor Appendix A Replacement Parts A 2 A 2 LaserFlow Sensor ...
Page 103: ...TIENet 360 LaserFlow Velocity Sensor Appendix A Replacement Parts A 3 ...
Page 104: ...TIENet 360 LaserFlow Velocity Sensor Appendix A Replacement Parts A 4 ...
Page 105: ...TIENet 360 LaserFlow Velocity Sensor Appendix A Replacement Parts A 5 ...
Page 106: ...TIENet 360 LaserFlow Velocity Sensor Appendix A Replacement Parts A 6 ...
Page 107: ...TIENet 360 LaserFlow Velocity Sensor Appendix A Replacement Parts A 7 ...
Page 109: ...TIENet 360 LaserFlow Velocity Sensor Appendix A Replacement Parts A 9 ...
Page 111: ...TIENet 360 LaserFlow Velocity Sensor Appendix A Replacement Parts A 11 ...
Page 132: ...TIENet 360 LaserFlow Velocity Sensor D 6 ...
Page 136: ......
Page 138: ...Warranty ...
Page 140: ......


