background image

70

 -

TBD


©

2007-2020


A

LL RIGHTS RESERVED TO 

T

ELE

F

IRE 

F

IRE AND 

G

AS 

D

ETECTORS 

L

TD

.


R

EVISION 

1.11


F

EBRUARY 

2020


Page 

11 of 19 


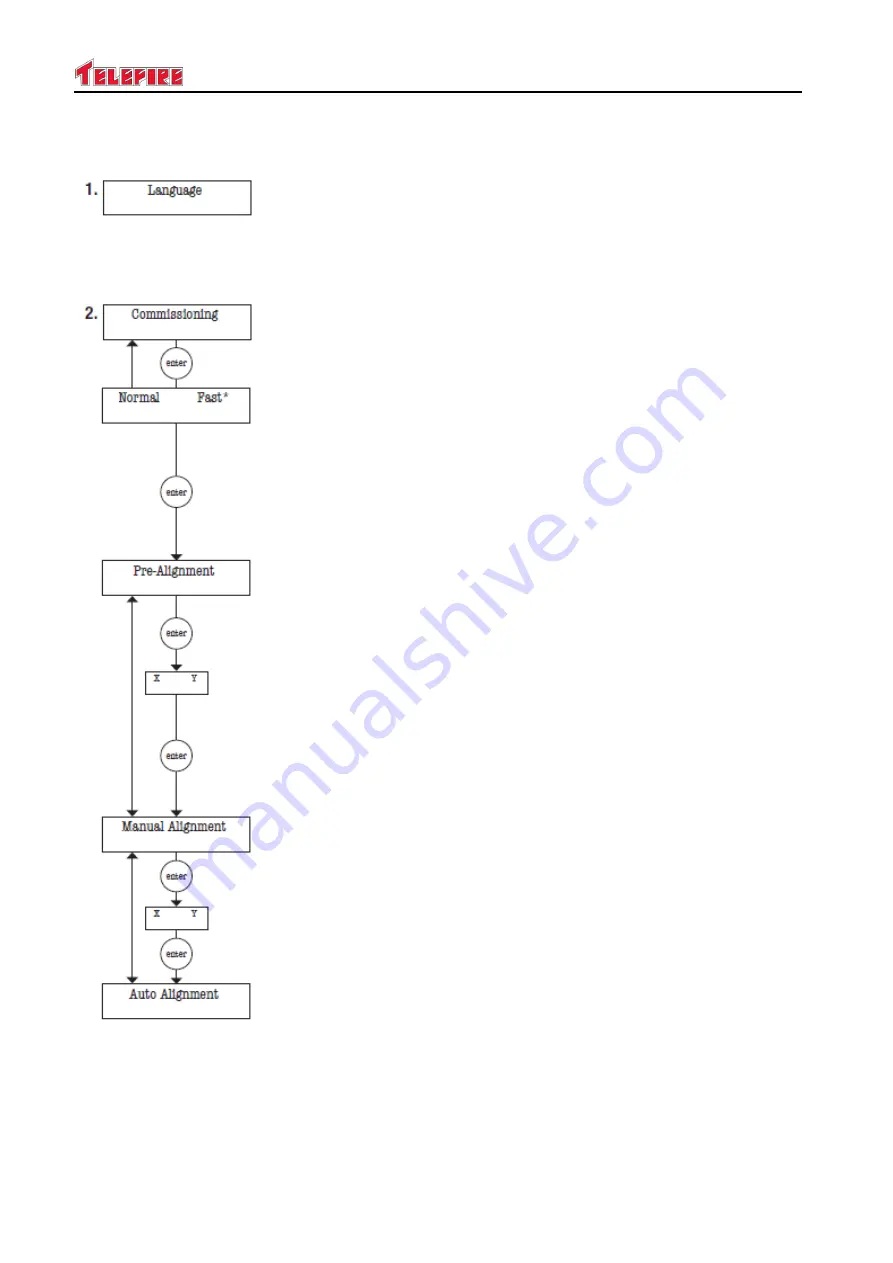
Sub-menus  

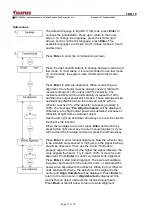
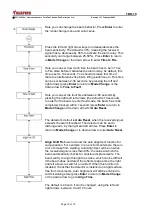
The default language is English. If this is ok, press 

Enter

 to 

continue the initiatlization. Press up to return to the home 
screen. To change the language, press the left and right 
arrows, and to confirm the language, press 

Enter

. The 

available languages are Enlish, Dutch, Italian, Spanich, Czech 
and German. 


Press 

Enter

 to enter the commissioning screen.  


Press the right and left buttons to change between normal and 
fast mode. In most cases, it is recommended to use fast mode 
(in normal state, the system uses 3.5mA and in fast mode, 
17mA).  


Press 

Enter

 to start pre-alignment. When conducting pre-

alignment, the reflector must be always covered. Start with 
receiver settings of 10% output and 5% sensitivity. The 
receiver sensitivity will be automatically increased to 100%, 
and then the output power will increase. These settings will be 
automatically disabled when the received signal, with no 
reflector, reaches 6%. If the detector increases gradually to 
100%, the message "

Pre Align Complete

" will be displayed. 

Otherwise, a too high output power was obtained, because of 
reflection of light from an adjacent object. 

Use the left, right up and down arrow keys to avoid the objects 
that blocks the reflector. 

When the readings are correct, press 

Enter

 and confirm by 

pressing the right arrow key to enter manual alignment. If you 
wish to abort the pre-align command, press the left arrow key. 


Press 

Enter

 to enter manual alignment. Now the reflector has 

to be installed and exposed. A high jump in the signal intensity 
should be observed. If not, use the X and Y buttons to 
properly align the reflector (the higher the signal intensity, the 
more aligned the beam). Try to reach 100% or more for auto 
alignment. Press 

Enter

 to confirm and enter Auto Alignment. 

Press 

Enter

 to start Auto Alignment. The beam will calibrate 

the power and search for the reflector ends 

– it will adjust the 

power when aligned with the reflector. When the four reflector 
ends are detected twice, the detector will be aligned to the 
center and 

Align Complete

 will be displayed. Press 

Enter

 to 

return to the main menu, if 

Align Aborted

 is displayed, this 

means that an object obstructs the received signal beam. 
Press 

Back

 or the left arrow to return to Auto Alignment.  


Summary of Contents for FireBeam Xtra

Page 1: ...Detector for Automatic Alignment Displacement Compensation Technical instructions TELEFIRE FIRE AND GAS DETECTORS LTD P O Box 7036 Petach Tikwa 49250 Tel 03 970 0400 Fax 03 921 1816 Email info telefir...

Page 2: ...i Please Note Do not install operate or conduct maintenance operations in the device before reading this manual thoroughly 2007 2020 ALL RIGHTS RESERVED TO TELEFIRE FIRE AND GAS DETECTORS LTD...

Page 3: ...ND GAS DETECTORS LTD REVISION 1 11 FEBRUARY 2020 Page 1 of 19 1 Operation range and location 1 1 Operation range FIREBEAM Xtra detectors can be installed at three distance ranges 7 70 m detector prims...

Page 4: ...ctor on a solid and stable structure Install the detector at a level of 2 7 m minimum from the floor to prevent the passage of people and equipment through the beam Also take into account the traffic...

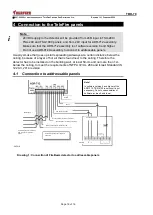
Page 5: ...cting the connector and tightening it to the base with the Allen key supplied with the detector 2 2 Installation of the control unit Install the control unit at a suitable level taking into account ac...

Page 6: ...70 TBD 2007 2020 ALL RIGHTS RESERVED TO TELEFIRE FIRE AND GAS DETECTORS LTD REVISION 1 11 FEBRUARY 2020 Page 4 of 19 2 3 Wiring...

Page 7: ...to change language use the right and left buttons to select the desired language When you finish selecting the desired language press Enter 5 Press Enter The Normal Fast screen will be displayed In m...

Page 8: ...n and Enter to enter a manual adjustment mode Caution If a free radius of 50 cm is impossible and the detector beam is obstructed by objects the IR intensity will stop increasing and the beam alignmen...

Page 9: ...gnment 10 When the value of AQ is higher than 100 manually press Enter to exit manual mode and then press Enter to enter Auto Alignment mode Auto alignment is an automatic process that first reduces t...

Page 10: ...R Cover the prims entirely and quickly If the beam is well aligned an error message will be displayed after 10 seconds The yellow fault lamp on the detector head and on the control unit will be flashi...

Page 11: ...y reading the resistance on the grey and black terminals If connected 110 Ohm has to be shown and if disconnected the resistance will be 220 Ohm This screen is displayed when the beam conducts alignme...

Page 12: ...Enter to enter the system menu Then press Down to browse the main menu options Press Enter to change the language Press Enter to align the detector Press Enter to set the detector settings sensitivity...

Page 13: ...100 the message Pre Align Complete will be displayed Otherwise a too high output power was obtained because of reflection of light from an adjacent object Use the left right up and down arrow keys to...

Page 14: ...conds In order for the beam to enter fault mode the beam has to be completely blocked within 1 second press Enter to return to Mode Change or the down arrow for Auto Reset The detector s default is Au...

Page 15: ...such that if the beam is set to alarm mode at 65 threshold of 35 the beam intensity has to reach 15 80 before it returns to normal state This operation prevents fluctuations in the reflected signal c...

Page 16: ...The relay will not be released before the Time to Fire expires This value can be between 2 30 seconds Press the left back arrows to end the test Fire Test will be displayed Press the left back arrows...

Page 17: ...70 TBD 2007 2020 ALL RIGHTS RESERVED TO TELEFIRE FIRE AND GAS DETECTORS LTD REVISION 1 11 FEBRUARY 2020 Page 15 of 19...

Page 18: ...ext to the ceiling Therefore the detector has to be installed on the building wall at least 50 cm and no more than 1 m below the ceiling to meet the requirements of NFPA 72 UL 268 and Israeli Standard...

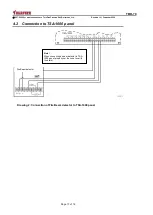
Page 19: ...ETECTORS LTD REVISION 1 11 FEBRUARY 2020 Page 17 of 19 4 2 Connection to TSA 1000 panel Drawing 2 Connection of Fire Beam detector to TSA 1000 panel Note When connecting a beam detector to TSA 1000 pa...

Page 20: ...S LTD REVISION 1 11 FEBRUARY 2020 Page 18 of 19 4 3 Connection to TSA 200 TSA 240 panel Drawing 3 Connection of Fire Beam detector to TSA 200 TSA 240 panel Note When connecting a beam detector to TSA...

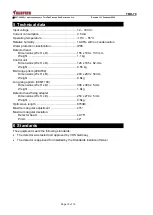
Page 21: ...t Dimensions W x H x D 120 x 185 x 62 mm Weight 0 55 kg Mid range prism 40KIT80 Dimensions W x H x D 293 x 293 x 50mm Weight 0 8kg Long range prism 80KIT100 Dimensions W x H x D 394 x 394 x 5 mm Weigh...

Reviews: