background image

English

   - 40 -

Switching On/Off

To Switch the TV On

Connect the power cord to a power source such as a 

wall socket (220-240V AC, 50 Hz). 
To switch on the TV from standby mode either:

• 

Press the 

Standby

 button, 

Pro/-

 or a 

numeric button on the remote control.

• 

Press the 

Standby

 button or 

Pro/-

 on 

the TV.

The TV will then switch on.

To Switch the TV Off

Press the 

Standby 

button on the remote control or 

press the 

Standby 

button on the TV, then the TV 

switches into standby mode.

To power down the TV completely, unplug the 

power cord from the mains socket.

Note:

 When the TV is switched into standby mode, the 

standby LED can blink to indicate that features such as 

Standby Search, Over Air Download or Timer is active. The 

LED can also blink when you switch on the TV from standby 

mode.

First Time Installation

When turned on for the first time, the language 

selection screen is displayed. Select the desired 

language and press 

OK

.

On the next screen, set your preferences using the 

directional buttons.

Note:

 Depending on the 

Country

 selection you may be asked 

to set and confirm a PIN at this point. The selected PIN cannot 

be 0000. You have to enter it if you are asked to enter a PIN 

for any menu operation later.

About Selecting Broadcast Type

Aerial:

 If 

Aerial

 broadcast search option is turned on, 

the TV will search for digital terrestrial broadcasts after 

other initial settings are completed.

Cable:

 If 

Cable

 broadcast search option is turned on, 

the TV will search for digital cable broadcasts after 

other initial settings are completed. According to your 

other preferences a confirmation message may be 

displayed before starting to search. Select 

YES

 and 

press 

OK

 to proceed. To cancel operation, select 

NO


and press 

OK

. You can select 

Network

 or set values 

such as 

Frequency

Network ID

 and 

Search Step

When finished, press 

OK

 button. 

Note:

 Searching duration will change depending on the 

selected 

Search Step

.

Satellite:

 If 

Satellite

 broadcast search option is 

turned on, the TV will search for digital satellite 

broadcasts after other initial settings are completed. 

Before satellite search is performed some settings 

should be made. 

Antenna Type

 menu will be 

displayed  first.  You  can  select 

Antenna Type

 as 

Direct

Single Satellite Cable

 or 

DiSEqC switch

 by 

using “ ” or “ ” buttons.

• 

Direct: 

If you have a single receiver and a direct 

satellite dish, select this antenna type. Press 

OK

 to 

continue. Select an available satellite on the next 

screen and press 

OK

 to scan for services. 

• 

Single Satellite Cable:

 If you have multiple 

receivers and a single satellite cable system, select 

this antenna type. Press 

OK

 to continue. Configure 

settings by following instructions on the next screen. 

Press 

OK

 to scan for services.

• 

DiSEqC switch:

 If you have multiple satellite dishes 

and a 

DiSEqC switch

, select this antenna type. 

Press 

OK

 to continue. You can set four 

DiSEqC


options (if available) on the next screen. Press 

OK


button to scan the first satellite in the list.

Analogue: 

If 

Analogue

 broadcast search option is 

turned on, the TV will search for analogue broadcasts 

after other initial settings are completed.
Additionally you can set a broadcast type as your 

favourite one. Priority will be given to the selected 

broadcast type during the search process and the 

channels of it will be listed on the top of the 

Channel 

List

. When finished, press 

OK

 to continue.

You can activate 

Store Mode

 option at this point. 

This option will configure your TV’s settings for store 

environment and depending on the TV model being 

used, the supported features of it may be displayed 

on the top of the screen as an info banner. This option 

is intended only for store use. It is recommended to 

select 

Home Mode

 for home use. This option will be 

available in 

System>Options>More

 menu and can 

be turned off/on later. 
Press 

OK

 button on the remote control to continue 

and the 

Network/Internet Settings

 menu will be 

displayed.  Please refer to 

Connectivity

 section to 

configure a wired or a wireless connection. After the 

settings are completed press 

OK

 button to continue. 

To skip to the next step without doing anything press 

the 

Rapid advance

 button on the remote.

After the initial settings are completed TV will start 

to search for available broadcasts of the selected 

broadcast types.
After all the available stations are stored, scan results 

will be displayed. Press 

OK

 to continue. The 

Edit 

Channel List

 menu will be displayed next. You can 

edit the channel list according to your preferences or 

press the 

Menu

 button to quit and watch TV.

While the search continues a message may appear, 

asking whether you want to sort channels according 

to the LCN

(*)

. Select 

Yes

 and press 

OK 

to confirm

.

(*) 

LCN is the Logical Channel Number system that organizes 

available  broadcasts  in  accordance  with  a  recognizable 

channel number sequence (if available).

Summary of Contents for D40U300A4CW

Page 1: ...LCD TV BEDIENUNGSANLEITUNG INSTRUCTION MANUAL MODE D EMPLOI ISTRUZIONI PER L USO D40U300A4CW R ...

Page 2: ...GmbH Vertrieb Vestel Germany GmbH D 85748 Garching bei München 1 Die Marke TELEFUNKEN ist eine eingetragene Marke der TELEFUNKEN Licenses GmbH 1 TELEFUNKEN licensed by TELEFUNKEN Licenses GmbH Imported by Vestel Germany GmbH D 85748 Garching Munich ...

Page 3: ...Playback via USB Input 41 Media Browser Menu 41 FollowMe TV 41 CEC and CEC RC Passthrough 41 E Manual 42 TV Menu Contents 43 General TV Operation 47 Using the Channel List 47 Configuring Parental Settings 47 Electronic Programme Guide EPG 47 Teletext Services 48 Software Upgrade 48 Troubleshooting Tips 48 PC Input Typical Display Modes 49 AV and HDMI Signal Compatibility 49 Supported Video File Fo...

Page 4: ... by qualified personnel before operating it any further Do not expose the TV to direct sunlight open flames or place it near intense heat sources such as electric heaters Listening in excessive volumes from earphones and headphones may cause hearing loss Ensure that no open flame sources such as lit candles are placed on top of the TV To prevent injuries this TV must be securely attached to a wall...

Page 5: ... to set the Backlight to a fixed value set as Custom and adjust the Backlight located under the Energy Saving setting manually using Left or Right buttons on the remote Set as Off to turn this setting off Note Available Energy Saving options may differ depending on the selected Mode in the System Picture menu The Energy Saving settings can be found in the System Picture menu Note that some picture...

Page 6: ...3 Programme buttons 4 Volume buttons Press the Volume buttons simultaneously to view main menu and use Programme buttons to navigate and Volume buttons to change value Note The position of the control buttons may differ depending on the model Operation with the Remote Control Press the Menu button on your remote control to display main menu screen Use the directional buttons to select a menu tab a...

Page 7: ... logo are trademarks of Google Inc Information for Users on Disposal of Old Equipment and Batteries European Union only Equipment bearing these symbols should not be disposed as general household waste You should look for appropriate recycling facilities and systems for the disposal of these products Notice The sign Pb below the symbol for batteries indicates that this battery contains lead Produc...

Page 8: ... electronic programme guide 22 Mute Completely turns off the volume of the TV 23 Info Displays information about on screen content 24 Exit Closes and exits from displayed menus or returns to previous screen 25 OK Confirms user selections holds the page in TXT mode views channel list DTV mode 26 Programme 27 Directional buttons Helps navigate menus content etc and displays the subpages in TXT mode ...

Page 9: ...en receiving DTV channels Mpeg4 H 264 or while in Media Browser mode output will not be available via the scart socket When using the wall mounting kit available from third party in the market if not supplied we recommend that you plug all your cables into the back of the TV before mounting on the wall Insert or remove the CI module only when the TV is SWITCHED OFF You should refer to the module i...

Page 10: ...ngle receiver and a direct satellite dish select this antenna type Press OK to continue Select an available satellite on the next screen and press OK to scan for services Single Satellite Cable If you have multiple receivers and a single satellite cable system select this antenna type Press OK to continue Configure settings by following instructions on the next screen Press OK to scan for services...

Page 11: ... display 1000 image files stored on the connected USB device Media Browser Menu You can play photo music and movie files stored on a USB disk by connecting it to your TV Connect a USB disk to one of the USB inputs located on the side of the TV Pressing the Menu button while in the Media Browser mode will access the Picture Sound and Settings menu options Pressing the Menu button again will exit fr...

Page 12: ...trolled using the remote control of the TV To activate this feature set the Speakers option in the System Options More menu as Amplifier The TV speakers will be muted and the sound of the watched source will be provided from the connected sound system Note The audio device should support System Audio Control feature and CEC option should be set as Enabled E Manual You can find instructions for you...

Page 13: ...of the picture by pressing Left or Right buttons Picture Zoom Sets the desired image size format Film Mode Films are recorded at a different number of frames per second to normal television programmes Turn this feature on when you are watching films to see the fast motion scenes clearly Skin Tone Skin tone can be changed between 5 and 5 Colour Shift Adjust the desired colour tone HDMI Full Range W...

Page 14: ...orts AVL Automatic Volume Limiting Sets the sound to obtain fixed output level between programmes Headphone Lineout When you connect an external amplifier to your TV using the headphone jack you can select this option as Lineout If you have connected headphones to the TV set this option as Headphone Please ensure before using headphones that this menu item is set to Headphone If it is set to Lineo...

Page 15: ... track will be played for the blind or visually impaired audience Press OK to see all available Audio Description menu options This feature is available only if the broadcaster supports it Netflix If this feature is supported by your TV you can view your ESN number and deactivate Netflix ESN number is an unique ID number for Netflix created especially to identify your TV More Displays other settin...

Page 16: ...nel scan Searches for the linked channels in the broadcast system Digital Aerial Searches for aerial network channels Digital Cable Searches for cable network channels Analogue fine tune You can use this setting for fine tuning analogue channels This feature is not available if no analogue channels are stored Satellite Settings Displays satellite settings Satellite list Displays available satellit...

Page 17: ...e country option in the First Time Installation is set as France Italy or Austria Maturity Lock s value will be set to 18 as default Child Lock If this option is set to ON the TV can only be controlled by the remote control In this case the control buttons on the TV will not work Internet Lock If this option is set to ON the open browser application in the portal will be disabled Set to OFF to rel...

Page 18: ...On the main menu select System Options and then More Navigate to Software upgrade and press the OK button In Upgrade options menu select Scan for upgrade and press OK button to check for a new software upgrade If a new upgrade is found it starts to download the upgrade After the download is completed confirm the question asking about rebooting the TV by pressing the OK to continue with the reboot ...

Page 19: ...900 75Hz 27 1600x1200 60Hz 28 1680x1050 59Hz 29 1680x1050 60Hz 30 1920x1080 60Hz AV and HDMI Signal Compatibility Source Supported Signals Available EXT SCART PAL O SECAM O NTSC4 43 O NTSC3 58 RGB 50 60 O Side AV PAL O SECAM O NTSC4 43 O NTSC3 58 O YPbPr 480i 480p 60Hz O 576i 576p 50Hz O 720p 50Hz 60Hz O 1080i 50Hz 60Hz O HDMI 480i 60Hz O 480p 60Hz O 576i 576p 50Hz O 720p 50Hz 60Hz O 1080i 50Hz 60...

Page 20: ...P 3gpp 3gp AVI avi MKV mkv H 264 3840x2160 30fps 1080P 60fps 135Mbps FLV flv MP4 mp4 mov 3GPP 3gpp 3gp MPEG transport stream ts trp tp ASF asf AVI avi MKV mkv Motion JPEG 720P 30fps 10Mbps AVI avi 3GPP 3gpp 3gp MP4 mp4 mov MKV mkv ASF asf VP8 1080P 30fps 20Mbps MKV mkv WebM webm HEVC 4K2K 60fps 160Mbps MP4 mp4 mov MKV mkv MPEG transport stream ts trp tp VP9 4K2K 30fps 100Mbps MKV mkv WebM webm Sup...

Page 21: ...KHz 44 1KHz 48KHz 32Kbps 640Kbps AC3 ac3 AVI avi Matroska mkv mka 3GPP 3gpp 3gp MP4 mp4 mov m4a MPEG transport stream ts trp tp MPEG program stream DAT VOB MPG MPEG EAC3 32KHz 44 1KHz 48KHz 32Kbps 6 Mbps EAC3 ec3 3GPP 3gpp 3gp MP4 mp4 mov m4a MPEG transport stream ts trp tp MPEG program stream DAT VOB MPG MPEG AAC HEAAC 8KHz 48KHz AAC aac AVI avi Matroska mkv mka 3GPP 3gpp 3gp MP4 mp4 mov m4a MPEG...

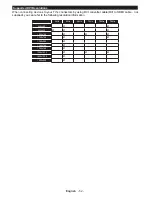
Page 22: ...nnectors by using DVI converter cable DVI to HDMI cable not supplied you can refer to the following resolution information 56Hz 60Hz 66Hz 70Hz 72Hz 75Hz 640x480 þ þ 800x600 þ þ þ 1024x768 þ þ þ 1280x768 þ þ 1280x960 þ 1360x768 þ 1366x768 þ 1280x1024 þ þ þ 1400x1050 þ 1600x900 þ ...

Page 23: ...l outlet LAN input on the rear side of the TV network wall socket Configuring Wired Device Settings Network Type The Network Type can be selected as Wired Device Wireless Device or Disabled in accordance with the active connection to the TV set Select this as Wired Device if you are connecting via an ethernet Internet Speed Test Highlight Internet Speed Test and press the OK but ton TV will check ...

Page 24: ... this keyboard via the directional buttons and the OK button on the remote control Wait until the IP address is shown on the screen This means that the connection is now established To disconnect from a wireless network highlight Network Type and press Left or Right buttons to set as Disabled Highlight Internet Speed Test and press the OK button to check your internet connection speed Highlight Ad...

Page 25: ...V For this reason your TV cannot connect to the internet Contact your internet service provider and request information on how to connect a different device such as your TV to the internet It is also possible that the connection may not be available due to a firewall problem If you think this causes your problem contact your internet service provider A firewall might be the reason of a connectivit...

Page 26: ...the terms of the agreement Installation is not possible without this agreement 7 Click the Next button On the next screen you can set your installation preferences 8 Click the Install button The installation begins and finishes automatically A progress bar will indicate the state of the installation process 9 Click the Finish button The installation is completed You will be directed to the web sit...

Page 27: ...o the USB input of your TV for easier and quicker navigation Some web pages include flash content These are not supported by the browser Your TV does not support any download processes from the internet via the browser HBBTV System HbbTV Hybrid Broadcast Broadband TV is a new industry standard that seamlessly combines TV services delivered via broadcast with services delivered via broadband and al...

Page 28: ...st be connected to the internet IMPORTANT Make sure the TV and mobile device are connected to the same network For media sharing feature Audio Video Sharing option should be enabled if available Press the Menu button on the remote select System Options More menu and press OK Highlight Audio Video Sharing and change as Enabled Your TV is ready to connect to your mobile device now Install the Smart ...

Page 29: ... Youtube related to the selected programme Note For some functions an internet connection may be required FollowMe TV Feature if available Tap on the FOLLOW ME TV widget located at the bottom left of the screen of your mobile device to change the layout for FollowMe TV feature Tap the play icon to start streaming of the content from the TV to your mobile device Available if your device is in your ...

Page 30: ... and iOS platforms 5 Router modem Notes For Android devices Normal mdpi Large hdpi and Extra Large xhdpi screen sizes are supported Devices with 3 or smaller screen sizes are not supported For iOS devices all screen sizes are supported User interface of the Smart Center application is subject to change according to version installed on your device Imported by VESTEL GERMANY GmbH Parkring 6 D 85748...

Reviews: