background image

English   

- 109 -

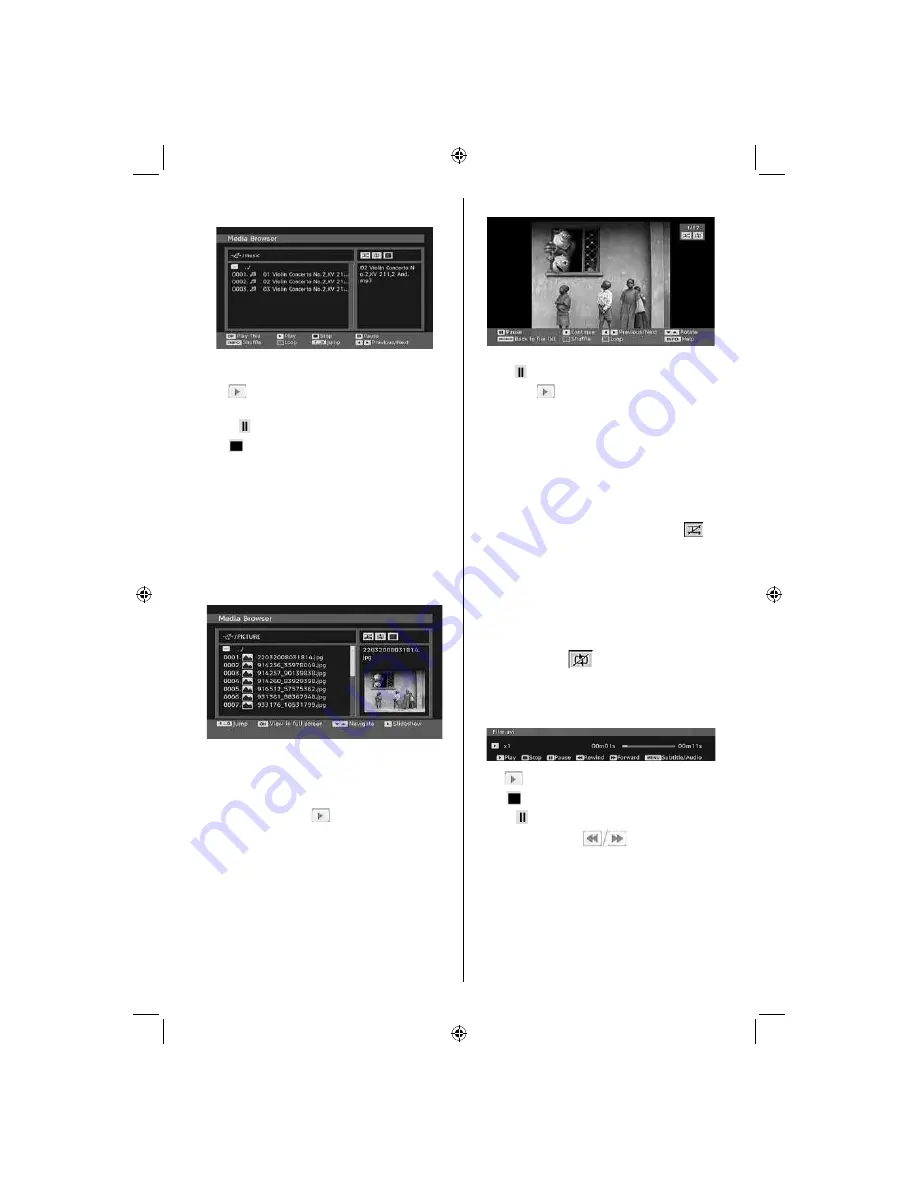
 Playing MP3 Files 


 Play This (

OK

 button) : Plays the selected fi le.

Play (

 button) : Plays all media fi les in the 

folder starting with the selected one.

Pause (  button) : Pause playing fi le.

Stop (

 button) : Stop the playing fi le.

Previous/Next (

Left/Right

 buttons) : Jumps to 

previous or next fi le to play.

Shuffl e (

INFO

 button) : Plays the fi les randomly. 

If shuffle mode is enabled, previous/next 
function will also jump to the tracks randomly.

Loop (

Blue

 button) : Plays the selected fi le 

repeatedly. 

 Viewing JPG Files 


 Jump (Numeric buttons) : jump to selected fi le 
using the numeric buttons.

OK

 : views the selected picture in full screen.

Play / Slideshow (

 button) : starts the 

slideshow with all pictures in the folder. 

 Slideshow Options 


 Pause (  button) : Pause the slideshow.

Continue (

 button) : Continue with the 

slideshow.

Previous/Next (

Left/Right

 buttons) : Jump to 

previous or next fi le of slideshow.

Rotate (

Up/Down

 buttons) : Rotate the picture 

using up/down buttons.

RETURN : Back to fi le list.

Shuffl e (

Red

 button) : Shows the fi les randomly 

and continuous in current folder and 

 icon 

turns the highlighted icon. If during a slideshow 
the shuffl e mode is enabled, the next pictures 
will be choosen randomly (If the loop function is 
not enabled, the slideshow will stop at the end. If 
the loop function is enabled, after the slideshow 
ends, it will start again and again).

Loop (BLUE button) : Slideshow goes on 
continuously and  

 icon turns the highlighted 

icon.

Info : Activates the operations bar.

Video Playback

Play (

 button

)

 : Starts the video playback.

Stop (

 button

)

 : Stops the video playback.

Pause (

 button

)

 : Pause the video playback.

Rewind / Forward (

)

 : Goes backward/ 

Goes forward.

Menu (Menu button)

 : Sets subtitle/Audio.

• You can set subtitles by using OK button before 

starting the playback or by using MENU button 
during the playback.

Press RETURN button to switch back to 
previous menu.  

02_[GB]_SSM_MB35_42857W_1900UK_IDTV_TC_PVR_100HZ_SILVER1_10065463_50156645.indd   109

02_[GB]_SSM_MB35_42857W_1900UK_IDTV_TC_PVR_100HZ_SILVER1_10065463_50156645.indd   109

05.10.2009   20:13:02

05.10.2009   20:13:02

Summary of Contents for T42A857FHD

Page 1: ...bene Taste ist die Menu Taste der Fernbedienung Vielen Dank f r Ihr Verst ndnis Ihr TELEFUNKEN Team Sehr geehrte Kunden Achtung Die Taste 37 der Fernbedienung hat nicht wie auf Seite 7 beschrieben kei...

Page 2: ...R LCD TV Bedienungsanleitung Instruction Manual T42A857FHD DVB C T PVR...

Page 3: ...Einstellungen 23 Allgemeine Bedienung 24 Informationszeile 24 Timeshift Funktion 25 Sofort Aufnahme 25 Aufgenommene Programme ansehen 26 Langsamer Vorlauf 26 Elektronischer Programmf hrer EPG Programm...

Page 4: ...legung SCART Anschluss 62 Pinbelegung HDMI Anschluss 62 Signaleingang 62 Anhang E PIP PAP Kombinationen 63 Anhang F Im USB Modus unterst tzte Dateiforma te 64 Technische Daten 65 Herstellergarantie 66...

Page 5: ...Automatische Stummschaltung wenn keine bertragung stattfindet NTSC Wiedergabe PIP PAP PAT Funktionen AVL Automatische Lautst rkebegrenzung Wird kein g ltiges Signal entdeckt schaltet sich das Ger t n...

Page 6: ...es zu einem Kurzschluss oder zu einem Stromschlag f hren kann Machen Sie niemals KHinweisn in das Kabel und binden Sie es nie mit anderen Kabeln zusammen Das Netzkabel muss so verlegt werden dass niem...

Page 7: ...lten grunds tzlich auch wiederverwertet werden Verpackungsmaterial wiez B Plastikt ten darfnichtindieReichweite von Kindern gelangen Batterien auch schwermetallfreie d rfen nicht mit dem normalen Haus...

Page 8: ...ie Leistung oder Funktionsf higkeit Ihres Produkts aber in keiner Weise beeintr chtigt Warnhinweis Lassen Sie das TV Ger t nicht im Standby oder aktiven Modus wenn Sie weggehen Lizenzhinweise optional...

Page 9: ...SUBTITLE RETURN SOURCE SLEEP SCREEN 6 37 38 39 40 41 42 43 LANG 01_ DE _SSM_MB35_42857W_1900UK_IDTV_TC_PVR_100HZ_SILVER1_10065463_50156645 indd 7 01_ DE _SSM_MB35_42857W_1900UK_IDTV_TC_PVR_100HZ_SILVE...

Page 10: ...l Bildmodus Picture Mode 22 AV Quelle 23 Rot Men Ton Kanalliste im DTV 24 Modus Gr n Men Bild Untertitel im DTV 25 Modus Gelb Men Funktion Aktuelle Sprache 26 Men Ein Aus 27 Blau Installationsmen 28 F...

Page 11: ...fw rts abw rts Tasten Lautst rke 4 H i n w e i s D r c k e n S i e gleichzeitig die Tasten um das Hauptmen aufzurufen 01_ DE _SSM_MB35_42857W_1900UK_IDTV_TC_PVR_100HZ_SILVER1_10065463_50156645 indd 9...

Page 12: ...on und Ausgabe an Zusatzger te n Schlie en Sie das SCART Kabel zwischen einer der SCART Buchsen des TV Ger ts und der SCART Buchse des Zusatzger ts z B Decoder Videorecorder DVD Player an Hinweis Wenn...

Page 13: ...e oder eines Kabels Beachten Sie Wenn Sie einen Decoder oder einen Medienrecorder verwenden sollten Sie das Antennenkabel ber diesen mit einem geeigneten Antennenkabel an das TV Ger t anschlie en wie...

Page 14: ...ignal mit Kopfh rern zu h ren optional Die Videoeing nge werden zum Anschlie en der 5 Videosignale von Zusatzger ten verwendet Schlie en Sie das Videokabel zwischen den VIDEOEINGANG des TV Ger ts und...

Page 15: ...es an einer Steckdose anstecken Stecken Sie das Netzkabel in eine Netzsteckdose Anschluss Antenne Kabel Schlie en Sie den Antennen oder Kabel TV Stecker an die Buchse ANTENNENEINGANG an der R ckseite...

Page 16: ...Siehe den Abschnitt Laufwerk formatieren auf den folgenden Seiten f r weitere Informationen zur Formatierung von Laufwerken Beachten Sie dass beim Formatieren alle auf dem USB Laufwerk gespeicherten D...

Page 17: ...s Es k nnte unter Umst nden sein dass die aufgezeichneten Sendungen im Format TS von Ihrer Medienplayer Software nicht unterst tzt werden Installieren Sie in diesem Fall eine geeignete Medienplayer So...

Page 18: ...T Anschlie en des LCD TVs an einen PC Zur Anzeige des Computerbilds auf Ihrem LCD TV k nnen Sie dieses an einen Computer anschlie en Schalten Sie Computer und TV Ger t aus bevor Sie die Anschl sse vor...

Page 19: ...NENT ANSCHL SSE angeschlossen Verwenden Sie ein Component Videokabel um es an den Videoeingang anzuschlie en Um das Audiosignal wiederzugeben verwenden Sie ein Component Audiokabel wie unten in der Ab...

Page 20: ...Schlie en Sie den Camcorder nicht gleichzeitig an die Anschl sse VIDEO IN an da dies zu Bildst rungen f hren kann F r die Auswahl der entsprechenden Quelle siehe den Abschnitt Eingangsauswahl im Folg...

Page 21: ...uschen Schalten Sie das LCD TV und die externen Lautsprecher erst ein wenn Sie alle Anschl sse vorgenommen haben Lesen Sie f r weitere Informationen das Handbuch Ihres Lautsprechersets ZumAnschluss ei...

Page 22: ...n Kabel nicht im Lieferumfang enthalten sind Schalten Sie das Zusatzger t und TV Ger t aus bevor Sie die Anschl sse vornehmen Lesen Sie f r weitere Informationen das Handbuch des Zusatzger ts R CKSEIT...

Page 23: ...Netz mit 50 Hz an Dr cken Sie die Taste STANDBY Die Standby LED leuchtet auf Um das TV Ger t aus dem Standby einzuschalten Dr cken Sie die Tasten P P oder eine Zifferntaste auf der Fernbedienung Dr c...

Page 24: ...ationen ber die Benutzung der Men s finden Sie im Abschnitt Men system AV Modus Dr cken Sie die Taste TV AV im Bedienfeld am TV Ger t um zwischen den AV Modi umzuschalten Bedienung mit den Tasten der...

Page 25: ...die Option auf Aus gestellt werden Siehe dazu das Men Einstellung in den folgenden Abschnitten f r weitere Informationen Dr ckenSiedieTasteOKaufderFernbedienung um fortzufahren Die folgende Meldung w...

Page 26: ...esen Sie bitte den Abschnitt Men Installation Hinweis F r die richtige Funktion des digitalen Teletexts im DTV Modus m ssen Sie im analogen AUTOPROGRAMM das Land auf UK setzen nur bertragungen in UK S...

Page 27: ...Timeshift Wiedergabe nach vor oder zur ck zu gehen Ist das Ende der Timeshift Wiedergabe erreicht wird der Timeshift Modus verlassen und Sie kehren zur normalen Programmansicht zur ck Dr cken Sie die...

Page 28: ...r Vorlauf Wenn Sie beim Ansehen von aufgenommenen Programmen die Taste PAUSE dr cken ist die Zeitlupenwiedergabe vorw rts m glich Dazu k nnen Sie die Taste verwenden Durch wiederholtes Dr cken der Tas...

Page 29: ...Channel Mit dieser Option k nnen Sie im EPG Men zum gew hlten Kanal umschalten Aufnahmetimer einstellen l schen WICHTIG Um ein Programm aufzunehmen sollten Sie zuerst eine USB Festplatte an das TV Ge...

Page 30: ...italen terrestrischen Sendung DVB T verf gen Sie neben Kan len die digitalen Teletext und normales Fernsehbild beinhalten auch solche die nur digitalen Teletext ausstrahlen Das Bildseitenverh ltnis be...

Page 31: ...der verschoben werden soll Dr cken Sie die Tasten oder um im Kanallisten Men die Option Verschieben auszuw hlen Die folgende OSD wird neben der Option OK eingeblendet um anzuzeigen dass Sie ber die Zi...

Page 32: ...u machen Um einen Kanal zu sperren m ssen Sie zun chst das Kindersicherungs Passwort kennen Es ist werksseitig auf 0000 gesetzt und kann nur im Men Einstellungen ge ndert werden W hlen Sie den Kanal d...

Page 33: ...meine Bedienung Aufnahmetimer WICHTIG Um Aufnahmetimer oder programmierte Aufnahmen zu sehen sollten Sie zuerst eine USB Festplatte an das TV Ger t anschlie en wenn dieses ausgeschaltet ist Schalten S...

Page 34: ...ew nschten Optionen dr cken Sie die Taste GR N um Ihre Einstellungen zu speichern Aufnahmetimer l schen W hlen Sie einenTimer im Men Aufnahmetimer durch Dr cken der Taste oder Dr cken Sie die Taste RO...

Page 35: ...ginn weg wieder Fortsetzen setzt die Aufnahme fort Wiedergabe ab Zeitpunkt gibt einen bestimmten Wiedergabepunkt an Hinweis W hrend der Wiedergabe ist das Betrachten des Hauptmen s und der Men optione...

Page 36: ...diesem Men sehen wie folgt aus Aufnahmen Um die Aufnahmeeinstellungen festzulegen w hlen Sie die Option Aufnahmen im Men Setup Zur Konfiguration der Aufnahmen wird das folgende Men eingeblendet In die...

Page 37: ...ung vornehmen H rgesch digte nur f r EU L nder W hlen Sie mit den Tasten oder die Einstellung H rgesch digte und dr cken Sie die Taste oder um die Option auf Ein oder Aus zu setzen Wenn der Programman...

Page 38: ...w hlen Sie mit den Tasten oder Setup und dr cken Sie wieder OK Markieren Sie mit den Tasten oder das Men Einstellungen und dr cken Sie OK Verwenden Sie die Tasten oder um RECEIVERAKTUALISIERUNG auszu...

Page 39: ...schreiben Sie diesen bitte auf und bewahren Sie ihn an einem sicheren Ort auf Zeiteinstellungen Die L nderauswahl ist f r Gro britannien nicht verf gbar Markieren Sie im Men Einstellungen mit den Tast...

Page 40: ...tellungen verwendet Andernfalls werden die aktuellen Einstellungen verwendet Audio ndern Sie durch Dr cken der Tasten oder die Audiosprache Untertitel ndern Sie die Untertitelsprache mit den Tasten od...

Page 41: ...sind folgende Symbole enthalten Antenneninstallation Kabelinstallation Diensteliste l schen Erstinstallation F r D nemark Schweden Norwegen oder Finnland Antenneninstallation Aerial Installation W hle...

Page 42: ...quenzsuche Geben Sie die gew nschte Frequenz ein Dr cken Sie OK wenn Sie fertig sind und das TV Ger t beginnt die Frequenzsuche Netzwerksuche Network Search Wenn Sie die Zeile Netzwerksuche Network Se...

Page 43: ...ellen Wenn Sie 1000 kHz w hlen f hrt das TV Ger t den Suchvorgang detaillierter durch Die Dauer der Suche verl ngert sich dementsprechend Wenn Sie fertig sind dr cken Sie OK um die automatische Suche...

Page 44: ...ine Meldung eingeblendet die die Suche nach analogen Kan len abfragt Dr cken Sie die Taste OK um nach analogen Kan lenzusuchen DasfolgendeMen erscheint f r die Suche nach analogen Kan len W hlen Sie I...

Page 45: ...der Erstinstallation erscheint folgender Hinweis auf dem Bildschirm W hlen Sie Ja Yes um den automatischen Suchlauf zu starten und Nein No um abzubrechen Um eine Ja oder Nein Option auszuw hlen markie...

Page 46: ...TV Modus m ssen Sie im analogen AUTOPROGRAMM das Land auf UK setzen nur f r UK Medienbrowser Um das Medienbrowser Fenster anzuzeigen dr cken Sie entweder die Taste M auf der Fernbedienung und w hlen S...

Page 47: ...Rechts Springt zur vorhergehenden oder n chsten Datei der Slideshow Drehen Tasten Auf Ab Drehen des Bilds mit den Tasten Auf Ab RETURN Zur ck zur Dateiliste Zufall Taste Rot zeigt die Dateien im aktue...

Page 48: ...tion Modus einstellen W hlen Sie die Option Modus mit den Tasten oder Dr cken Sie die Taste oder um eine der folgenden Optionen auszuw hlen Kino Dynamisch and Nat rlich Helligkeit Kontrast Farbe Sch r...

Page 49: ...in den PIP PAP Modus geschaltet wird wird die Option Spielmodus aus dem Men Bild ausgeblendet und deaktiviert Bildzoom Picture Zoom W hlen Sie die Option Bildzoom durch Dr cken der Taste oder aus Verw...

Page 50: ...reo Dual I oder Dual II w hlen jedoch nur wenn der gew hlte Kanal den entsprechenden Modus unterst tzt AVL D i e F u n k t i o n A u t o m a t i s c h e Lautst rkebegrenzung AVL stellt den Klang so ei...

Page 51: ...d die Filmmodus Funktion demonstriert auf der anderen H lfte wird das Bild mit den normalen Einstellungen f r TV angezeigt Hinweise Die Funktion Filmmodus Movie Sense arbeitet bei bertragungen mit 24...

Page 52: ...nn Ein gew hlt wird kann das TV Ger t nur ber die Fernbedienung gesteuert werden In diesem Fall sind die Tasten am Bedienfeld des TV Ger tes mit Ausnahme der STANDBY Taste au er Funktion gesetzt Wenn...

Page 53: ...Ausgang mit den Tasten oder aus Dr cken Sie die Taste oder um Ext Ausgang auf Ein oder Aus zu stellen Hinweis Zum Kopieren von einem DVD oder VCR Ger t sollten Sie die gew nschte Quelle aus dem Men Qu...

Page 54: ...en Cursor in den Seiten auf oder ab bewegen indem Sie die Navigationstasten dr cken um alle dieser Programme im TV Modus zu sehen au er dem AV Modus Mit der Cursorbewegung erfolgt automatisch die Prog...

Page 55: ...enen Programmen angezeigt Men Quelle Dr cken Sie die Taste oder um das sechste Symbol auszuw hlen Dr cken Sie anschlie end oder OK Das Men Quelle erscheint auf dem Bildschirm Markieren Sie im Men Quel...

Page 56: ...chieben W hlen Sie die Option Bildlage Vertikal mit der Taste oder aus Verwenden Sie die Taste oder um den Wert einzustellen Phase Abh ngig von derAufl sung undAbtastfrequenz die Sie in das TV Ger t e...

Page 57: ...chmals die Taste um den PAP Modus zu aktivieren Im PAP Modus werden zwei Fenster gleicher Gr e auf dem Bildschirm angezeigt Die Bildverh ltnisse beider Fenster sind festgelegt Wenn Sie in den PAP Modu...

Page 58: ...enformat 4 3 ausdehnen um den Bildschirm auszuf llen ohne dabei das Bild unnat rlich erscheinen zu lassen Der obere und der untere Teil des Bildes sind leicht abgeschnitten 14 9 Mit dieser Funktion wi...

Page 59: ...um Ausw hlen einer Seite dr cken Hinweis Die meisten TV Sender verwenden die Seitennummer 100 f r die Indexseite Farbtasten ROT GR N GELB BLAU Ihr TV Ger t unterst tzt die Systeme FASTEXT und TOPtext...

Page 60: ...altet ist Schalten Sie dann das TV Ger t ein um die Aufnahmefunktion zu aktivieren Andernfalls ist die Aufnahmefunktion nicht verf gbar Wenn die Aufnahme nicht funktioniert versuchen Sie das TV Ger t...

Page 61: ...9 VESA 11 800 600 70 43 8 12 800 600 72 48 1 VESA 13 800 600 75 46 9 VESA 14 800 600 85 53 7 VESA 15 832 624 75 49 7 MAC 16 1024 768 43 35 5 VESA interlace 17 1024 768 60 48 4 VESA 18 1024 768 70 56...

Page 62: ...20P 50Hz O 720P 60Hz O 1080I 50Hz O 1080I 60Hz O 1080P 50Hz O 1080P 60Hz O 1080P 24 HZ O X Nicht m glich O M glich Hinweis In einigen F llen kann unter Umst nden ein Signal nicht richtig auf dem LCD S...

Page 63: ...anschlie en k nnen Sie sich an die folgenden Aufl sungsinformationen halten 24Hz 25Hz 30Hz 50Hz 60Hz 480i 480p 576i 576p 720p 1080i 1080p 01_ DE _SSM_MB35_42857W_1900UK_IDTV_TC_PVR_100HZ_SILVER1_1006...

Page 64: ...11 TMDS Clock Shield 2 TMDS Data2 Shield 12 TMDS Clock 3 TMDS Data 2 13 CEC 4 TMDS Data 1 14 Reserviert im Ger t nicht beschaltet 5 TMDS Data1 Shield 15 SCL 6 TMDS Data1 16 SDA 7 TMDS Data0 17 DDC CE...

Page 65: ...lich ist wenn an Scart 1 ein RGB Signal anliegt Einschr nkungen Scart 1 muss ein RGB Signal haben um mit den Quellen TV Scart 2 FAV und PIP PAP zu erm glichen Wenn diese Quellen im Hauptfenster angeze...

Page 66: ...ertitel srt Textdateiformat wird unterst tzt jedoch kein Bilddateiformat smi sub Beachten Sie Die erforderlichen Bitraten f r einige Videotypen sind h her als die USB Einschr nkungen Aus diesem Grund...

Page 67: ...Hz AUDIO SRS TruSurround XT AUDIO AUSGANGSLEISTUNG WRMS 10 THD 2 x 8 LEISTUNGSAUFNAHME W 210 W max 1 W Standby PANEL 16 9 Anzeige 42 Bildschirmgr e ABMESSUNGEN mm TxLxB Mit Standfu 246 x 1010 x 688 Ge...

Page 68: ...st w hrend der Garantiedauer nach 4 unserer Wahl die Instandsetzung Ihres Ger tes oder den Austausch gegen ein gleichwertiges Ger t die bei uns anfallenden Arbeitsl hne Material kosten und die Transpo...

Page 69: ...fstellung des Ger tes in Feuchtr umen oder im Freien bei Sch den die auf h here Gewalt Wasser Blitzschlag berspannung zur ckzuf hren sind bei berm iger Nutzung insbesondere bei anderer als privater Nu...

Page 70: ...mote Control 88 Initial Settings 89 General Operation 90 Important 90 Information Banner 90 Timeshifting 91 Instant Recording 91 Watching Recorded Programmes 91 Slow Forward 92 Electronic Programme Gu...

Page 71: ...D Pin Specifications 124 SCART connector pin specifications 124 HDMI connector pin specifications 124 Signal Input 124 Appendix E PIP PAP Mode Combinations 125 Appendix F Supported File Formats for US...

Page 72: ...hild lock A u t o m a t i c s o u n d m u t e w h e n n o transmission NTSC playback PIP PAP PAT functions AVL Automatic Volume Limiting When no valid signal is detected after 5 minutes the TV switche...

Page 73: ...e by qualified personnel Moisture and Water Do not use this device in a humid and damp place avoid the bathroom the sink in the kitchen and near the washing machine Do not expose this device to rain o...

Page 74: ...your household wastes There are separate collection systems for recycling in EU For more information please contact the local authority or the dealer where you purchased the product Disconnecting the...

Page 75: ...UBTITLE RETURN SOURCE SLEEP SCREEN 6 37 38 39 40 41 42 43 LANG 02_ GB _SSM_MB35_42857W_1900UK_IDTV_TC_PVR_100HZ_SILVER1_10065463_50156645 indd 73 02_ GB _SSM_MB35_42857W_1900UK_IDTV_TC_PVR_100HZ_SILVE...

Page 76: ...ce 23 Red Sound menu Channel list in 24 DTV mode Green Picture menu Subtitle in DTV 25 mode Yellow Feature menu Current language 26 Menu on off 27 Blue Installation menu Favourite 28 selection OK Stor...

Page 77: ...amme Up Down buttons 3 Volume Up Down buttons 4 Note Press buttons at the same time to view main menu 02_ GB _SSM_MB35_42857W_1900UK_IDTV_TC_PVR_100HZ_SILVER1_10065463_50156645 indd 75 02_ GB _SSM_MB3...

Page 78: ...or a DVD player Note If an external device is connected via the SCART sockets the TV will automatically switch to AV mode If both sockets are employed at the same time SCART 1 will override SCART 2 u...

Page 79: ...shown in the illustrationin the following pages 10 PC Input is for connecting a personal computer to the TV set Connect the PC cable between the PC INPUT on the TV and the PC output on your PC 11 HDM...

Page 80: ...e TV from headphones optional Video Input is used for connecting video signals of 5 external devices Connect the video cable between the VIDEO IN socket on the TV and the VIDEO OUT jack on your device...

Page 81: ...ins Plug the power cable to the mains socket outlet Aerial Cable Connection Connect the aerial or cable TV plug to the AERIAL CABLE socket located at the rear of the TV Aerial or Cable REAR VIEW 02_ G...

Page 82: ...puter and the formatted disk type should be FAT32 USB Disk Connection Plug your USB device to the USB input of the TV If the plugged USB disk is not recognised please reinsert the disk Note Plug or un...

Page 83: ...d programmes are stored in the following directory of the connected USB disk DVR RECS All recordings are indicated with a number such as 4801 000 ts A text txt file is created for each recording This...

Page 84: ...ade switch to PC source See Input selection section Set the resolution that suits your viewing requirements Resolution information can be found in the appendix parts REAR VIEW PC audio cable not suppl...

Page 85: ...d through COMPONENT SOCKETS Use a component video cable to connect video input For enabling audio use a component audio cable as illustrated below When the connection is made switch to YPbPr source Se...

Page 86: ...he camcoder to VIDEO IN socket at the same time since it can cause noise in the picture For selecting the related source see the section Input selection in the following parts To listen the TV sound f...

Page 87: ...he LCD TV and external speaker set after all connections are made Refer to your speaker set s manual for further queries For connecting a to a device that has SPDIF support use an appropriate SPDIF ca...

Page 88: ...on are not supplied Power off both the TV and the devices before making any connections For more information refer to your device s own instruction book REAR VIEW Scart sockets Decoder DVD Recorder Vi...

Page 89: ...0 Hz Press STANDBY switch Then the standby LED lights up To switch on the TV from standby mode either Press the button P P or a numeric button on the remote control Press the P CH or P CH button on th...

Page 90: ...ntrol panel on the TV to switch between AV modes Operation with the Remote Control The remote control of your TV is designed to control all the functions of the model you selected The functions will b...

Page 91: ...tinue and the following message will be displayed on the screen To start installation process select Yes to cancel select No To select the Yes or No option highlight the item by using or buttons and p...

Page 92: ...n the remote control and select DTV USB to switch the TV set to digital terrestrial television broadcasting Important Whenever you connect an external USB disk and switch on the TV duration of the har...

Page 93: ...ewing main menu are not available during the recording Instant Recording IMPORTANT To record a programme you should first connect a USB disk to your TV while the TV is switched off You should then swi...

Page 94: ...nd time The time scale can be changed by pressing left or right buttons If there is any event information data available only programme names and dates are displayed On the bottom of the screen info b...

Page 95: ...imer will be cancelled Note It is not possible to record or set timer for two or more individual events at the same time interval Displaying Subtitles With digital terrestrial broadcasting DVB T some...

Page 96: ...ist is highlighted and press the OK button to display the Channel List The following operations can be performed in this menu Navigating the entire list of channels Deleting channels Renaming channels...

Page 97: ...d by pressing or button Then highlight the Edit Name item by pressing or button as illustrated below Press the OK button to activate the rename feature Now pressing or button moves to the previous nex...

Page 98: ...in to re add a channel To activate Favourites go to the Configuration menu and select Favourite mode Use to set Favourite mode as on To cancel Favourites set Favourite Mode to Off On Screen Help For a...

Page 99: ...ct a timer in the Recording Tiners menu by pressing or button Press GREEN button on the remote control and Modify Timer OSD will be displayed on the screen You can press RED button to set this recordi...

Page 100: ...tions menu Play from start Plays the recording from the beginning Resume Recommences the recordings Play from offset Specifies a playing point Note Viewing main menu and menu items will not ve availab...

Page 101: ...Available only for EU country options End Late You set recording timer s starting time to start later by using this setting Available only for EU country options Max Timeshift This setting allows you...

Page 102: ...essage will be displayed on the screen Channel List Use or buttons to go to Channel List option Use or buttons to toggle Channel List Mode If you select TV Only with the or buttons you navigate throug...

Page 103: ...it is correct the Parental Control menu will be displayed Maturity Lock If you set Country option as UK in the first time installation Maturity Lock option will not be visible This setting is availabl...

Page 104: ...eferred Language Optional By pressing the or buttons the preferred audio description language is being changed This setting can be used only if it is available Relative Volume Optional Using this opti...

Page 105: ...you should first switch off the TV after first time installation has finished You can then switch on the TV This process is important for enabling the USB disk access after first time installation The...

Page 106: ...manual and auto search any existing channel in the database is not re stored to avoid redundant duplicates of that channel Frequency Search Enter the desired frequency When finished press OK button a...

Page 107: ...select frequency ranges from this screen For highlighting the lines you see use or button You can enter the frequency range manually by using the numeric buttons on the remote control After this opera...

Page 108: ...uring the Network Search if channels that have network search info are found the TV will automatically show the frequencies of those channels and network search process will end by locating those chan...

Page 109: ...st time installation is performed the following message appears on the screen To start installation process select Yes to cancel select No To select the Yes or No option highlight the item by using or...

Page 110: ...ction Note For proper functioning of digital teletext in DTV mode you should set country as UK in analogue AUTO PROGRAM for UK only Media Browser To display Media Browser window press either M button...

Page 111: ...p down buttons RETURN Back to file list Shuffle Red button Shows the files randomly and continuous in current folder and icon turns the highlighted icon If during a slideshow the shuffle mode is enabl...

Page 112: ...Cool Normal and Warm Note Setting Cool option gives white colours a slight blue stress Setting Warm option gives white colours a slight red stress For normal colours select Normal option Noise Reducti...

Page 113: ...the desired frequency by pressing or button and increase or decrease the frequency gain by pressing or button Press the MENU button to return to the previous menu Note Equalizer menu settings can be...

Page 114: ...em is stereo switching this effect on will give a more spatial effect Press or button to select Effect Press or button to set as On or Off SRS TruSurr XT optional By pressing or select SRS TruSurr XT...

Page 115: ...unavailable to be used Swap Select Swap item by using or button Use or button to set This function enables to swap between the main and the PIP picture Note See Appendix E for all PIP PAP modes Sleep...

Page 116: ...080i 1080P resolutions Full Mode item will be visible You can set Full Mode as 1 1 or Normal by using or If you select 1 1 screen ratio will be adjusted correctly If you set Normal screen ratio may ex...

Page 117: ...s By cursor action programme selection is done automatically Name To change the name of a programme select the programme and press the RED button The first letter of the selected name will be highligh...

Page 118: ...connecting a PC to the TV set For switching to PC source press SOURCE button on your remote control and select PC input You can also use Source menu to switch to PC mode Note that PC mode menu setting...

Page 119: ...ramme Name Sound Indicator and Zoom Mode information is displayed on the screen when a new programme is entered or INFO button is pressed Mute Function Press button to disable sound Mute indicator wil...

Page 120: ...rmly stretches the left and right sides of a normal picture 4 3 aspect ratio to fill the wide TV screen For 16 9 aspect ratio pictures that have been squeezed into a normal picture 4 3 aspect ratio us...

Page 121: ...art of the screen if available You can set the desired option by highlighting it using or button and then by pressing OK button Tips Screen Care Clean the screen with a slightly damp soft cloth Do not...

Page 122: ...ansmission Have you selected the correct button on the remote control Try once more Also make sure the correct input source has been selected Sound You can not hear any sound Did you perhaps interrupt...

Page 123: ...3 8 12 800 600 72 48 1 VESA 13 800 600 75 46 9 VESA 14 800 600 85 53 7 VESA 15 832 624 75 49 7 MAC 16 1024 768 43 35 5 VESA interlace 17 1024 768 60 48 4 VESA 18 1024 768 70 56 5 VESA 19 1024 768 72 5...

Page 124: ...50Hz O 576P 50Hz O 720P 50Hz O 720P 60Hz O 1080I 50Hz O 1080I 60Hz O 1080P 50Hz O 1080P 60Hz O 1080P 24 HZ O X Not Available O Available Note In some cases a signal on the LCD TV may not be displayed...

Page 125: ...upplied you can refer to the following resolution information 24Hz 25Hz 30Hz 50Hz 60Hz 480i 480p 576i 576p 720p 1080i 1080p 02_ GB _SSM_MB35_42857W_1900UK_IDTV_TC_PVR_100HZ_SILVER1_10065463_50156645 i...

Page 126: ...signal 1 TMDS Data2 11 TMDS Clock Shield 2 TMDS Data2 Shield 12 TMDS Clock 3 TMDS Data 2 13 CEC 4 TMDS Data 1 14 Reserved N C on device 5 TMDS Data1 Shield 15 SCL 6 TMDS Data1 16 SDA 7 TMDS Data0 17 D...

Page 127: ...This indicates that selection is possible only if Scart 1 has a RGB signal Restrictions Scart 1 source must have RGB signal to perform PIP PAP with sources TV Scart 2 FAV If these sources are set to...

Page 128: ...ixel External Subtitles srt Support Text File Format but do not support Picture File Format smi sub Note Necessary bitrates for some video types are higher than USB limits For this reason some video t...

Page 129: ...compliant with ISO IEC 135818 6 and UK DTT profile Frequency range 474 850 MHz for UK models 170 862 MHz for EU models Transmission standard DVB T MPEG 2 Demodulation COFDM with 2K 8K FFT mode FEC all...

Page 130: ...es GmbH Vertrieb Vestel Germany GmbH D 85748 Garching bei M nchen 1 Die Marke Telefunken ist eine eingetragene Marke der Telefunken Licenses GmbH 1 Telefunken licensed by Telefunken Licenses GmbH Impo...

Reviews: