background image

Operation

8

8

Operation

Changing the battery

1.  Remove the battery compartment cover 

on the back of the RC.

2.  Insert two AAA batteries into the battery 

compartment making sure that the correct 
polarity is observed.

3.  Put the cover back.
•  The RC should be pointed at remote 

sensor within 8 meters and within 30 degrees 
at the left or the right side.

•  Take the battery out of the RC if it is not 

used for a long time.

•  Do not mix new and used batteries or 

different types of batteries. Weak batteries can 
leak and severely damage the RC.

•  Do not expose the RC to shock, liquids, 

and do not place it in an area with high 
humidity.

General operations

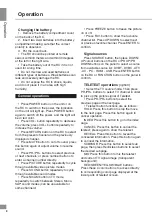
•  Press POWER button on the unit or on 

the RC to switch on the power, the indication 
on the unit will light up. Press POWER button 
again to switch off the power, and the light will 
be in red color.

•  Press VOL- button repeatedly to decrease 

the volume; press VOL+ button repeatedly to 
increase the volume.

•  Press RETURN button on the RC to select 

from the present channel and the previously 
displayed channel.

•  Press MUTE button to cut off sound, press 

this button again or adjust volume to resume 
sound.

•  Press PR-/PR+ buttons to select previous 

or next channels; or press number buttons to 
enter a channel number directly.

•  Press PICTURE button repeatedly to cycle 

through available video picture modes.

•  Press SOUND button repeatedly to cycle 

through available sound modes.

•  Press NICAM button in TV mode 

repeatedly to switch between Stereo, Mono, 
SAP sound modes (can be unavailable for 
some channels).

•  Press FREEZE button to freeze the picture 

on or off.

•  Press FAV. button to show the favourite 

channel list. Press UP/DOWN to select next 
or previous favorite channel. Press ENTER to 
confirm.

Signal sources

Press SOURCE button, then press DOWN/

UP cursor buttons on the RC or PR UP/PR 
DOWN buttons on the panel to select a source 
from available source list: DVBT - DVBC - ATV 
- AV -  PC - HDMI - USB. Press ENTER button 
on the RC or FUNCTION button on the panel to 
confirm.

TELETEXT operations 

(option)

•  Select the TV source mode. Then press 

PR-/PR+ buttons to select TV channel in order 
to pick up the picture signal of Teletext.

•  Press PR-/PR+ buttons to select the 

previous page or the next page.

•  Teletext button functions are as follows:
HOLD: Press this button to stop the move 

to the next page. Press this button again to 
cancel operation.

INDEX: Press this button to go to the index 

page.

CANCEL: Press this button to cancel the 

teletext; press again to show the teletext.

REVEAL: Press this button to reveal the 

concealed information. Press this button again 
to conceal the information.

SUBPAGE: Press this button to select sub 

page, then press Red/Green buttons to select 
the desired subpage.

MIX: Press this button to mix the teletext 

and current TV signal image (transparent 
background).

RED/GREEN/YELLOW/BLUE buttons: 

Press these 4 color buttons to access directly 
to corresponding color page displayed at the 
lower parts of teletext screen.

Summary of Contents for TF-LED40S13T2

Page 1: ...Table of contents 3 LED TV Телевизор цветного изображения c жидкокристаллическим экраном TF LED40S13T2 Instruction manual Руководство по эксплуатации ...

Page 2: ...re Sound Time Channel Option Lock Personal Video Recording PVR Electronig Program Guide EPG TimeShift CI Information USB operation General playback information Operations of file playback General information Troubleshooting Causes of interference Accessories Specifications Dear customer Thank you for purchasing our product For safety it is strongly recommended to read this manual carefully before ...

Page 3: ...metal part and do not destroy twist pull or heat the power cord Please contact the service center immediately if you found that the cable core is bare or has been broken Please replace the AC outlet if the metal plug cannot be inserted into the power socket completely or it cannot be fastened even when it was pushed in otherwise any accidents of shocks and fires could happen Never touch the antenn...

Page 4: ... of the product s body becomes a little higher after a long period of use This indicates that heat exchange is in normal working mode thus please do not let children or anyone who is sensitive to temperature touch the unit All images provided herein are schematic drawings of real objects and may differ from their real life images Wall or ceiling mounting implements must be durable and sufficient e...

Page 5: ...d adjust the volume to what you want If the video source has a HDMI output jack you can connect the signal to the TV by the HDMI cable not included Use the HDMI 1 MHL input to connect your smartphone via a special cable to see the digital content on the TV screen Support of all devices with the MHL function is not guaranteed S PDIF coaxial output is intended for transmitting multi channel digital ...

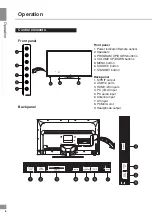
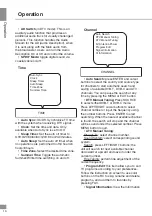
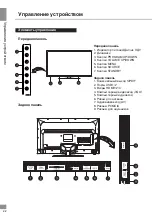
Page 6: ...emote sensor 2 Speakers 3 PROGRAM UP DOWN buttons 4 VOLUME UP DOWN buttons 5 MENU button 6 SOURCE button 7 STANDBY button Back panel 1 S PDIF output 2 USB1 2 ports 3 HDMI1 2 3 inputs 4 PC VGA input 5 PC audio input 6 Antenna input 7 AV input 8 PCMCIA slot 9 Headphone output Back panel ...

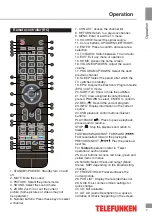
Page 7: ...andby 19 EPG Display the Electronic Program Guide EPG in DTV mode 20 SUBTITLE Show or hide the subtitles 21 FAV View assigned favorite channels press UP DOWN to select ENTER to confirm 22 REC Record the current program 23 INFO Display information on the current source 24 USB playback control buttons Teletext buttons PLAY PAUSE Press to pause playback press again to resume STOP Stop the playback an...

Page 8: ...e through available sound modes Press NICAM button in TV mode repeatedly to switch between Stereo Mono SAP sound modes can be unavailable for some channels Press FREEZE button to freeze the picture on or off Press FAV button to show the favourite channel list Press UP DOWN to select next or previous favorite channel Press ENTER to confirm Signal sources Press SOURCE button then press DOWN UP curso...

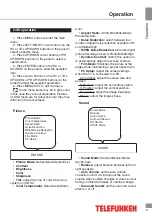
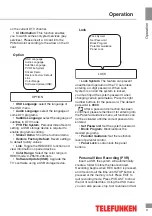
Page 9: ...stem is in NTSC Color Temperature Nature User Warm Cool Aspect Ratio 4 3 16 9 Subtitle Movie Panorama Auto Noise Reduction select between four modes of digital noise reduction available Off Low Middle High MPEG Noise Reduction eliminate digital picture decoding noises Off Low Middle High Dynamic Contrast Switch this option on to automatically adjust the screen contrast Film Mode Stretches the pict...

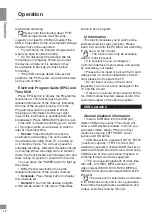
Page 10: ...er Program Edit Signal Information CI Information Auto Search press ENTER and cursor buttons to select the country and source type for channels to start automatic search and saving of available DVB T DVB C and ATV channels You can pause the search at any time by pressing the MENU or EXIT button DTV Manual Tuning Press SOURCE to select either DVB T or DVB C mode Press LEFT RIGHT cursor buttons to s...

Page 11: ...rage device Lock LOCK Lock System Set Password Block Program Parental Guidance Panel Lock Lock System The feature can prevent unauthorized operation of the TV set unless entering a 4 digit password When Lock System is on and the system is locked you must input the system password when changing certain parameters Press the right number buttons for the password The default password is 0000 After a p...

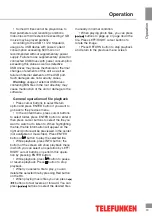
Page 12: ...he detailed information of the current channel Schedule Press Yellow button to display the schedule list Remind If you find the desired program which will be shown in the future Press Blue button to book program CI Information This function enables you to watch some encrypted services pay services Please insert a CI card into the PCMCIA slot according to the arrow on the CI card The function can o...

Page 13: ...us menu In the content menu press cursor buttons to select folder press ENTER button to enter it then press cursor buttons to select the file you want to watch or to listen to When highlighting the file the file information will appear on the right and picture will be previewed in the center not available for music files Press ENTER button or button to play the selected file While playback press I...

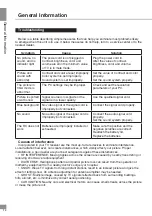
Page 14: ... the signal cord is improperly not connected Connect the audio signal cord properly Set the sound system properly The RC does not work Batteries are improperly installed or exhausted Make sure the positive and the negative polarities are correct Reattach the battery lid Replace the batteries Causes of interference Incorporated in your TV receiver are the most up to date devices to eliminate interf...

Page 15: ...es Electric shock protection class II Nominal voltage range of the LED TV 100 240 V 50 60 Hz Specific power rating in operation mode 0 02 W cm2 Power consumption in operation mode 75 W Power consumption in stand by mode 0 5 W Power consumption in off mode 0 W Unit dimensions mm with stand 900 7 x 220 x 558 2 without stand 900 7 x 60 1 x 517 4 Net weight 11 kg The LED panel is a high technology pro...

Page 16: ...General information 16 14 General information ...

Page 17: ...дключение Подключение внешней антенны Прочие подключения Управление устройством Элементы управления Передняя панель Задняя панель Пульт дистанционного управления Установка батареек Общие операции Источники сигнала Операции с телетекстом Экранное меню Изображение Звук Время Канал Опции Блок Запись цифровых программ PVR Электронный телегид EPG TimeShift Интерфейс CI Операции с USB Общая информация В...

Page 18: ...та так и с заземляющим третьим контактом Во избежание поражения электричес ким током защищайте шнур питания от возможного нажатия на него или защемле ния особенно рядом с разъемами Не закрепляйте шнур питания метизами Если Вы не пользуетесь устройством длительное время или в случае грозы обязательно отключайте шнур питания из розетки а также отключайте все сигналь ные кабели от входных разъемов Пр...

Page 19: ...ния Не устанавливайте вблизи устройства источники открытого огня например свечи В случае их падения устройство может быть повреждено или может произойти возгора ние Установка телевизора в замкнутое пространство при эксплуатации может сократить срок службы устройства поэтому необходимо обеспечить минимальную дистанцию между LCD телевизором и внутренними границами приспособления под аппарат для норм...

Page 20: ...рех винтов 4X10 Крепление на стену Для крепления на стену на задней пане ли телевизора имеются 4 отверстия дис танция 200 100 мм Для крепления следует использовать настенный кронштейн стан дарта VESA в комплект поставки не входит и приобретается отдельно Из за особенностей конструкции крепле ние на стену не рекомендуется осущест влять с помощью поворотных и наклонных кронштейнов Такое крепление мо...

Page 21: ...осигнала имеет HDMI выход подключите его к HDMI входу телевизора используя специаль ный HDMI кабель в комплект не входит Разъем HDMI 1 поддерживает функцию MHL позволяющую выводить на экран телевизора изображение со смартфонов с функцией MHL Требуется специальный кабель в комплект не входит Не гаран тируется совместимость со всеми мобиль ными устройствами поддерживающими функцию MHL Коаксиальный в...

Page 22: ...итания Датчик ПДУ 2 Динамики 3 Кнопки PROGRAM UP DOWN 4 Кнопки VOLUME UP DOWN 5 Кнопка MENU 6 Кнопка SOURCE 7 Кнопка STANDBY Задняя панель 1 Коаксиальный выход S PDIF 2 Порты USB1 2 3 Входы HDMI1 2 3 4 Компьютерный видеовход VGA 5 Компьютерный аудиовход 6 Разъм для антенны 7 Аудиовидеовход AV 8 Разъем PCMCIA 9 Разъем для наушников ...

Page 23: ... времени автоматического отключения телевизора 19 EPG Доступ к электронному телегиду 20 SUBTITLE Отобразить убрать субтитры 21 FAV Просмотр списка избранных каналов нажимайте ВВЕРХ ВНИЗ для выбора ENTER для подтверждения 22 REC Запись текущей программы 23 INFO Отображение информации о текущем канале файле и т д 24 Кнопки управления воспроизведением PLAY PAUSE Пауза возобновление STOP Остановка FAS...

Page 24: ...я между звуковыми режимами Stereo Mono SAP доступно не для всех каналов Нажмите кнопку FREEZE для включе ния стоп кадра Нажмите кнопку FAV для отображения списка избранных каналов Нажимайте кнопки ВВЕРХ ВНИЗ для выбора предыду щего или следующего канала Нажмите ОК для подтверждения Источники сигнала Нажмите кнопку SOURCE затем нажи майте кнопки курсора ВНИЗ ВВЕРХ на ПДУ или кнопки PR UP PR DOWN на...

Page 25: ...енный Кино Спорт Пользовательский Контрастность Яркость Цвет Резкость Оттенок настройка оттенка в режиме NTSC Цветовая температура Естественная Пользовательская Теплая Холодная Режим экрана 4 3 16 9 Субитр Кино Панорама Авто Шумоподавление выберите один из четырех режимов цифрового шумоподавления Выкл Низкий Средний Высокий Шумоподавление MPEG уровень устранения цифровых шумов при декодировании ви...

Page 26: ...и отсутствии каких либо действий выкл 4 часа 6 часов 8 часов Часовой пояс Выберите часовой пояс Летнее время Включите отключите автоматический переход на летнее время и обратно Канал КАНАЛ Автонастройка Ручная настройка DTV Ручная настройка ATV Питание антенны 5В Редактор программ Информация о сигнале Информация CI Автонастройка используйте кнопки курсора и кнопку ENTER для запуска автоматического...

Page 27: ...Включение режима демонстрации функций телевизора Сброс настроек Возврат настроек к исходным заводским значениям Link Управление функцией HDMI CEC и просмотр информации о подключенных устройствах Цветовой диапазон Range Выберите цветовой диапазон для режима HDMI 0 255 16 235 Авто Обновление ПО USB Обновление программного обеспечения телевизора с помощью USB носителя Блок БЛОК Блок системы Задать па...

Page 28: ...иса вещательной компании вам может быть доступна информация о программах на ближайшие 8 дней Для выхода из меню нажмите кнопку EXIT или MENU Сдвиг по времени это функция позволяющая осуществлять запись эфирных телепрограмм во время вашего отсутствия у телевизора для просмотра в удобное для вас время Запись Нажмите Красную кнопку для настройки параметров записи Устройство может выполнять запрограмм...

Page 29: ...их ток который превышает данное значение а также неисправных USB носителей может вызвать механические или термические изменения элементов конструкции дан ного устройства а также выход из строя внутренних элементов защиты USB порта Такие повреждения не являются гарантий ным случаем Внимание использование внешних USB устройств содержащих файлы с расши рением BIN в корневой директории может привести ...

Page 30: ...щего или следующего файла нажимайте кнопки При воспроизведении файлов с изо бражениями нажимайте кнопки для выбора предыдущего или следующего файла Нажимайте кнопки курсора ВЛЕВО ВПРАВО чтобы вращать изображение Нажмите кнопку EXIT чтобы оста новить воспроизведение и вернуться на предыдущий уровень меню ...

Page 31: ...е контрастность и цвет Установите правильную систему звука Изображение в режиме VGA некорректное Параметры разрешения на компьютере установлены непра вильно Отрегулируйте параметры раз решения компьютера Изображение заснеженное Сигнал низкого качества Используйте исправный и качес твенный кабель Синий фон Отсутствует видео сигнал или кабель плохо подсоединен не подсоединен Подсоедините кабель долж...

Page 32: ...ражения объясняется тем что телевизи онный сигнал отражается от окружающих построек холмов самолетов и других объектов Свести такой эффект к минимуму можно изменив направление антенны АВТОМОБИЛЬНЫЕ ДВИГАТЕЛИ Работающие неподалеку автомобильные двигатели и электромоторы могут создавать помехи в изображении в виде небольших полосок или дрожания изображения на экране Комплект поставки 1 Телевизор 1 ш...

Page 33: ...ебляемая мощность в рабочем режиме 75 Вт Потребляемая мощность в режиме ожидания 0 5 Вт Потребляемая мощность в выключенном режиме 0 Вт Размеры устройства мм с подставкой 900 7 x 220 x 558 2 без подставки 900 7 x 60 1 x 517 4 Масса нетто 11 кг ЖК панель является высокотехнологичным устройством содержащим множество тонкопленочных транзисторов которые дают четкие детали изображения В некоторых случа...

Page 34: ...30 ...
Reviews: