background image

2 EN

Installation/Connection

Basic Procedure

1. 

Remove the key from the ignition switch, then disconnect the   

terminal of the car battery.

2. 

Make proper input and output wire connections.

3. 

Install the unit to your car.

4. 

Reconnect the   terminal of the car battery.

5. 

Reset the unit.

Warning




The unit can only be installed in a car with a 12 V DC power 

supply, negative ground.




If you connect the ignition wire (red) and the battery wire (yellow) 

to the car chassis (ground), you may cause a short circuit, that in 

turn may start a fire. Always connect those wires to the power 

source running through the fuse box.




Disconnect the battery’s negative terminal and make all electrical 

connections before installing the unit.




Insulate unconnected wires with vinyl tape or other similar 

material. To prevent a short circuit, do not remove the caps on the 

ends of the unconnected wires or the terminals.




Be sure to ground this unit to the car’s chassis again after 

installation.




If the power is not turned ON, the speaker wire may have a short-

circuit or touched the chassis of the vehicle and the protection 

function may have been activated. Therefore, the speaker wire 

should be checked.

Caution




If your car’s ignition does not have an ACC position, connect the 

ignition wires to a power source that can be turned on and off 

with the ignition key. If you connect the ignition wire to a power 

source with a constant voltage supply, as with battery wires, the 

battery may die.




Install this unit in the console of your vehicle. Make sure the 

faceplate will not hit the lid of the console (if any) when closing 

and opening.




After the unit is installed, check whether the brake lamps, 

blinkers, wipers, etc. on the car are working properly.




Mount the unit so that the mounting angle is 30° or less.




If the fuse blows, first make sure the wires are not touching to 

cause a short circuit, then replace the old fuse with one that has 

the same rating.




Connect the speaker wires correctly to the terminals to which they 

correspond. The unit may be damaged or fail to work if you share 

the   wires or ground them to any metal part in the car.




When only two speakers are being connected to the system, 

connect the connectors either to both the front output terminals 

or to both the rear output terminals (do not mix front and rear).




Mounting and wiring this product requires skills and experience. 

For safety’s sake, leave this work to professionals.

If you experience problems during installation, consult your 

TELEFUNKEN dealer.

Wiring Connection

ISO Connector Wiring Chart

Pin

Color and function

Pin

Color and function

A4

Yellow

Battery (+)

B1/B2 Violet  /Violet/Black 

Right rear speaker

A5

Blue

Connect to system control terminal of the 

power AMP or auto antenna relaycontrol 

terminal (Max 150MA 12VDC)

B3/B4 Grey  /Grey/Black 

Right front speaker

A7

Red

Ignition (ACC)

B5/B6 White  /White/Black 

Left front speaker

A8

Black

Ground

B7/B8 Green  /Green/Black 

Left rear speake

REAR

L

R

1
2

3
4

5
6

7
8

4

5

7
8

A

B

ISO Connector 

(not included)

Rear RCA Output (Left)

FM/AM Antenna Socket

Rear RCA Output (Right)

Antenna Jack (not included)

Summary of Contents for TFA-ES7110

Page 1: ...CD MP3 USB RADIO BEDIENUNGSANLEITUNG USER MANUAL MANUALE DI ISTRUZIONI TFA ES7110...

Page 2: ......

Page 3: ...Wartung Reinigung des Ger ts Entfernen Sie Staub auf der Konsole mit einem trockenen Silikontuch oder einem weichen Lappen Die Nichteinhaltung dieser Vorkehrungen kann zu Sch den am Bildschirm oder G...

Page 4: ...sole Ihres Fahrzeugs Die Frontplatte darf beim ffnen und Schlie en nicht gegen den Deckel der Konsole sofern vorhanden schlagen berpr fen Sie nach der Installation des Ger ts ob die Bremslampen Blinke...

Page 5: ...aube nicht mitgeliefert Einbaurahmen Frontrahmen Bedienkonsole Ger t entfernen 1 Nehmen Sie die Bedienkonsole ab 2 Lassen Sie die Sperrstifte des Ausbauwerkzeugs in den L chern an beiden Seiten der Ab...

Page 6: ...die automatische Sendersuche aktivieren gedr ckt halten um die manuelle Sendersuche zu aktivieren W hrend der MedienwiedergabeTitel Dateien berspringen oder f r den schnellen Suchlauf vorw rts r ckw...

Page 7: ...ng von 7 bis 7 BALANCE Stellt die Balance zwischen dem rechten und linken Lautsprecher auf einenWert von 12R ganz rechts bis 12L ganz links ein FADER Stellt die berblendung zwischen den vorderen und h...

Page 8: ...as PTY Men zu ffnen Drehen Sie den Lautst rkeregler zum Ausw hlen einer Kategorie Verf gbare Programmtypen POP M ROCK M EASY M LIGHT M CLASSICS OTHER M JAZZ M COUNTRY NATION M OLDIES M FOLK M A TEST A...

Page 9: ...rts r ckw rts zu aktivieren Dr cken um einenTitel zu wiederholen Erneut dr cken um alleTitel wiederholt abzuspielen Gedr ckt halten um den gesamten Ordner zu wiederholen Dr cken um den Suchmodus zu a...

Page 10: ...orverst rkers 2 5V Ausgangsspannung des Subwoofers 2 5V UKW Radio Frequenzbereich 87 5 108MHz Empfindlichkeit Besser als 15dB bei S N 30dB MW Radio Frequenzbereich 522 1620KHz Empfindlichkeit Besser a...

Page 11: ...l and in your area Maintenance Cleaning the unit Wipe off the dirt on the panel with a dry silicon or soft cloth Failure to observe this precaution may result in damage to the monitor or unit Cleaning...

Page 12: ...e battery may die Install this unit in the console of your vehicle Make sure the faceplate will not hit the lid of the console if any when closing and opening After the unit is installed check whether...

Page 13: ...side Dashboard Screw not included in this packing Sleeve Trim plate Control panel Removing the unit 1 Detach the control panel 2 Engage the catch pin on the removal tools into the holes on both sides...

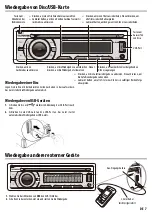
Page 14: ...r Radio mode to enter into the Auto Seek mode press and hold to enter into the Manual Seek mode Under Media playback mode to skip track file press and hold to fast forward backward To access into the...

Page 15: ...evel 7 to 7 TREBLE ADJUST TREBLE LEVEL Adjust the level 7 to 7 BALANCE Adjust the balance between the right and left speakers from 12R full right to 12L full left FADER Adjust the fader between the fr...

Page 16: ...Available Program Type POPM ROCKM EASYM LIGHTM CLASSICS OTHERM JAZZM COUNTRY NATIONM OLDIESM FOLKM A TEST ALARM NEWS AFFAIRS INFO SPORT EDUCATE DRAMA CULTURE SCIENCE VARIED WEATHER FINANCE CHILDREN SO...

Page 17: ...mponents Detaches the control panel Press to select a track file Press and hold for fast forward backward Press to repeat one track press again to repeat all tracks Press and hold repeat a folder Pres...

Page 18: ...ofer Output Voltage 2 5V FM tuner section Frequency Range 87 5 108MHz Usable Sensitivity Better than 15dB at S N 30dB AM tuner section Frequency Range 522 1620KHz Usable Sensitivity Better than 45dB a...

Page 19: ...tenzione Pulizia dell unit Pulire lo sporco sul pannello con un panno asciutto in silicone o morbido La mancata osservanza di questa precauzione pu provocare danni al monitor o all unit Pulizia del co...

Page 20: ...stallare l unit nella console del veicolo Assicurarsi che il frontalino non sbatta contro il coperchio della console se presente quando questo viene aperto o chiuso Dopo aver installato l unit control...

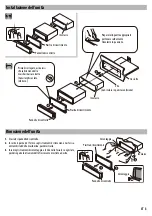
Page 21: ...ite non incluso in questa confezione Involucro Piastra di rivestimento Pannello di controllo Rimozione dell unit 1 Staccare il pannello di controllo 2 Inserire il perno del fermo sugli strumenti di ri...

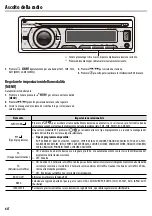
Page 22: ...re premuto per entrare nella modalit di ricerca manuale In modalit di riproduzione per saltare un brano file premere e tenere premuto per avanti indietro veloce Per accedere alla modalit Menu Audio pr...

Page 23: ...REBLE LEVEL Regolare il livello da 7 a 7 BALANCE Regolare il bilanciamento tra i diffusori destro e sinistro da 12R completamente a destra a 12L completamente a sinistra FADER Regolare il fader tra i...

Page 24: ...manopola del volume del codificatore verso la categoria selezionata Tipo di programma disponibile POP M ROCK M EASY M LIGHT M CLASSICS OTHER M JAZZ M COUNTRY NATION M OLDIES M FOLK M A TEST ALARM NEW...

Page 25: ...erselezionareunbrano file Premereetenerepremutoperavanti indietroveloce Premereperripetereunbrano premeredinuovoperripeteretuttiibrani Premereetenerepremutoperripetereunacartella Premereinmodalit diri...

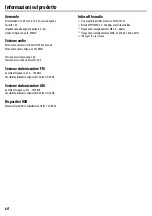
Page 26: ...woofer 2 5V Sezione sintonizzatore FM Gamma di frequenza 87 5 108 MHz Sensibilit utilizzabile migliore di 15 dB a S N 30 dB Sezione sintonizzatore AM Gamma di frequenza 522 1620KHz Sensibilit utilizza...

Page 27: ......

Page 28: ...INFORMATION DOWNLOAD www telefunken com Copyright by TELEFUNKEN AutoTainment GmbH HOCHBERGSTRASSE 28a 83313 SIEGSDORF GERMANY autotainment telefunken de www telefunkenautotainment com AUTOTAINMENT...

Reviews: