background image


FRANCAIS 

10 

NETTOYAGE ET ENTRETIEN 

1.


A  la  fin  de  votre  utilisation,  éteignez  votre  appareil  en 
positionnant le sélecteur sur 0.  

2.


Débranchez le câble d’alimentation de la prise secteur.  

3.


Assurez-vous de toujours débrancher l’appareil avant toute 
opération de nettoyage. Ne placez pas le bloc moteur dans 
le lave-vaisselle et n’immergez pas l’appareil dans l’eau.  


Nettoyer le bloc moteur :  


Utilisez  un  chiffon  doux  ou  une  éponge  imbibée  avec  un 
produit à ph neutre pour nettoyer les surfaces de l’appareil.  


Nettoyer les accessoires :  


Les accessoires (bol, couvercle, disques, lames, etc.) peuvent 
être mis au lave-vaisselle. Nous vous conseillons de lancer un 
programme à basse température. 


Vous  pouvez  aussi  les  laver  avec  une  éponge  imbibée  de 
liquide vaisselle, les rincez à l’eau chaude puis les séchez avec 
un chiffon doux. 


Pour enlever les taches résistantes, nous vous conseillons de 
remplir  les  bols  d’eau  chaude  avec  du  liquide  vaisselle  et 
laisser reposer pendant 30 min. puis nettoyer avec une brosse 
plastique. 


N’utilisez  jamais  d’éponges  métalliques  et  produits  agressifs 
pour éviter d’abimer l’appareil. 


DANGER Risque de coupure ! Les lames livrées avec votre appareil sont 

très tranchantes ! Soyez prudent lorsque vous devez les manipuler ou les 
nettoyer. N’utilisez pas de produits tranchants, toxiques et agressifs tel que 
alcools à brûler, décapants industriels, solvants pour nettoyer votre appareil 
car ces derniers risquent de l’endommager.


Summary of Contents for TKVFDB1

Page 1: ...ROBOT MULTIFONCTIONS TKVFDB1 ...

Page 2: ...ENVIRONNEMENTS Á CARACTÈRE RÉSIDENTIEL o DES ENVIRONNEMENTS DE TYPE CHAMBRES D HÔTES TOUTE UTILISATION AUTRE QUE CELLE PRÉVUE POUR CET APPAREIL OU POUR UNE AUTRE APPLICATION QUE CELLE PRÉVU PAR EXEMPLE UNE UTILISATION COMMERCIALE EST INTERDITE UNE UTILISATION NON CONFORME AU MODE D EMPLOI DÉGAGERAIT LA MARQUE DE TOUTE RESPONSABILITÉ ET ENTRAÎNERAIT LA PERTE DE LA GARANTIE APRÈS AVOIR DÉBALLÉ VOTRE...

Page 3: ...E UTILISÉ ET REPOSÉ SUR UNE SURFACE STABLE N UTLISEZ PAS L APPAREIL A VIDE AVERTISSEMENT RISQUES DE BLESSURES EN CAS DE MAUVAISE UTILISATION DE L APPAREIL CET APPAREIL NE DOIT PAS ÊTRE UTILISÉ PAR DES ENFANTS CET APPAREIL PEUT ÊTRE UTILISÉ PAR DES PERSONNES AYANT DES CAPACITÉS PHYSIQUES SENSORIELLES OU MENTALES RÉDUITES OU UN MANQUE D EXPÉRIENCE ET DE CONNAISSANCES Á CONDITION QU ELLES AIENT REÇU ...

Page 4: ... LES INFORMATIONS DÉTAILLÉES SUR LA MANIÈRE DE NETTOYER LES SURFACES EN CONTACT AVEC LES ALIMENTS RÉFÉREZ VOUS AU PARAGRAPHE CI APRÈS DE LA NOTICE EN CE QUI CONCERNE LES DURÉES DE FONCTIONNEMENT ET LES RÉGLAGES DE VITESSE POUR LES ACCESSOIRES DANGER RISQUE DE COUPURE PRENDRE DES PRÉCAUTIONS LORS DE LA MANIPULATION DE LA LAME A MÉLANGER LORSQUE VOUS VIDEZ LE BOL DE PRÉPARATION ET LORS DU NETTOYAGE ...

Page 5: ... APPAREIL Á L ARRÊT ET LE DÉCONNECTER DE L ALIMENTATION AVANT DE CHANGER LES ACCESSOIRES OU D APPROCHER LES PARTIES QUI SONT MOBILES LORS DU FONCTIONNEMENT EN CAS DE BLOCAGE DE LA LAME A MÉLANGER VEILLEZ Á TOUJOURS DÉBRANCHEZ L APPAREIL DU RÉSEAU D ALIMENTATION AVANT D ENLEVER LA PRÉPARATION DU BOL DE PRÉPARATION LORSQUE L APPAREIL EST EN MARCHE VEILLEZ A TENIR ÉLOIGNER DU HAUT DU COUVERCLE MAINS ...

Page 6: ...T EXPOSÉ AUX INTEMPÉRIES ET Á L HUMIDITÉ NE LAISSEZ PAS VOTRE APPAREIL BRANCHÉ EN CAS DE LONGUE PÉRIODE SANS UTILISATION IL EST CONSEILLÉ D EXAMINER RÉGULIÈREMENT LE CÂBLE D ALIMENTATION POUR DÉCELER TOUT SIGNE DE DÉTÉRIORATION ÉVENTUELLE ET L APPAREIL NE DOIT PAS ÊTRE UTILISÉ SI LE CABLE EST ENDOMMAGÉ SI LE CÂBLE D ALIMENTATION EST ENDOMMAGÉ IL DOIT ÊTRE REMPLACÉ PAR LE FABRICANT SON SERVICE APRÈ...

Page 7: ...E LIQUIDE EN COURS D UTLISATION DE L APPAREIL VEILLEZ A METTRE L APPAREIL EN ARRÊT EN APPUYANT SUR LE BOUTON 0 POUR AJOUTER DES INGRÉDIENTS AVANT TOUTE OPÉRATION DE NETTOYAGE OU D ENTRETIEN DÉBRANCHEZ L APPAREIL POUR COUPER L ALIMENTATION ÉLECTRIQUE PENDANT SON FONCTIONNEMENT ÉVITEZ DE DÉPLACER L APPAREIL NORMES DE SÉCURITÉ CET APPAREIL EST CONFORME AUX DIRECTIVES ET NORMES EN VIGUEURS ...

Page 8: ...r avec ses accessoires couteaux 3 Utiliser le bol mixeur 5 Utiliser le batteur 6 Utiliser le presse agrumes 6 Utiliser le disque émulsionneur 7 Utiliser les lames à râper et à trancher 8 Anomalies de fonctionnement 9 NETTOYAGE ET ENTRETIEN 10 INFORMATION TECHNIQUE 11 ENVIRONNEMENT ET RECYCLAGE 11 ...

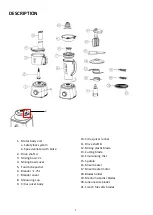
Page 9: ...Batteur fouets 17 Unité moteur batteur 18 Support lames 19 Lame pour trancher moyen 20 Lame pour râper fin 21 Lame pour râper gros 1 Bloc moteur a Système de verrouillage de sécurité b Sélecteur de vitesses et position Pulse 2 Axe d entrainement 3 Bol hachoir 2L 4 Couvercle bol hachoir 5 Poussoir 6 Bol mixeur 1 75L 7 Couvercle bol mixeur 8 Verre gradué 9 Filtre presse agrumes a ...

Page 10: ...t sèche Lavez tous les accessoires avec une éponge imbibée de produits liquides puis rincez les à l eau chaude avant de les sécher avec un torchon propre Sélecteur de vitesse a Position 0 mise à l arrêt b Variateur de vitesse MIN à MAX marche continue ne dépassez pas les 4 minutes d utilisation pensez à laisser l appareil reposer pendant 30 secondes avant de le réutiliser c Position pulse marche i...

Page 11: ...s en vitesse 2 Pâte légère gâteaux 2 minutes en vitesse 2 IMPORTANT la capacité maximale en farine est de 300gr 4 Posez le couvercle sur le bol et tournez dans le sens des aiguilles d une montre jusqu à ce que le système de verrouillage de sécurité s enclenche 5 Insérez le poussoir dans la cheminée du couvercle La cheminée et le poussoir vous permet de rajouter des ingrédients au fur et à mesure d...

Page 12: ...e Potage soupe compote 20 secondes en vitesse 2 Smoothie 30 secondes en vitesse 2 6 A la fin de votre préparation suivez la procédure suivante mettez à l arrêt votre appareil retirez l ensemble bol couvercle du bloc moteur et retirez le couvercle du bol A noter vous pouvez rajoutez des ingrédients tout au long de votre préparation en enlevant le verre gradué Pensez à toujours mettre à l arrêt votr...

Page 13: ... de votre préparation suivez la procédure suivante mettez à l arrêt votre appareil retirez l ensemble bol couvercle du bloc moteur et retirez le couvercle du bol A noter vous pouvez rajoutez des ingrédients tout au long de votre préparation en enlevant le poussoir Pensez à toujours mettre à l arrêt votre appareil lors de rajout d ingrédients IMPORTANT Pour éviter de surchauffer le moteur ne dépass...

Page 14: ...sez reposer l appareil 30 secondes entre chaque utilisation de 4 minutes Utiliser le disque émulsionneur 1 Fixez l axe d entrainement sur le bloc moteur 2 Mettez le bol hachoir en place Orientez la poignée vers l arrière et tournez dans le sens des aiguilles d une montre jusqu à ce que le système de verrouillage de sécurité s enclenche 3 Ajoutez le support de couteaux dans le bol en le fixant sur ...

Page 15: ...n continu au delà de 4 minutes Laissez reposer l appareil 30 secondes entre chaque utilisation de 4 minutes Utiliser les lames à râper et à trancher a Mise en place des lames sur son support 1 Choisissez la lame à utiliser en fonction de votre préparation Positionnez la lame sélectionnée au dessus du support en axant l orifice de la lame sur l embout central du support 2 Clipsez l ensemble 3 Retou...

Page 16: ... à l arrêt votre appareil lors de rajout d ingrédients IMPORTANT Pour éviter de surchauffer le moteur ne dépassez pas le temps d utilisation en continu au delà de 4 minutes Laissez reposer l appareil 30 secondes entre chaque utilisation de 4 minutes Anomalies de fonctionnement Si votre appareil ne fonctionne pas vérifiez 1 Le branchement de votre appareil 2 Le verrouillage de chaque accessoire 3 L...

Page 17: ...ous conseillons de lancer un programme à basse température Vous pouvez aussi les laver avec une éponge imbibée de liquide vaisselle les rincez à l eau chaude puis les séchez avec un chiffon doux Pour enlever les taches résistantes nous vous conseillons de remplir les bols d eau chaude avec du liquide vaisselle et laisser reposer pendant 30 min puis nettoyer avec une brosse plastique N utilisez jam...

Page 18: ...r la santé humaine et l environnement Le symbole de la poubelle barrée est apposé sur tous les produits pour rappeler les obligations de collecte séparée Les consommateurs devront contacter les autorités locales ou leur revendeur concernant la démarche à suivre pour l enlèvement de leur vieil appareil Lorsqu il ne fonctionnera plus ne jetez pas l appareil avec les ordures ménagères mais déposez le...

Page 19: ...ROBOT MULTIFONCTIONS TKVFDB1 ...

Page 20: ...TS THIS APPLIANCE SHOULD NOT BE USED FOR ANY OTHER PURPOSE OR IN ANY OTHER APPLICATION SUCH AS FOR NON DOMESTIC USE OR IN A COMMERCIAL ENVIRONMENT ANY COMMERCIAL USE INAPPROPRIATE USE OR FAILURE TO COMPLY WITH THE INSTRUCTIONS THE MANUFACTURER ACCEPTS NO RESPONSIBILITY AND THE GUARANTEE WILL NOT APPLY AFTER UNPACKING THE APPLIANCE MAKE SURE IT IS NOT DAMAGED THE APPLIANCE MUST NOT BE USED IF IT HA...

Page 21: ...CCUR FROM MISUSE THIS APPLIANCE SHALL NOT BE USED BY CHILDREN CHILDREN FROM 0 TILL 8 YEARS SHALL NOT USE THIS APPLIANCE THIS APPLIANCE CAN BE USED BY PERSONS WITH REDUCED PHYSICAL SENSORY OR MENTAL CAPABILITIES OR LACK OF EXPERIENCE AND KNOWLEDGE IF THEY HAVE BEEN GIVEN SUPERVISION OR INSTRUCTION CONCERNING USE OF THE APPLIANCE IN A SAFE WAY AND UNDERSTAND THE HAZARDS INVOLVED CLEANING AND USER MA...

Page 22: ...ENANCE REGARDING THE INFORMATION FOR OPERATING TIMES AND SETTING THANKS TO REFER TO THE BELOW PARAGRAPH OF THE MANUAL DANGER OF SERIOUS CUTTING INJURIES NEVER USE AND PUT YOUR HANDS INSIDE THE BOWL WHILE THE APPLIANCE IS PLUGGED IN AVOID AT ALL COST TOUCHING THE SHARP BLADES WHEN THE APPLIANCE IS PLUGGED IN AND OPERATING ALWAYS UNPLUG THE APPLIANCE FROM THE OUTLET WHEN NOT IN USE ALWAYS UNPLUG THE...

Page 23: ...UST BE EARTHED IF YOU NEED TO USE AN EXTENSION LEAD IT IS IMPORTANT THAT YOU USE A MODEL FITTED WITH AN EARTH PLUG ENSURE TO CHECK THAT THE VOLTAGE MARKED ON THE RATING PLATE MATCHES TO YOUR LOCAL SUPPLY IF NOT THE CASE DO NOT USE THE APPLIANCE AND SEEK FOR EXPERT ADVICE DO NOT LET THE SUPPLY CORD HANG OVER EDGE OF TABLE OR COUNTER NEVER IMMERSE THIS APPLIANCE IN WATER FOR YOUR OWN SAFETY WE RECOM...

Page 24: ...CONTROL SYSTEM NEVER PLUG THE APPLIANCE AND TOUCH THE THERMOSTAT WITH WET HANDS NEVER USE THE APPLIANCE WITH BARE OR WET FEET NEVER UNPLUG THE APPLIANCE BY PULLING THE POWER CABLE OR THE APPLIANCE ITSELF THE PLUG MUST BE REMOVED FROM THE SOCKET OUTLET BEFORE THE BOWL IS FILLED WITH WATER OR LIQUID PREPARATIONS TO ADD WATER TURN THE APPLIANCE OFF USING THE SWITCH NEVER FILL THE APPLIANCE UNDER RUNN...

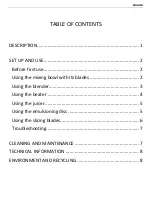
Page 25: ...e first use 2 Using the mixing bowl with its blades 2 Using the blender 3 Using the beater 4 Using the juicer 5 Using the emulsioning disc 5 Using the slicing blades 6 Troubleshooting 7 CLEANING AND MAINTENANCE 7 TECHNICAL INFORMATION 8 ENVIRONMENT AND RECYCLING 8 ...

Page 26: ...r beater 17 Mixer beater motor 18 Blades holder 19 Medium size disc blades 20 Julienne disc blades 21 French fries disc blades 1 Motor body unit a Safety lock system b Speed variator with Pulse 2 Drive shaft A 3 Mixing bowl 2L 4 Mixing bowl cover 5 Food tube pusher 6 Blender 1 75L 7 Blender cover 8 Measuring cup 9 Citrus juicer body a ...

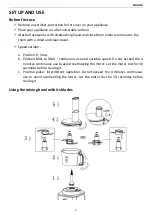
Page 27: ... a dried and clean towel Speed variator a Position 0 Stop b Position MIN to MAX continuous use and variable speed Do not exceed the 4 minutes continuous use to avoid overheating the motor Let the motor rest for 30 secondes before reusing it c Position pulse intermittent operation Do not exceed the 4 minutes continuous use to avoid overheating the motor Let the motor rest for 30 secondes before reu...

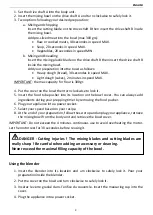
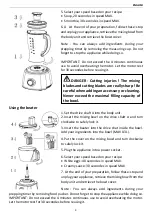
Page 28: ...nsert the food tube pusher into its location on the bowl cover You can always add ingredients during your prepping timer by removing the food pusher 6 Plug your appliance into a power socket 7 Select your speed based on your recipe 8 At the end of your preparation follow these stop and unplug your appliance retrieve the mixing bowl from the body unit and retrieve the bowl cover IMPORTANT Do not ex...

Page 29: ...into the drive shat inside the bowl Add your ingredients into the bowl MAX 0 3L 4 Put the cover on the mixing bowl and turn clockwise to safely lock it 5 Plug the appliance into a power socket 6 Select your speed based on your recipe White eggs 40 secondes in speed MAX Creamy sauce 30 secondes in speed MAX 7 At the end of your preparation follow these stop and unplug your appliance retrieve the mi...

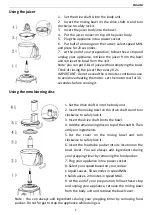
Page 30: ...sing it Using the emulsioning disc 1 Set the drive shaft A into the body unit 2 Insert the mixing bowl on the drive shaft A and turn clockwise to safely lock it 3 Insert the drive shaft B into the bowl 4 Add the emulsioning disc on top of the shaft B Then add your ingredients 5 Put the cover on the mixing bowl and turn clockwise to safely lock it 6 Insert the food tube pusher into its location on ...

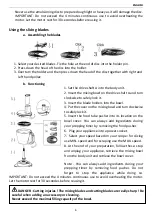
Page 31: ... and turn clockwise to safely lock it 5 Insert the food tube pusher into its location on the bowl cover You can always add ingredients during your prepping timer by removing the food pusher 6 Plug your appliance into a power socket 7 Select your speed based on your recipe for slicing use MIN speed and for scraping use the MAX speed 8 At the end of your preparation follow these stop and unplug your...

Page 32: ...he dishwashing or under the water Cleaning the body motor unit Clean the outer surface with a soft cloth or sponge on the surfaces of the appliance Do not use a hard brush or any others cleaners to avoid scratching or damaging the appliance Cleaning the accessories The accessories bowl covers blades etc could be put inside a dishwashing machine Use the low temperature to avoid damaging the accesso...

Page 33: ...nces must not be disposed of in the normal unsorted municipal waste stream Old appliances must be collected separately in order to optimize the recovery and recycling of the materials they contain and reduce the impact on human health and the environment The crossed out wheeled bin symbol on the product reminds you of your obligation that when you dispose of the appliance it must be separately col...

Reviews: