background image


CC-10


INSTRUMENT MANUAL 


Phone:(215) 947-2500   fax:(215) 947-7464   e-mail:sales@televac.com     web site:www.televac.com 

CC-10 MANUAL REV D 

Page 19 of 40 

TELEVA


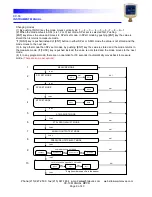
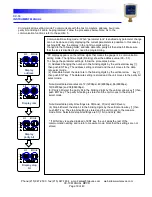
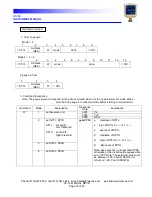
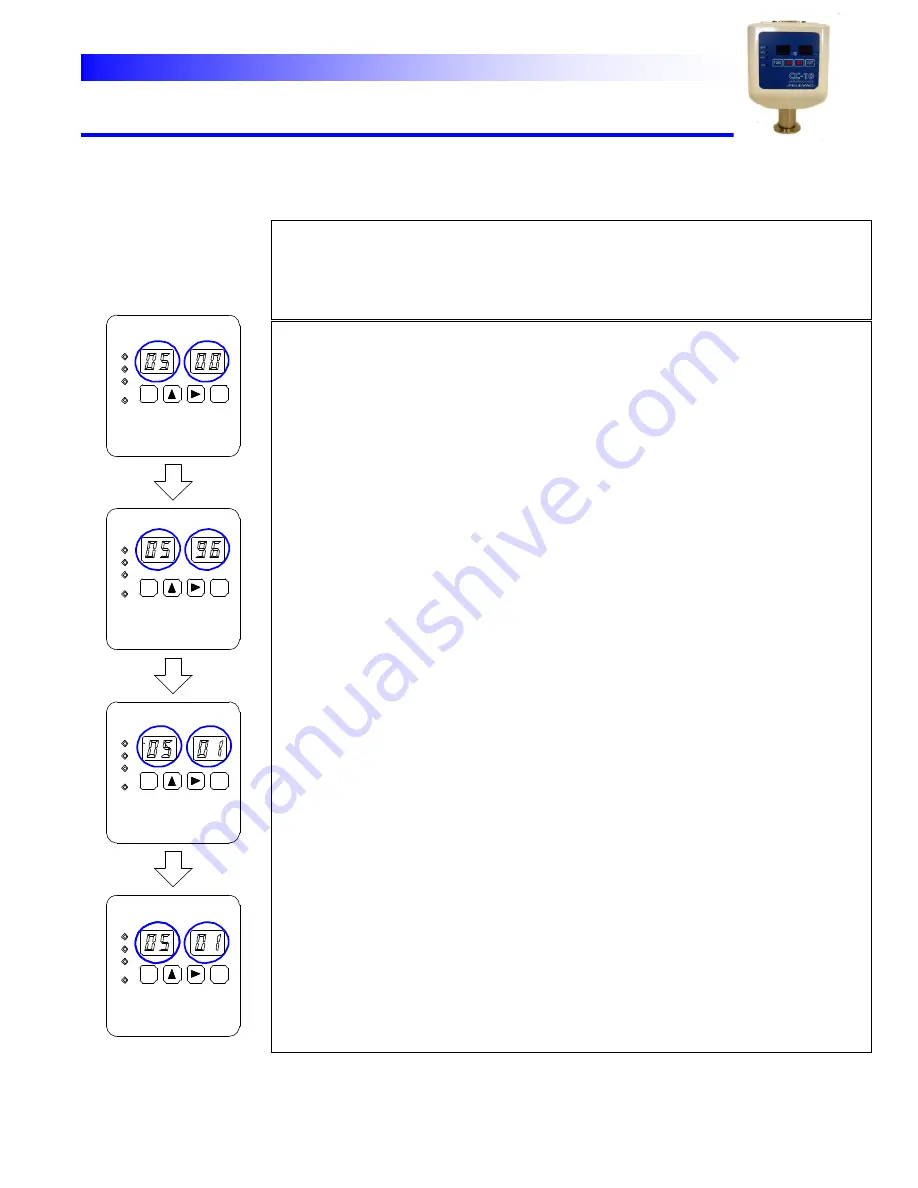
Communication setting mode To communicate with the host computers, address, boud rate, 
parity bit and stop bit are to be programmed. Follow the procedures below. Note: As to the 
communication functions refer to the section 5. 


SP1 

SP2 

SP3 

HV 

SP2 

SP1 

SP3 

HV 

HV 

SP2 

SP1 

SP3 

SP3 

SP2 

SP1 

HV 

X10 

Pa 

Pa 

Pa 

Pa 

X10 

X10 

X10 

FUNC 

FUNC 

FUNC 

FUNC 

ENT 

ENT 

ENT 

ENT 

Display stop 

bit 

Display 

parity bit 

Display rate 

Display 

address 

Lit       Blink 

Lit       Blink 

Lit       Blink 

Lit       Blink 

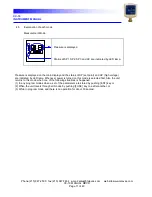
Communication setting mode : When 

“parameter lock” is enabled any parameter change 

can not be done and only displaying the current parameters is possible. In this case by 
pushing ENT key, the display in the right two digits will be 
changed in the following order; address, data rate, parity bit then stop bit. Make sure 
that the lock is disabled if you need the programming. 
 

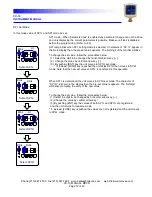
“05” display appears on the left two digits that means the gauge is in communication 
setting mode. The right two digits (blinking) show the address value (00 

– 0F) . 

To change the parameter settings, follow the procedures below. 

(1) Address Changing the number in the blinking digits by the vertical arrow key [

↑] 

then push ENT key. The address setting is stored and the unit moves to the data 

  rate select mode. 
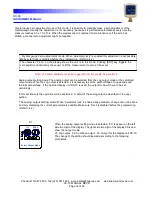
  (2) Data Rate Select the data rate in the blinking digits by the vertical arrow     key [

↑] 

then push ENT key. The data rate setting is stored and the unit moves to the parity bit 
select mode. 

 
   Note: Selectable data rates are 12(1200bps), 48(4800bps), 96(9600bps), 

 19(19200bps) and 38(38400bps). 
 (3) Parity bit Select the parity bit in the blinking digits by the vertical arrow key [

↑] then 

 push ENT key. The parity bit setting is stored and the unit moves to the stop bit     
 select mode.      


   Note: Selectable parity bit settings are 00(none), 01(odd) and 02(even). 
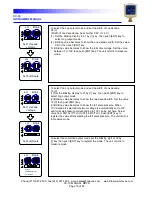
   (4) Stop bit Select the stop bit in the blinking digits by the vertical arrow key [

↑] then       

   push ENT key. The stop bit setting is stored and the unit moves to the measure 
   mode. Note: Selectable stop bit settings are 01(1 bit) and 02(2 bits). 
 
 
   * If FUNC key is pushed instead of ENT key, the unit skips the rest of the 
   communication setting and return to measure mode. Note that the settings are  not 

stored. 

Summary of Contents for CC-10

Page 1: ...TELEVAC A DIVISION OF THE FREDERICKS COMPANY 2400 PHILMONT AVE HUNTINGDONVALLEY PA 19006 ...

Page 2: ...ww televac com CC 10 MANUAL REV D Page 1 of 40 Y TELEVA TABLE OF CONTENTS SECTION TITLE PAGE 1 Introduction and Safety Instructions 2 User Controls 3 Specifications 4 Operation 5 Analog Output 6 Digital Interface 7 Maintenance 8 I O Connector 9 Dimensions 10 Error Message List 11 Troubleshooting ...

Page 3: ...om 10 2 to 10 9 Torr 1 2 1 Crystal Sensor Operating Principle The crystal sensor is a simple tuning folk shaped quartz oscillator that s similar to the oscillators commonly used in wrist watches The electrical impedance of the oscillation depends upon the pressure of the gas that surrounds the quartz oscillator because the resistance to the oscillation as caused by friction between the quartz surf...

Page 4: ...rious personal injury including death or property damage These safety precautions must be observed during all phases of operation installation and service of this product Failure to comply with these precautions or with specific warnings elsewhere in this manual violates safety standards of design manufacture and intended use of the instrument Televac disclaims all liability for the customer s fai...

Page 5: ...us voltage points or short out parts that could result in a fire or electric shock Be careful not to spill liquid of any kind onto the products Do not substitute parts or modify instrument Because of the danger on introducing additional hazards do not install substitute parts or perform any unauthorized modifications to the product Return the product to Televac for service and repair to ensure tha...

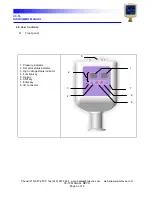
Page 6: ... televac com web site www televac com CC 10 MANUAL REV D Page 5 of 40 Y TELEVA 2 0 User Controls 2 1 Front panel 1 Pressure indicator 2 Set point status indicator 3 High Voltage status indicator 4 Function key 5 Up key 6 Shift key 7 Enter key 8 I O connector 2 5 4 1 7 8 3 6 ...

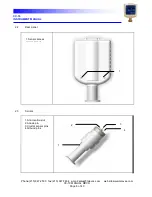
Page 7: ... fax 215 947 7464 e mail sales televac com web site www televac com CC 10 MANUAL REV D Page 6 of 40 Y TELEVA 2 2 Rear panel 2 3 Sensor 1 Sensor access screws screws 1 Anti rotation slot 2 Anode pin 3 Crystal sensor pins 4 Ground pins 1 1 4 2 3 ...

Page 8: ...ntissa digits and two exponent digits Pressure unit Torr Pascal selectable Set point Three set points one independent set point and two common ground set points Setting method 1 By local switches 2 Through communication interface Contact rating DC50V 0 12A Analog output Log or combined output selectable Voltage 0 10V Ambient temperature Humidity operating 0 50C 10 90 RH Power requirement 22 26vdc ...

Page 9: ...ion between enabled and disabled follow the procedure below When shipped it is set to disabled 4 3 Display modes and mode changing There are nine modes that are changed by pushing FUNC key and ENT key Those are 1 Measurement mode 2 SP1 setting mode SP1L setting SP1H setting 3 SP2 setting mode SP2L setting SP2H setting 4 SP3 setting mode SP3L setting SP3H setting 5 Crystal gauge ATM atmospheric pre...

Page 10: ... 3 In any other mode than SPx set modes by pushing ENT key the value is stored and the mode returns to the measure mode If FUNC key is pushed instead the value is not stored and the mode moves to the next mode 4 If in any program mode there are no operation for 30 seconds it automatically moves back to measure mode There are some exceptions MEASURE MODE SP1 SET MODE SP1L SP1H ENT SP2 SET MODE SP2L...

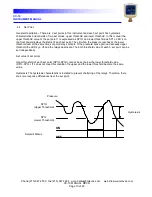
Page 11: ...lit when the pressure reaches at the lower threshold and at the same time set point relays activate If the pressure rises again and exceeds upper threshold the LED s go off and the relays deactivate The both threshold value of each 3 set point can be set independently Set value of set points Upper threshold of each set point SP1H SP3H cannot be set below the lower threshold value SP1L SP3L If it d...

Page 12: ...ated by LED lamp Whenever power is turned on this mode is selected first Also the unit returns to this mode when one of the following situations is happened 1 In any program modes when a set of the parameters are stored by pushing ENT key or 2 When the unit travels through all modes by pushing FUNC key one after another or 3 While in program mode and there is no operation for about 30 second SP1 S...

Page 13: ...sa blinks To change the set value follow the procedures below 1 Select the digit to be changed by horizontal arrow key 2 Change the value by vertical arrow key 3 By pushing ENT key the unit moves to SP1H set mode If instead FUNC key is pushed the unit skips SP1H then moves to SP2L mode Note that the new set value of SP1L is not stored in this operation When SP1L is determined the unit moves to SP1...

Page 14: ... the display shows the unit is in this mode Make sure the system is vented to atmosphere then push ENT key It triggers the adjustment instructing the sensor to fit the measurement to the pre set atmosphere value at the event As to the pre set atmosphere value see below Note If by some mis operation the adjustment is triggered when the system is in vacuum ErrA is displayed and the adjustment will n...

Page 15: ...an be triggered from I O pin 6 See section 8 Analog output setting mode The analog output can be selected from the Log output mode or the combined output mode When the Log output is selected it is necessary to set the width voltage of one decade and the full scale voltage If the optional display unit DS 10 is used the output mode will have to be set accordingly In this section only the operation w...

Page 16: ... width Set the value 0 5 V then push ENT key 3 Blinking value becomes to show the full scale voltage Set the value between 7 to 10V then push ENT key The unit returns to measure mode To select the Log output mode and set the width of one decade 1 0 V 1 Set the blinking display to 01 by key then push ENT key to select Log output mode 2 Blinking value becomes to show the one decade width Set the val...

Page 17: ...0V is shown in the figure below 0 5V decade x 12 decade 6V If the Log output is selected and the width of one decade is set to 1 0 V the range of the output voltage corresponding to the effective voltage of 1V to 10V is shown in the figure below 1 0V decade x 12 decade 12V SP3 SP2 SP1 HV Torr X10 FUNC ENT Output to display unit Lit Blink To select output for DS 10 display unit set the right side t...

Page 18: ...c com CC 10 MANUAL REV D Page 17 of 40 Y TELEVA 10 3 Torr 10 1 10 1 10 3 10 5 10 7 10 9 1 2 3 5 6 7 8 9 4 10 Effective voltage range V Set 10V 10 2 0 Pa Torr Set 10V 10 3 1 Pa Torr Set 10V 10 4 2 Pa Torr Set 10V 10 5 3 Pa Torr 10 9 Torr 10 8 Torr 10 7 Torr 10 6 Torr 10 0 Torr 10 1 Torr 10 2 Torr 10 3 Torr ...

Page 19: ... mode is selected On the right side two digits selected unit is displayed 01 Pa 02 Torr 03 mbar To change the unit select the value by the arrow key then push ENT key to register the parameter The unit returns to measure mode The pressure unit selection mode When parameter lock is enabled any parameter change can not be done and only displaying the current parameters is possible Make sure if lock ...

Page 20: ...n communication setting mode The right two digits blinking show the address value 00 0F To change the parameter settings follow the procedures below 1 Address Changing the number in the blinking digits by the vertical arrow key then push ENT key The address setting is stored and the unit moves to the data rate select mode 2 Data Rate Select the data rate in the blinking digits by the vertical arro...

Page 21: ...s followed by the serial number Ex If indicated as S N070020 4842 05 the property numbers are 4842 and 05 06 display appears on the left two digits that means the gauge is in crystal sensor property set mode To enter the property numbers into the unit follow the procedures below 1 Push horizontal arrow key to indicate the first property number Ex 4842 The current number XXXX is displayed The first...

Page 22: ...he LOG output and the COMBINED output The signal is comes from pin 9 and pin 1 of the I O connector 5 1 Log Output Analog Output 0 5V decade 10 9 8 7 6 5 4 3 2 1 1 0E 09 1 0E 08 1 0E 07 1 0E 06 1 0E 05 1 0E 04 1 0E 03 1 0E 02 1 0E 01 1 0E 00 1 0E 01 1 0E 02 1 0E 03 Pressure Torr Analog output voltage V is expressed as V 0 5logP n 1 5 where P is pressure Torr and n is full scale set value n 7 8 9 o...

Page 23: ... 40 Y TELEVA Analog Output 1V decade V LogP 10 V LogP 9 V LogP 8 V LogP 7 0 1 9 8 7 6 5 4 3 2 1 1 0E 09 1 0E 08 1 0E 07 1 0E 06 1 0E 05 1 0E 04 1 0E 03 1 0E 02 1 0E 01 1 0E 00 1 0E 01 1 0E 02 1 0E 03 Pressure Torr Analog output voltage V is expressed as V logP 10 n where P is pressure Torr and n is full scale pressure value n 0 1 2 or 3 10 ...

Page 24: ... 40 Y TELEVA 5 2 Combined Output Complex Output 9 8 7 6 5 4 3 1 E 09 1 E 08 1 E 07 1 E 06 1 E 05 1 E 04 1 E 03 1 E 02 1 E 01 1 E 00 1 E 01 1 E 02 1 E 03 P Torr Analog output voltage V is expressed as for Torr unit V mantissa of the pressure 20 exponent of the pressure 15 2 P 2V int 2V int 2V antlog int 2V 14 Torr use X 1V when X 0 measured ...

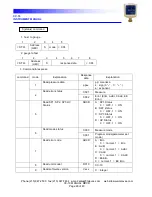
Page 25: ...ication Specification Interface EIA RS 485 compatible Data transfer method Synchronous half duplicate method Address HEX 0 F Data rate 1200 4800 9600 19200 38400 Data format 1 start bit 8 bit ASCII parity bit 1 stop bit Error detection Parity bit Parity bit None odd even Stop bit Transfer distance Max 100m 6 2 Command Explanation Command Explanation R read command Read the set parameters of the sp...

Page 26: ...11 12 STX Address HEX R Response mode CR 3 Command response Command Mode Explanation Response Data Explanation R 1 Read pressure unit 0001 Pa 0002 1 133 3 Pa 0003 1 100 Pa 2 Read SP1L SP1H SP set point1 1L Low threshold SP set point1 1H High threshold ppsePPSE p Mantissa of the low threshold s Sign of the low threshold e 0 or 1 Exponent of the low threshold EXAMPLE ppse 7505 mean 7 5E 5 Torr P Man...

Page 27: ...E otherwise or the invalid value causes data error 0003 Note The setpoint value must be between 1 0E 9 and 9 9E3 Torr or mbar or 1 0E 7 and 9 9E5 Pa 5 Read Analog output set parameter 1ABB For Log output mode A voltage span for 1 decade 0 0 5V decade 1 1 0V decade BB full scale voltage when A 0 BB is 07 to 10 when A 1 BB is 00 to 03 for Torr and mbar unit or is 02 to 05 for Pa unit 2000 combined o...

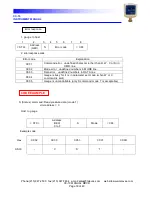
Page 28: ...y parameter set mode Make sure that the gauge is in measure mode before starting communication Command Mode Explanation Response Date Explanation W 1 set pressure unit 0001 Pa 0002 Torr 0003 mbar 2 set SP1L SP1H SP1L set point1 Low threshold SP1H set point1 High threshold ppsePPSE p mantissa of SP1L s sign of SP1L 0 or 1 e exponent of SP1L P mantissa of SP1H S sign of SP1H 0 or 1 E Exponent of SP1...

Page 29: ...age when A 0 BB must be 07 to 10 When A 1 BB must be 00 to 03 for Torr and mbar unit or must be 02 to 05 for Pa unit 2000 Select combined output mode 3000 Select special mode for remote display unit 1 host to gauge 1 2 3 4 5 STX Address HEX C mode CR 2 gauge to host 1 2 3 4 5 6 7 8 STX Address HEX C response data CR 3 Command response command mode Explanation Response data Explanation C 1 Trigger ...

Page 30: ...on 1 Read pressure data ppse pp mantissa s sign 0 1 e exponent 2 Read error status 0001 Measure 0002 Error ErrO AdEr CALE EE Error 5 Read SP1 SP2 SP3 HV Status ABCD A SP1 Status 0 OFF 1 ON B SP2 status 0 OFF 1 ON C SP3 Status 0 OFF 1 ON D HV Status 0 OFF 1 ON 6 Read mode status 0000 Measure mode 0001 Program mode parameter set mode 7 Read error code ABCD A Erro 0 normal 1 Erro B AdEr 0 normal 1 Ad...

Page 31: ...r undefined character other than R W C or S in CMD line 0002 Mode error undefined numbers in MODE line 0003 Data error undefined numbers in DATA line 0004 Gauge is busy for it is in parameter set mode when W or C command is sent 0005 Gauge is uncontrollable only S command mode 7 is acceptable S Status command Read pressure data mode 1 Unit address 0 Host to gauge STX Address HEX 0 to F S Mode CR E...

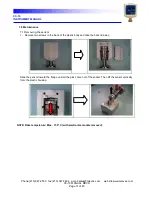
Page 32: ... 40 Y TELEVA 7 0 Maintenance 7 1 Removing the sensor 1 Remove two screws in the back of the plastic body and take the back lid away Slide the sensor toward the flange until all the pins come out of the socket Then lift the sensor vertically from the plastic housing lift slide NOTE Bake temperature Max 150 C with electronics module removed ...

Page 33: ...lot on the sensor and the key on the housing together anti rotation slot 2 Slide the sensor toward the socket so that all the pins are inserted correctly into the socket Do not push the sensor too strong Normally the pins can be inserted smoothly with a little power slide 3 If the pins are firmly inserted put the plastic cover back on the housing and fix it with two screws if the pins are not full...

Page 34: ...e and remove the washer and the spacer 2 Pull the anode pin located at the center upward until the whole electrode assembly is come out of the sensor body Remove the magnet assembly and the O ring the electrode assembly and the washer are magnetic Keep them off the magnet so as not to be attracted by the magnet 7 4 Sensor Cleaning Polish the anode and the inner surface of the envelope with a fine ...

Page 35: ...0 Y TELEVA 7 5 Sensor Assembly 1 Install the magnet 2 Insert the anode assembly fitting the key into the anti rotation hole 3 Install the spacer the washer and the nut in this order 4 Tighten the nut securely so that the O ring has an enough seal force Notes Perform the zero and the atmosphere adjustment when new anode assembly is installed ...

Page 36: ...l input External 24V input I O 14 Atmosphere adjustment Trigger input When it is activated atmosphere Adjustment is triggered 6 Zero adjustment trigger input When it is activated zero adjustment is triggered manually 13 HV inhibit signal While it is activated cold cathode high voltage is inhibited and the gauge is measured with crystal sensor all the time 9 ANALOG OUT Output Analog output 1 ANALOG...

Page 37: ...REV D Page 36 of 40 Y TELEVA Connecting schematics Refer to the figure below as to the connection of the I O OUTPUT CC 10 COM 1 OUT 1 COM 2 3 OUT 2 OUT 3 5 12 4 11 3 OUTPUT CC 10 7 14 6 13 EXT Vcc IN 1 IN 2 IN 3 24V system Momentary contact over 300ms Momentary contact over 300ms Relay Contact or Open Collector 0V 0V 0V 0V ...

Page 38: ...CC 10 INSTRUMENT MANUAL Phone 215 947 2500 fax 215 947 7464 e mail sales televac com web site www televac com CC 10 MANUAL REV D Page 37 of 40 Y TELEVA 9 0 Dimensions 94 m m N W 25 40φ 3 7 5 4 2 8 ...

Page 39: ...ir Contact service agent CALE A D converter calibration error Needs electronics repair Contact service agent EE Error scroll display EEPROM error Needs electronics repair Contact service agent 11 0 Troubleshooting Symptom Possible Cause Treatment No display appears Power failure Check connector Check power 24 VDC supply Pressure reading is unstable Contamination in the sensor Sensor cleaning Press...

Page 40: ...les televac com web site www televac com CC 10 MANUAL REV D Page 39 of 40 Y TELEVA For technical and applications assistance please contact Televac 2400 Philmont Avenue Huntingdon Valley PA 19006 Phone 215 947 2500 Fax 215 947 7464 Email sales televac com www televac com ...

Reviews: