background image


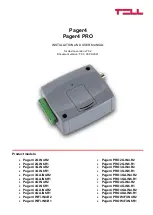
Pager4 

Pager4 PRO 


INSTALLATION AND USER MANUAL 


for device version v7.02 

Document version: 7.03  03.09.2021 


Product models: 


Pager4 2G.IN4.R2 


Pager4 2G.IN6.R1 


Pager4 3G.IN4.R2 


Pager4 3G.IN6.R1 


Pager4 3GA.IN4.R2 


Pager4 3GA.IN6.R1 


Pager4 4G.IN4.R2 


Pager4 4G.IN6.R1 


Pager4 4GA.IN4.R2 


Pager4 4GA.IN6.R1 


Pager4 WiFi.IN4.R2 


Pager4 WiFi.IN6.R1 


Pager4 PRO 2G.IN4.R2 


Pager4 PRO 2G.IN6.R1 


Pager4 PRO 3G.IN4.R2 


Pager4 PRO 3G.IN6.R1 


Pager4 PRO 3GA.IN4.R2 


Pager4 PRO 3GA.IN6.R1 


Pager4 PRO 4G.IN4.R2 


Pager4 PRO 4G.IN6.R1 


Pager4 PRO 4GA.IN4.R2 


Pager4 PRO 4GA.IN6.R1 


Pager4 PRO WiFi.IN4.R2 


Pager4 PRO WiFi.IN6.R1 

Summary of Contents for Pager4 2G.IN4.R2

Page 1: ...GA IN4 R2 Pager4 3GA IN6 R1 Pager4 4G IN4 R2 Pager4 4G IN6 R1 Pager4 4GA IN4 R2 Pager4 4GA IN6 R1 Pager4 WiFi IN4 R2 Pager4 WiFi IN6 R1 Pager4 PRO 2G IN4 R2 Pager4 PRO 2G IN6 R1 Pager4 PRO 3G IN4 R2 P...

Page 2: ...ia USB 13 4 2 3 Remote connecting to devices via cloud service 14 4 2 4 Remote connecting to devices via peer to peer connection 17 4 2 5 Remote connecting to devices which are using the TEX protocol...

Page 3: ...and status query by SMS 81 7 Updating the firmware 83 7 1 Updating via USB 83 7 2 Updating remotely over the internet 84 8 Restoring the factory default settings 84 8 1 Restoring the factory default...

Page 4: ...0 notification templates can be created and assigned to events in order to configure the priorities of reporting channels used for reporting to CMS Configurable Contact ID event codes for each event i...

Page 5: ...eously The WiFi model can only be used with a WiFi network SMS and call based functions are not available in this model since it does not have a GSM modem In turn this model does not require a SIM car...

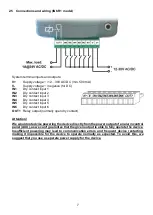
Page 6: ...activate the input choose the NC normally closed option in the given input s settings In this case the input will become activated when the closed contact between the given input IN1 IN4 IN6 and the...

Page 7: ...ontact input 6 OUT1 Relay output normally open dry contact Attention We would not advise powering the device directly from the power output of an alarm control panel AUX as we can t guarantee that the...

Page 8: ...pen the holder 3 Slide the SIM card into the opened part with the contacts facing down as shown in the figure Fold back the opened part together with the SIM card Secure the SIM card by pressing down...

Page 9: ...vice provider and enable the services in the menu or visit one of the service provider s personal customer services and ask to enable these services on the SIM card Check the SIM card to be installed...

Page 10: ...disarmed Service events are such as arming disarming error events periodic test report Custom events are generated by sending any configurable command to the device in a text message Custom events and...

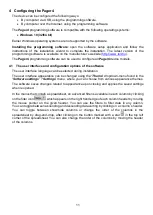
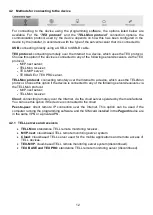
Page 11: ...face language can be selected during installation The user interface appearance can be changed using the Theme dropdown menu found in the Software settings Settings menu where you can choose from vari...

Page 12: ...ver the Internet to a device which uses the TELLMon protocol Choose this option if the device is connected to any of the following servers receivers via the TELLMon protocol MVP next server TELLMon re...

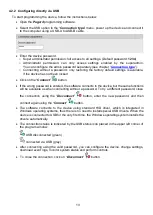
Page 13: ...d the software connects to the device but the same functions will be available as when connecting without a password To try a different password close the connection using the Disconnect button enter...

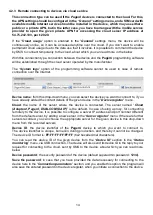
Page 14: ...ready added the contact details of the given device in the Device register menu Cloud the name of the server where the device is connected The server named Cloud Adapter2 Pager4 DUALCOM SIA IP is the...

Page 15: ...ard installed into the device The device accepts the request for connecting to the cloud server from the configured and authorized user phone numbers If the connecting request is sent from an unauthor...

Page 16: ...y default values are configured for this SMS command Specification APN APN PWD device password Configuring the APN APN APN username password PWD device password Configuring the APN along with the user...

Page 17: ...cal network using its local IP address With this connection type a direct peer to peer connection will be established between the device and the Pager4 programming software The System logs option of t...

Page 18: ...ield For the WiFi product model you have to use the WAN IP address of the router to which the device is connected if you want to connect to the device from outside the local network Entering the devic...

Page 19: ...r where the device is connected The server or receiver contact details should be recorded in advance in the Server register menu TEX group ID the CMS identifier of the Pager4 to which you want to conn...

Page 20: ...connection between the device and the Pager4 programming software can be established through the receiver on which the device is online The System logs option of the programming software cannot be use...

Page 21: ...d by the superadmin You can configure the admin password separately see chapter Connection type o Connecting remotely without a password is not possible Click on the Connect button The Pager4 device t...

Page 22: ...n device model i e a Pager4 device has to be connected in order to show the specific settings options of that device model However using the Offline device selector it is possible to view the settings...

Page 23: ...licking on the Change Admin password button for Actual password enter the superadmin password Details in this window you can follow the connection progress Available options Change Admin password You...

Page 24: ...erase the actual settings therefore please save your settings if needed The reset process may take more than 1 minute and involves a device restart Wait until the device restarts and the status LED on...

Page 25: ...register The shortcut will open the software and will initiate a remote connection to the given device automatically If you enter new device contact details in the Connection type menu the program wil...

Page 26: ...e from the servers and receivers recorded there to associate with the given device If a device is available on multiple servers or receivers and you want to record the contact details of the given dev...

Page 27: ...wise you can also enter the IP address manually Device password Confirm device password the superadmin or admin password configured in the given device depending on which one you want to use for conne...

Page 28: ...associating them with the added networks in the Device register menu You can use this option e g for separating the records used for remote access and access in the local network for WiFi devices The...

Page 29: ...used by the receiver TELLMon or TEX If there are devices connected to the receiver mixed through both protocols it is necessary to add the receiver with both protocols separately in the register in or...

Page 30: ...ramming software and enter the company ID of your MVP next account and the username and password configured for the registered Programming software type client application In order to download the dat...

Page 31: ...anges in the settings write the settings into the device by clicking on the Write button Overwriting the device settings If you want to completely overwrite the settings you can import and write data...

Page 32: ...w settings in order to take effect it is necessary to write the new settings into the device by clicking on the Write button This will write the changes only but all changes made in any menu Saving se...

Page 33: ...Internet Ask this from the mobile service provider of the SIM card installed in the device If no APN is configured the device will not try to connect to the Internet In this case you can only use the...

Page 34: ...he device in a better place if necessary If you want to use a static IP instead of DHCP configure the further network settings too in the WiFi section Write the changes into the device by clicking on...

Page 35: ...is control mode if you wish to arm and disarm the device by dry contact impulses e g pushbutton or monostable relay output using up one input This control mode uses input IN4 for the IN4 R2 model or i...

Page 36: ...option is enabled if the arming disarming settings are configured to Always armed Cloud server Cloud usage if this option is enabled the device will connect to the cloud server operated by the manufac...

Page 37: ...s Device name in this field you can enter a custom name for your Pager4 device For the PRO model the system will use this name in the subject of e mail notifications Attention The following characters...

Page 38: ...red limit When the limit is reached a service event will be generated which you can configure separately to control the output s or send notifications The SMS sending daily limit can be disabled and s...

Page 39: ...ration The mobile application can be assigned to the device with the help of a QR code which you can generate by clicking on the QR code button Available options Reading the settings from the device T...

Page 40: ...of mobile device s user The name entered in this section will be used to identify the mobile devices upon selecting the notification channels when configuring events The name should not be longer than...

Page 41: ...ing the settings into the device After changing the settings or entering new settings in order to take effect it is necessary to write the new settings into the device by clicking on the Write button...

Page 42: ...or the TELLMon communication protocol Supervision message interval if supervision message sending is enabled you can configure the interval of message sending from 30 to 86400 seconds for the SIA IP...

Page 43: ...nt acknowledgement options when the device sends a notification by call it requires a confirmation that the notification has been received otherwise it will retry to deliver the notification In this s...

Page 44: ...er by CLIP service which makes it possible to perform further actions automatically upon receiving the call For this an incoming call from user event should be configured for the given phone number at...

Page 45: ...eport to the servers receivers configured as backup The order of reporting to servers and receivers configured as backup in a template corresponds to the numbering 1 to 6 of the channels in the templa...

Page 46: ...xisting template To create a copy of the selected template click on the Clone button Please note that the new copy should have a different unique name Editing an existing template To edit the selected...

Page 47: ...to the device After changing the settings or entering new settings in order to take effect it is necessary to write the new settings into the device by clicking on the Write button This will write the...

Page 48: ...is section you can configure the time for which state changes of the given input will be ignored after arming the device If the given zone is violated during the exit delay input event will not be gen...

Page 49: ...the settings into the device After changing the settings or entering new settings in order to take effect it is necessary to write the new settings into the device by clicking on the Write button Thi...

Page 50: ...y be configured if reporting to CMS is used otherwise select the notification template named EMPTY Event code in this section you can configure the 3 digit Contact ID event code which you want to assi...

Page 51: ...tput can be controlled by pulse series as well The number of pulse series can be configured from 1 up to 3 For each pulse it can be configured how long the output should be activated how long should b...

Page 52: ...devices or e mail addresses when the given input event occurs The device will send the same message for each notification channel SMS Push e mail The device is capable to insert various dynamic data...

Page 53: ...ice To read the settings from the device click on the Read button This will read all settings in all menus Writing the settings into the device After changing the settings or entering new settings in...

Page 54: ...ternet connection restores Most common reasons for this type of error are the following wrong APN configured or the mobile Internet service is not enabled on the SIM card Low supply voltage the device...

Page 55: ...hem in the Incoming call management section Phone numbers in this section you can select the user phone numbers from which incoming calls will generate an incoming call from user event and to which yo...

Page 56: ...ches the limit configured in Megabytes in the Second data usage limit warning field Settings changed this type of event is generated when the Superadmin user changes a protected setting that the Admin...

Page 57: ...configure the control mode of the output or the selected output 1 or 2 in case of the IN4 R2 model Available options None the output will not be used Monostable the output will be activated for the t...

Page 58: ...bile devices enabled with the help of the checkboxes in the drop down list E mail notification Pager4 PRO only in this section you can select the addressees to whom e mail should be sent when the give...

Page 59: ...SMS to the device s phone number Attention Custom commands must be different than the available default SMS commands see chapters Remote control and status query by SMS and Remote connecting to device...

Page 60: ...Alert Open or Alert Open When sending from unauthorized phone numbers Sending one command Alert PWD 1234 or Alert PWD 1234 Sending multiple commands Alert Open PWD 1234 or Alert Open PWD 1234 Availabl...

Page 61: ...n event The software includes a built in event code search tool which contains the list of standard Contact ID codes The search tool opens by clicking on the icon with the question mark symbol placed...

Page 62: ...ailable if an output control mode is selected which has further settings In this section you can configure the additional settings of specific output control modes such as timings for monostable contr...

Page 63: ...aximum 45 characters which you wish to send to the selected phone numbers mobile devices or e mail addresses when the given event occurs The device will send the same message for each notification cha...

Page 64: ...given event can be viewed in the mobile application upon receiving the Push notification Available options Reading the settings from the device To read the settings from the device click on the Read...

Page 65: ...twork it is necessary to replace the local IP address and port in the URL obtained using the ONVIF camera detector program with the external WAN IP address of your router and the external port and aft...

Page 66: ...messages of up to 10 seconds length are supported therefore a longer audio file will be cut automatically Available options Reading the settings from the device To read the settings from the device c...

Page 67: ...ll be selected automatically in the dialog box as well but you can also select a different voice message number using the drop down menu The audio file will be uploaded into the voice message slot sel...

Page 68: ...if configured in the Service events menu whenever the Superadmin makes any changes to any of these protected settings Available options Reading the settings from the device To read the settings from t...

Page 69: ...all menus Write the settings into the device After changing the settings or entering new settings in order to take effect it is necessary to write the new settings into the device by clicking on the W...

Page 70: ...hich affects calls made to the DTMF receiver configured in section TEL2 in the Reporting channels menu The setting also affects the spacing between tones accordingly The value can be set from 50ms to...

Page 71: ...ings 2G or 3G Number of attempts for call and SMS notifications it is possible to configure the maximum number of attempts for sending notifications to users about an event by call or SMS If the numbe...

Page 72: ...nly available when connected via USB In case of remote connection status information can be loaded or updated by clicking on the Query button The states of the control buttons are also updated based o...

Page 73: ...ons with servers receivers Modem status the actual status of the GSM modem Cloud connection the cloud connection status Inputs Outputs IN1 IN4 IN6 the actual state of the contact inputs Output1 Output...

Page 74: ...s button The output remains activated until deactivated manually or by an event which has been configured to control the given output in a way that deactivates it or a power loss occurs Deactivate out...

Page 75: ...ny events you want to see in the list last 10 20 or all Stop monitoring Suspends listing of new events New events will not be listed until event monitoring is restarted Stop pending notifications By c...

Page 76: ...H4 notifications to mobile devices 1 4 by Push notification EMAIL1 EMAIL4 notifications to addressees 1 4 by e mail Legend of notification status shown in the IP1 IP4 DTMF1 DTMF2 TEL1 TEL10 SMS TEL1 T...

Page 77: ...d the system event logs from the device open the Read drop down menu select how many events you want to download from the latest ones 10 20 or all and then click on the Read button You can save the do...

Page 78: ...re settings Extended logging for troubleshooting you can enable this option if you encounter issues with the software If enabled the program records detailed logs while the system operates The program...

Page 79: ...ows the availabilities of the manufacturer the version of the programming software and the path of the data folder where the software stores the logs By clicking on the path the program will open the...

Page 80: ...ow tone beeps 0 Disarm 3 beeps 1 Arm 6 beeps 2 Armed disarmed status query Disarmed 3 beeps Armed 6 beeps 4 GSM signal level query The signal level will be indicated by a number of beeps from 1 to 5 3...

Page 81: ...r x with the desired value If needed use the CRQ and PWD parameter and substitute yyyy with the device password see specifications below R2 ON PWD yyyy CRQ Activating output OUT2 bistable mode IN4 R2...

Page 82: ...using the CRQ parameter Armed the device has been armed Disarmed the device has been disarmed Arming failed the device could not be armed Disarming failed the device could not be disarmed Relay1 activ...

Page 83: ...name is the same as the firmware version number Open the update tool and click on the FIRMWARE button Keep the reset button pressed while connecting the device to the computer via USB and then releas...

Page 84: ...oftware over the cloud 8 Restoring the factory default settings The factory reset process will delete all settings and event logs in the device and will restore the factory default values including th...

Page 85: ...LED will show permanent red light first and then flashing red light until the device creates the clean configuration This process may take up to 1 minute In the meantime you can install the SIM card a...

Reviews: