background image

ASSEMBLY


continued

- 5 -

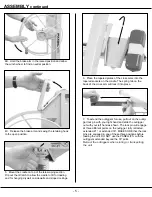
4B.  Hold the brake arm in the raised position and allow 

the winch wheel to find a neutral position.

Pull

6.  Place the tapered plates of the cross arms into the 

tapered sockets on the cradle. The spring tab on the 

back of the cross arm will lock it into place.

7.  To extend the outriggers for use, pull out on the outrig-

ger lock pin with your right hand and slide the outrigger 

out with your left hand as shown. The lock pin will engage 

at three different points on the outrigger: fully retracted, 

extended 21”, or extended 33”. MAKE SURE that the lock 

pins are engaged in one of these three positions before 

loading the unit. DO NOT use the PANELLIFT

®

 with the 

outriggers extended beyond the 33” point.

Retract the outriggers when storing or transporting 

the unit.

4C.  Release the brake arm and swing the retaining hook 

to the open position.

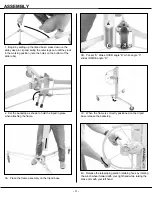
5.  Mount the cradle on top of the telescoping section. 

Flip out the tilt latch to allow the cradle to tilt for loading 

and for hanging drywall on sidewalls and sloped ceilings.

Summary of Contents for PaneL Lift 439

Page 1: ...o Inc All Rights Reserved Form 42 04 00 00 version 2b Read and become familiar with this manual BEFORE operating unit WARNING For Model 439 Before operating this equipment thoroughly read this set of...

Page 2: ...nd or serious bodily injury Operate the PANELLIFT Drywall Lift only on hard flat level sur faces free of obstructions debris clutter pits holes or openings Failure to follow this warning can result in...

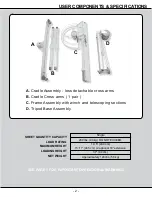
Page 3: ...ght 14 5 439 cm 15 11 485 cm w optional 18 extension Load Rating 200 lbs 90 kg DO NOT EXCEED Sheet Quantity Capacity Single 37 94 cm Approximately 124 lbs 56 kg A B C D A Cradle Assembly less detachab...

Page 4: ...shown to hold the tripod in place when attaching the frame 3A Place the frame assembly on the tripod base ASSEMBLY 4 3B Pocket A slides OVER angle B while angle C slides INSIDE angle D 3C When the fra...

Page 5: ...ft hand as shown The lock pin will engage at three different points on the outrigger fully retracted extended 21 or extended 33 MAKE SURE that the lock pins are engaged in one of these three positions...

Page 6: ...1 To Load Set the backstop on the tripod base to hold the unit in position Extend the cradle outriggers to properly support the drywall tilt the cradle and swing out the cross arm support hooks Load t...

Page 7: ...bottom and sliding the cross arm out of the tapered socket 3 Lock the cradle tilt latch and lift the cradle off of the frame 4 RAISE the retaining hook to engage telescoping sec tions Rotate winch wh...

Page 8: ...winch drive chain should be taut but not overly tight ened as this will exert excess side load on bearings and drive components To achieve correct tension proceed as follows Do not make this adjustme...

Reviews: