you do, be sure the + side is up. To remove the batteries, use a small metal (pointed) tool like a
screw driver or straightened paper clip (sorry, not included).
C)
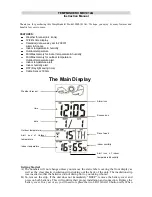
At this point you should see the indoor temperature and humidity as well as the outdoor
temperature. Please note due to variances in electronic components, the two temperatures may
not be exactly the same (+/- 1C even though the probe is indoors at the moment). Showing as
well will be the clock (12:00), month (1), date (1) and day (TU).
D)
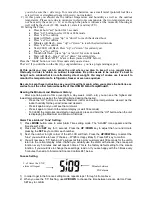
Setting the Time;
Press & hold “set” button for 3 seconds
Press “up” button to select 12hr or 24hr mode
Press “set” to confirm
Hour will flash – press “up” or “down” to reach the desired hour
Press “set” to confirm
Minutes will flash – press “up” or “down” to reach the desired minute
Press “set” to confirm
Year (2008) will flash. Press “up” or “down” for current year
Press “set” to confirm
Month will flash – press “up” or “down” for current month
Date will flash – press “up” or “down” for current date
DST will flash “OFF”. Leave it there (more on DST below)
Press the “Mode” button or wait 30 seconds and you are done.
That’s it! If you did that on the first try, congratulations – you’re a programming expert.
At this point you may wish to place the unit where you plan to keep it on a regular basis.
Obviously in order to obtain an outdoor temperature the probe needs to be outside. It’s best to
hang it out a window that is not affected by direct sunlight. You may of course use it as well to
monitor the temperature of a refrigerator, freezer or even an aquarium.
Be sure to keep these instructions as you will need them again when you replace the batteries as
well as for all the other features/benefits of this HOME® brand TempMinder®.
Reading the Minimum and Maximum History:
After a certain period of time (overnight, a day, week, month, etc) you can see the highest and
lowest temperatures as well as the humidity attained during that period.
- Press the “UP” button to see the Maximum indoor and outdoor temperatures as well as the
indoor humidity for the period (since last cleared).
- Press it again and you will see the minimums
- Press it again to return to the normal display (or wait 30 seconds)
- To CLEAR the memories (and start a new period), press and hold the “UP” button when the unit
is displaying the Maximum and Minimum histories
Alarm Time & Alarm “Tune” Setting:
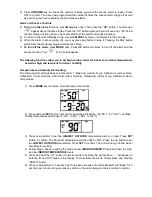
1) Press
MODE
button once to enter Alarm Time setting mode. The “ALARM” icon appears and the
time shows 12:00.
2) Press and hold
SET
key for 3 seconds. Press the
UP /DOWN
key to adjust the hour and minute
pressing the
SET
key to confirm each number.
3) Next, the number in right corner of the 4th LCD will flash. Press the
UP/DOWN
key to select the
“tune” you would like to hear (7 choices – FYI #6 is Happy B’day!!). Press SET key to confirm.
4) You will now see a “05” flashing. We suggest at this point you simply wait 30 seconds for the unit to
return to the normal display mode. If/when you actually use the alarm with snooze, the snooze will
function every 5 minutes and will repeat 3 times. This is the factory default setting for the snooze
function. If you would like to change these settings, read on. If you are happy with the 3 times every
5 minutes, then skip to “Alarm and Snooze Controls #4)” below.
Snooze Setting:
# of times the SNZ
alarm will repeat
Minutes between
SNZ alarms
1) In order to get to the Snooze setting mode, repeat steps 1 through 4 from above.
2) When you see the “05” flashing, use
UP/DOWN
to choose the time between snooze alarms. Press
SET key to confirm.

