background image

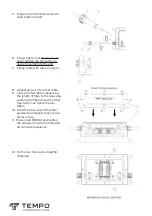
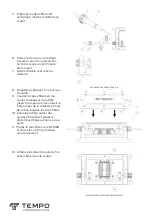
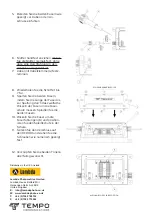
6.  Finger tighten nut. Make sure to 

never tighten the nut without a 
gasket inserted into the port.

7.   Clamp cable with cable clamp (4).

8.  Repeat steps 1-7 for other cable.


tray two times. Splice the two 

!"  

guides (6) and position splice pro-
tector in tray.

11.   Place lid on DFR100 and tighten 

the screws using the recommend-
ed numerical sequence.

#!$    

if desired.

%&"' *&#+,/&
800-642-2155

$9: ;<=*"<
*>?%&<*,@;$ABE%%#GH

www.TempoCom.com

H ?  

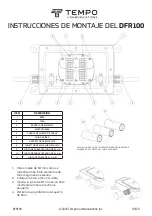
Feed cable into port.

Summary of Contents for DFR100

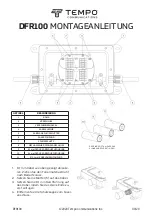
Page 1: ...sket on cable for small DFR100 ASSEMBLY INSTRUCTIONS DFR100 2020 Tempo Communications Inc 09 20 ITEM DESCRIPTION 1 BASE 2 LID 3 SPLICE TRAY 4 CABLE CLAMP 5 CABLE PORT NUT 6 FIBER GUIDE 7 SPLICE PROTEC...

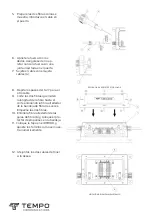
Page 2: ...cable with cable clamp 4 8 Repeat steps 1 7 for other cable tray two times Splice the two guides 6 and position splice pro tector in tray 11 Place lid on DFR100 and tighten the screws using the recom...

Page 3: ...erto EL ANILLO INDICA QUE EL EXTREMO PEQUE O SE INSERTAR PRIMERO EN EL PUERTO DEL CABLE EN LA BASE INSTRUCCIONES DE MONTAJE DEL DFR100 DFR100 2020 Tempo Communications Inc 09 20 ITEM DESCRIPCI N 1 BAS...

Page 4: ...l sujeta cables 4 8 Repita los pasos del 1 al 7 para el otro cable W Y 9 9 Z E W tector de empalmes en la bandeja W apriete los tornillos como se mues tra num ricamente Y _ si lo desea 800 642 2155 9...

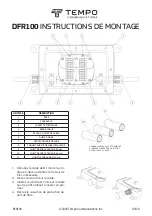
Page 5: ...on du L ANNEAU INDIQUE LE PETIT EMBOUT INS RER D ABORD DANS LE PORT DE C BLE SUR LA BASE DFR100 INSTRUCTIONS DE MONTAGE DFR100 2020 Tempo Communications Inc 09 20 ARTICLE DESCRIPTION 1 BASE 2 COUVERCL...

Page 6: ...nt la 9 E protecteur d pissure dans la cas sette 11 Placez le couvercle sur le DFR100 et serrez les vis tel qu indiqu num riquement ensemble si vous le voulez EMPLACEMENT DE L PISSURE M CANIQUE S QUEN...

Page 7: ...n 4 Entfernen Sie die Schutzkappe vom Faser anschluss DER RING ZEIGT AN DASS DAS KLEINE ENDE ZUERST IN DEN DFR100 MONTAGEANLEITUNG DFR100 2020 Tempo Communications Inc 09 20 ARTIKEL BESCHREIBUNG 1 BAS...

Page 8: ...z in der Schale 11 Setzen Sie den Verschluss auf den DFR100 und ziehen Sie die Schrauben wie numerisch gezeigt fest abel falls gew nscht MECHANISCHE SPLEISSPOSITION SCHRAUBENANZIEHFOLGE 1390 Aspen Way...

Reviews: