background image

19

NOI

TC

UD

OR

TNI

TN

AT

RO

PMI

SN

OIT

UA

CE

RP

ER

OF

EB

NI

GE

UO

Y

LLI

MD

AE

RT

NOI

TA

RE

PO

GNI

NOI

TI

DN

OC

SE

NIL

EDI

UG

GNI

TO

OH

SEL

BU

OR

T

EC

NA

NET

NIA

&

DET

IMI

L

YT

NA

RR

A

W

T940 OM 060506'.indd   19

2006/6/6   8:23:51 AM

Cleanliness of your treadmill and its operation environment will keep maintenance problems and service calls to a 

minimum. For this reason, we recommend that the following preventive maintenance schedule be followed.

AFTER EACH USE (DAILY)

Clean and inspect, following these steps:

•  Turn off the treadmill with the on/off switch, then unplug the power cord at the wall outlet.

•  Wipe down the running belt, deck, motor cover, and console casing with a damp cloth. Never use solvents, as 

they can cause damage to the treadmill.

•  Inspect the power cord. 

•  Make sure the power cord is not underneath the treadmill or in any other area where it can become pinched or 

cut.

•  Check the tension and alignment of the running belt. Make sure that the treadmill belt will not damage any other 

components on the treadmill by being misaligned.

EVERY WEEK

Clean underneath the treadmill, following these steps:

•  Turn off the treadmill with the on/off switch, then unplug the power cord at the wall outlet.

•  Fold the treadmill into the upright position, making sure that the lock latch is secure.

•  Move the treadmill to a remote location.

•  Wipe or vacuum any dust particles or other objects that may have accumulated underneath the treadmill.

•  Return the treadmill to its previous position.

EVERY MONTH - IMPORTANT!

•  Turn off the treadmill with the on/off switch, then unplug the power cord at the wall outlet.

•  Inspect all assembly bolts of the machine for proper tightness.

•  Turn off the treadmill and wait 60 seconds.

•  Remove the motor cover. Wait until ALL LED lights turn off.

•  Clean the motor and lower board area to eliminate any lint or dust particles that may have accumulated. Failure 

to do so may result in premature failure of key electrical components.

• Vacuum and wipe down the belt with a damp cloth. Vacuum any black/white particles that may accumulate 

around the unit. These particles may accumulate from normal treadmill use.

EVERY 6 MONTHS OR 150 MILES

It is necessary to lubricate your treadmill running deck every six months or 150 miles to maintain optimal performance. 

Once the treadmill reaches 150 miles, the console will display the message “LUBE” or LUBE BELT”. The treadmill will 

not operate while the message is showing. Hold Stop for 5 seconds to suspend message for 5 miles. Your treadmill 

came with a bottle of lubricant which can be used for two applications. 

•  Turn  off  the  treadmill  with  the  on/off  switch,  then  unplug  the 

power cord at the wall outlet.

•    Loosen  both  the  rear  roller  bolts.  (For  best  results,  place  two 

removable  marks  on  both  sides  of  the  frame  and  note  roller 

position). Once the belt is loosened, take the bottle of lubricant 

and apply it to the entire top surface of the running deck. Tighten 

both rear roller bolts (matching up the marks for proper position) 

to original position. After you have applied lubricant, plug in the 

power cord, insert the safety key, start the treadmill and walk on 

the belt for two minutes to spread the lubricant.

• Lubricate the air shocks with Teflon based spray.

• Once lubrication is complete, reset the console by pressing and 

holding ‘STOP’ and Speed ‘+’ buttons for 5 seconds.

MAINTENANCE

RUNNING BELT

RUNNING DECK

Summary of Contents for T941

Page 1: ...TREADMILL USER S GUIDE FOR MODEL T941 T940 OM 060506 indd 1 2006 6 6 11 39 05 AM...

Page 2: ...T940 OM 060506 indd 2 2006 6 6 8 23 38 AM...

Page 3: ...simply enjoy a fuller healthier lifestyle This treadmill can help you attain it adding club quality performance to your at home workouts with the ergonomics and innovative features you need to get str...

Page 4: ...ctric shock Check with a quali ed electrician or serviceman if you are in doubt as to whether the product is properly grounded Do not modify the plug provided with the product If it will not t the out...

Page 5: ...he warranty The treadmills are intended for in home use only Do not use this treadmill in any commercial rental school or institutional setting Failure to comply will void the warranty Do not use trea...

Page 6: ...There should be 6 feet of clearance behind the treadmill 3 feet on each side and one foot in front for folding and the power cord Do not place the treadmill in any area that will block any vent or ai...

Page 7: ...re short of breath Do not operate the treadmill if the power cord or plug is damaged If the treadmill appears to not be working properly do not use the treadmill Our Treadmills are heavy use care and...

Page 8: ...h turn the right adjustment bolt counter clockwise 1 4 TURN at a time using the supplied Allen wrench Check the belt alignment Allow belt to run a full cycle to gauge if more adjustment is needed Rep...

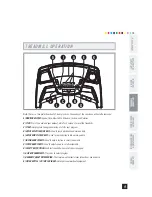
Page 9: ...ach desired speed more quickly E QUICK ADJUST SPEED KEYS Used to reach desired incline more quickly F INCLINE ARROW KEYS Used to adjust incline in small increments G SPEED ARROW KEYS Used to adjust sp...

Page 10: ...he sensor as this may cause damage MANUAL Allows On The Fly manual speed and incline changes Time based goal INTERVALS Walk or run a series of alternating paced speed levels Time based goal ROLLING Cr...

Page 11: ...the QUICK PROGRAM keys MANUAL INTERVALS ROLLING or WEIGHT LOSS SELECT A TIME Select a Time using the ARROW keys or use the default time Once a TIME has been chosen press START QUICK KEY OPERATION Once...

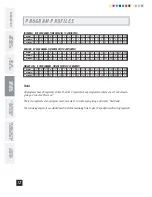
Page 12: ...MINUTES 1 2 3 4 5 6 7 8 9 10 11 12 13 14 15 16 17 18 19 20 2 2 2 2 2 3 4 5 4 3 2 3 4 5 4 3 3 2 2 2 3 3 3 3 3 4 5 6 7 5 6 4 5 3 4 5 6 7 5 6 4 5 4 5 3 3 3 SEGMENT SPEED MPH SPEED KMH WEIGHT LOSS SPEED C...

Page 13: ...imes If you ve been sedentary during the past year it may be a good idea to keep your exercise times to as little as five minutes initially Your body will need time to adjust to the new activity If yo...

Page 14: ...orking out at a Target Heart Rate Zone of between 60 and 75 of your maximum heart rate A beginner will want to workout in the 60 range while a more experienced exerciser will want to workout in the 70...

Page 15: ...wall with the toes of your left foot about 18 from the wall and the right foot about 12 behind the other foot Lean forward pushing against the wall with your palms Keep your heels at and hold this po...

Page 16: ...ur primary goal for exercising to lose weight Improve muscle Reduce stress Prepare for the spring racing schedule Knowing what your goals are will help you develop a more successful exercise program B...

Page 17: ...s placed close to a wall there will be more re ected noise TROUBLESHOOTING TREADMILL Your treadmill is designed to be reliable and easy to use However if you experience a problem please reference the...

Page 18: ...reathing heavily during a workout When your hands are constricted by wearing a ring When your hands are dry or cold Try to moisten your palms by rubbing them together to warm Anyone with heavy arrhyth...

Page 19: ...f switch then unplug the power cord at the wall outlet Inspect all assembly bolts of the machine for proper tightness Turn off the treadmill and wait 60 seconds Remove the motor cover Wait until ALL L...

Page 20: ...D HOME USE WARRANTY Incidental or consequential damages TEMPO Fitness is not responsible or liable for indirect special or consequential damages economic loss loss of property or pro ts loss of enjoym...

Page 21: ...e Horizon Fitness Vision Fitness producten zijn recycleerbaar Breng het apparaat aan het einde van de gebruiksduur voor recycling naar een vakkundig verzamelpunt E Informaciones para la evacuaci n Los...

Page 22: ...T940 092007 T940 OM 060506 indd 22 2006 6 6 8 23 52 AM...

Reviews: