
5
4
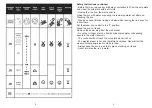
Ironing Temperature Guides
1 - Always follow the ironing instructions on the garment label. If these
instructions are missing but you do know what fabric the garment is made
from, check the table for directions.
2 - The Table is valid for garments only and is not applicable to any
applied finish, gloss etc. Textiles to which some kind of finish (gloss, wrin-
kle, relief etc) has been applied, are best ironed at lower temperatures.
3 - Sort the laundry according to ironing temperature required. Eg wool
items together, cotton with cotton etc.
4 - The Iron heats up quicker than it cools down. Therefore always start
ironing garments that require lower temperatures first such as synthetics.
5 - If the garment is made of a mixture of fabrics, select the fabric that
requires the lowest ironing temperature and set the Iron at this setting.
6 - If you do not know what fabric the garment is made from, find a spot
on the garment that will not show when wearing or using the garment.
Starting at the lower temperatures, increase heat till good results are
achieved.
7 - Pure woollen fabrics (100% wool) may be pressed with the Iron set
to a steam position. Preferably set the steam control (B) to the maximum
position and use a dry pressing cloth.
8 - When steam ironing woollen fabrics, marks can appear on the fabric.
To avoid this, either use a pressing cloth or turn the articles inside out and
iron the reverse side.
9 - Velvet and other fabrics which can rapidly acquire shiny spots should
be ironed in one direction only with light pressure. Always keep the iron
moving while ironing.
10 - When ironing silk or synthetic materials, iron the reverse side and do
not use sprays as they could stain.
Filling with Water (for steam ironing and spraying)
1 - Remove the power plug from the wall socket before filling (or empty-
ing) the iron with water.
2 - Set the steam control (B) to “0” position.
3 - Fill the filling cup with water (max 200ml), tilt the iron slightly and pour
the water into the filling aperture till the iron reaches maximum level.
4 - Use normal tap water when using for the first time.
5 - After initial use, distilled water may be used if the tap water is very
hard.
Do not put vinegar, starch, chemically descaled water or des-
caling agents in the water resevoir.
Setting the Temperature
1 - Stand the iron on its end.
2 - Set the temperature control (A) to the correct ironing temperature.
3 - Insert the power plug into the wall socket.
4 - After the temperature pilot light (I) has first gone out, you may start
ironing. The pilot light will come back on from time to time during ironing.
5 - If you set the temperature to a lower setting after ironing at a high tem-
perature, do not begin ironing untill the pilot light (I) has come on and then
turned off again. Otherwise you may scorch the fabric as the iron will still
be too hot.
Steam Ironing
1 - To iron without steam, set the steam control (B) to position “0”.
2 - Ensure there is enough water in the water reservoir prior to using
steam.
3 - Set the steam control;
Use the “0” (no steam) when ironing at temperatures between MIN and • •
Steam setting for temperature settings between • • and • • •
Maximum steam setting for temperatures between • • • and MAX.
Water may leak from the sole plate if too low a temperature is select-
ed for the steam setting.