background image

.01.

INSTRUCTION MANUAL

Please removed all packaging, stickers and films from the products surface and clean the 

product’s surfaces with a damp cloth and mild deturgent before using for the first  time.


Let the appliance stand upright for approximately 

24

 hours before connecting it to the 

power source, which helps to reduce the possibility of a cooling-system malfunction from 
handling during transportation.

Before  using  your  Wine Coolers,  please  carefully  read  this  instruction  manual  
in  order  to  maximize  its  performance.  Store  all documentation for subsequent 
use  or  for other  owners.This product is intended solely for household use or similar 
applications such as:
--the kitchen area for personnel in shops, offices and other working environments
--on farms, by clientele of hotels, motels and other environments of a residential type
--at bed and breakfasts (B & B)
--for catering services and similar applications not for retail sale.
 This appliance is intended to be used exclusively for the storage of wine or beverage, 
any other use is considered dangerous and the manufacturer will not be responsible for 
any omissions. Also, it is recommended that you take note of the warranty conditions.

 ENERGY SAVING AND ECOLOGICAL PROTECTION

Please pay attention to the following special instructions for saving energy 
and ecological protection: 

(a)  The most energy-saving configuration requires shelves to be 
positioned in the appliance, please refer to the corresponding pictures in 
the manual.
(b)  Please follow all the instructions in this manual on where and how 
to store wines in a the appliance for best preservation over the longest 
period, to avoid food waste;
(c)  Please follow all the instructions in this manual on the recommended 
setting of temperatures in each compartment for optimum food 
preservation.
(d)  An estimation of the impact of temperature settings on food waste: for 
the best storage time of wines, please consult your wine labels; the best 
storage time may reduce under other un-recommended temperature 
settings.
(e)  The appliance has no special modes and features that can affect 
temperatures.
(f)  This appliance is intended to be used exclusively for the storage of 

Summary of Contents for Sommelier SOM180DRB

Page 1: ...ation instructions of the appliances Please read it carefully before use and follow all safety information instructions It is recommended to keep this manual for easy reference so that you can be familiar with the operation of the appliance V2 2021 USER MANUAL Wine Coolers ...

Page 2: ...ATE 14 WINE STORAGE 15 CONTROL PANEL Control In Cabinet 16 POWER ON OFF CONTROL 16 UNLOCKING THE CONTROL PANEL 16 INTERIOR LIGHTING ON OFF CONTROL 17 TEMPERATURE DISPLAY WINDOW 17 TEMPERATURE SETTING 17 SELECTING FAHRENHEIT ºF CELSIUS ºC DISPLAY 18 FUNCTION INDICATING LIGHT 18 SELECTING ENERGY SAVING MODE FOR SOMPRO120SRB 19 CONTROL PANEL Control On Door 19 POWER ON OFF CONTROL FOR SOMZ45SB 19 UNL...

Page 3: ... Power Failure 24 Vacation Time 24 Disconnecting From Power 25 TROUBLESHOOTING 26 REVERSE THE DOOR SWING 26 Undercounter wine cooler 31 SOMPRO120SRB AND SOM180DRB 35 REMOVABLE FRONT GRILL INSTALLATION 37 OTHER LANGUAGE USER MANUAL ...

Page 4: ...age of wine or beverage any other use is considered dangerous and the manufacturer will not beresponsiblefor anyomissions Also itisrecommendedthatyoutakenoteofthewarrantyconditions ENERGY SAVING AND ECOLOGICAL PROTECTION Please pay attention to the following special instructions for saving energy and ecological protection a The most energy saving configuration requires shelves to be positioned in ...

Page 5: ... a minimum period of seven years and door gaskets for a minimum period of 10 year after placing the last unit of the model on the market m The minimum duration of the guarantee of the refrigerating appliance offered by the manufacturer importer or authorised representative Minimum guarantee is 5 years for Norway Sweden Finland and Denmark n For appliances with climate class Extended temperate this...

Page 6: ...ll it from the wall outlet Never pull out by the cord It is recommended that a separate circuit serving only your appliance be provided Unplug the appliance or disconnect power before cleaning maintenance or servicing Failure to do so can result in electrical shock or death If the supply cord is damaged it must be replaced by the manufacturer or its service agent or a similarly qualified person in...

Page 7: ... packaging indicates that this product is not to be handled as normal household waste and it is to be taken to a recycling collection point for electrical and electronic goods This appliance can be used by children aged from 8 years and above and persons with reduced physical sensory or mental capabilities or lack of experience and knowledge if they have been given supervision or instruction conce...

Page 8: ...portable socket outlets or portable power suppliers at the rear of the appliance WARNING To avoid a hazard due to instability of the appliance it must be fixed in accordance with the instructions SCRAPPING OLD APPLIANCES This appliance is marked according to the European directive 2012 19 EU on Waste Electrical and Electronic Equipment WEEE WEEE contains both polluting substances which can cause n...

Page 9: ... all of European safety health and environmental requirements stated in the legislation for this product Energy Saving Always ensure good ventilation Do not cover ventilation opening or grille Always keep fan louvers clear Do not place appliance in areas of direct sunlight or close to a stove heather or similar object Open or keep the doors open as little as possible Remove dust present on the rea...

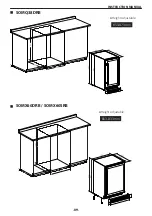
Page 10: ...into the kitchen cabinet please unscrew the original 4 leveling feet in white and screw the 2 short leveling feet in black which are packed as the accessory to the front bottom of the unit 2 Tighten the 2 screws to fix the Bottom Mounting Bar which has been fixed on the bottom of the unit to the kitchen cabinet 3 For a firmly fixing of the unit you can install an extra Top Mounting Bar which is an...

Page 11: ... 08 INSTRUCTION MANUAL SOMX15SRB SOMX30DRB 813 863mm Height Adjustable Height Adjustable 813 833mm ...

Page 12: ... 09 INSTRUCTION MANUAL SOMQ38DRB Height Adjustable 853 873mm SOMX60DRB SOMX60SRB Height Adjustable 813 833mm ...

Page 13: ... 10 INSTRUCTION MANUAL SOM2DX60DRB SOMPRO120SRB Height Adjustable 813 833mm ...

Page 14: ...efore connecting it to the power source which helps to reduce the possibility of a cooling system malfunction from handling during transportation Use a soft cloth to clean the interior surface with lukewarm water For all models except SOMZ45SB IMPORTANT The front louver at the base of the appliance is for ventilation Nothing should be placed in front of this front louver otherwise your Wine Cooler...

Page 15: ... We recommend that two people carry out this procedure o The height must be adjusted prior to building the appliance into the housing unit and it should be set at such a height that the top panel of the appliance fits exactly below the kitchen worktop o Tilt the appliance approximately 60 to allow access to the adjustable feet o Take care to ensure the cabinet is supported at all times o Twist the...

Page 16: ...ptional function If your Wine Cooler has such function a key should be attached inside the packing of this Manual Insert the key into the lock and turn it counter clockwise to unlock the door To lock it please turn clockwise Please save the key well OPERATING THE WINE COOLER WORKING CLIMATE The appliance is designed for operating from SN to T climate see below climate class chart It is recommended...

Page 17: ...asket make sure to have the door opened fully all the way before pulling the shelves out Please store wine in sealed bottles Do not cover the shelves with aluminum foil or any other shelf material which may prevent air circulation If the wine cooler is left empty for long periods switch off defrost clean dry and leave the door open to prevent mould developing within the appliance Pay attention to ...

Page 18: ...lus E Temp Minus F Lock Unlock G Function Indicator H ºC ºF Switch A B D C E F G H For SOMX30DRB SOMQ38DRB SOMX60DRB SOM180DRB A Power B Lighting C Upper Zone Display Window D Temp Plus E Temp Minus F Lock Unlock G ºC ºF Switch H Function Indicator 1 I Lower Zone Display Window J Function Indicator 2 K Zone Select A B D C E F G H I J K ...

Page 19: ...ease do not turn on the appliance again within 5 minutes after you turn it off UNLOCKING THE CONTROL PANEL To unlock the control panel touch the power mark and lighting mark with 2 fingers at the same time and hold for 3 seconds When unlocked a buzz sound will be heard The control panel will be automatically locked with a buzz sound heard after 10 seconds without being touched Under the locked con...

Page 20: ...mperature you have set TEMPERATURE SETTING For SOMX15SRB SOMX60SRB SOM2DX60DRB SOMPRO120SRB The default temperature setting range is 5 20 ºC 41 68 ºF Touch the mark to increase the set temperature by 1ºC or by 1ºF On the contrary touch the mark to decrease the set temperature by 1ºC or by 1ºF For SOMX30DRB SOMQ38DRB SOMX60DRB SOM180DRB The default temperature setting ranges are 5 12 ºC 41 54 ºF fo...

Page 21: ...wer zone starts to work SELECTING ENERGY SAVING MODE FOR SOMPRO120SRB Display screen mode setting When system is in locked state steadily press the mark for 3 seconds with a sound of buzzer beeping the indicator LED8 will light up indicating that system has changed to screen off mode In the same way the indicator LED8 will be extinguished with a sound of buzzer beeping when system has been switche...

Page 22: ...er the unit beeps once hold the power button for 3 seconds and your wine cellar will shut itself off Once the wine cellar has been turned off please allow at least 5 minutes before starting up again This will limit excessive wear on the compressor Warning To avoid damaging the compressor please do not turn on the appliance again within 5 minutes after you turn it off UNLOCKING THE CONTROL PANEL FO...

Page 23: ...SB Set For Single Zone Press to set temperature The digital flashes to inform the accessibility to adjust setting Temp Up Press to increase setting temperature by 1o Temp Down Press to decrease setting temperature by 1o TEMPERATURE DISPLAY WINDOW FOR SOMZ45SB Display Window is on Display Window is Off Actual temperature of the wine cellar Set temperature of the wine cellar ...

Page 24: ... AND MAINTENANCE CLEANING THE WINE COOLER Clean regularly surfaces of the wine coolerto avoid contamination of wines Turn off the power unplug the appliance and remove all items including shelves Wipe the inside surfaces with a sponge and baking soda solution The solution should be about 2 tablespoons of baking soda to 1 quart approx 1 litre of warm water Wash the shelves with a mild detergent sol...

Page 25: ...off from the 4 Locating Pins of Telescopic Rail Stopper Locating Pin Cut Carbon Filter Change Option A good ambient air quality is important for wine maturing The Carbon Filter is very helpful to absorb odor and improve air quality For the models with Carbon Filter we suggest to replace it once a year Pls contact your dealer to get the filter Removing the Carbon Filter o Hold the Carbon Filter and...

Page 26: ...ion you should follow the steps outlined below o Remove all items from the Wine Cooler o Securely tape down all loose items such as the shelves inside of the appliance o Turn the adjustable foot up to the base to avoid damage o Tape the door closed o Ensure the appliance stays secure in the upright position during transportation Also protect the outside of the appliance with a blanket or similar i...

Page 27: ...d switch off the appliance o The interior should be cleaned with a solution of bicarbonate of soda and lukewarm water o The interior should then be thoroughly dried o To prevent mould growth the door should be left slightly ajar Disconnecting From Power o If the unit is unplugged or there is a power cut you must wait for 5 minutes before restarting Attempting to restart the Wine Cooler before 5 mi...

Page 28: ...s not closed completely The temperature control is not set correctly The door gasket does not seal properly 4 The lighting does not work Not plugged in The circuit breaker tripped or a blown fuse The lighting is turned off 5 Too much vibration Check to assure that the appliance is level Check to assure no parts inside the cabinet or in the compressor chamber are loose 6 The wine cooler seems to ma...

Page 29: ...an Upper Left Hinge and a Bottom Left Hinge All removed parts is suggested to be saved in case of door re reversal Undercounter wine cooler Include models SOMX15SRB SOMX30DRB SOMQ38DRB SOMX60SRB and SOMX60DRB 1 Open the door and loosen the 2 screws from Pivot Hinge of the Bottom Right Hinge 60o Min Bottom Right Hinge Screw Pivot Hinge 2 Carefully remove the door from the Upper Right Hinge and prev...

Page 30: ...stallation Upper Right Hinge Bottom Right Hinge 4 Pull out the 6 Plastic Caps at the front left corner of the cabinet And move them all to the right side Plastic Caps 6pcs 5 Install the Upper Left Hinge and Bottom Left Hinge to the left side of the cabinet Make sure the screws are tightened Upper Left Hinge Bottom Left Hinge ...

Page 31: ...p 7 Remove the Handle Hole Cap 2pcs on the right side of Door by prying it out gently with small flat screwdriver Handle Hole Cap 8 Gently pull the door gasket to one side to reveal the Handle Screws 2pcs on the left side of the Door Unscrew it with a cross screwdriver and Remove the Handle Leave the Washers as where it is ...

Page 32: ...dle Screw Washer Handle 9 Install the Handle to the right side of the door by screwing tightly the Handle Screws 2PCS Handle Washer Handle Screw 10 Push the Handle Hole Cap 2pcs into the Handle Holes on the left side of the Door ...

Page 33: ...Handle Hole Cap 11 Insert the Pivot Hinge into the bottom hinge hole of the door Pivot Hinge 12 Install the door to the left hinge side by tightening the Pivot Hinge with the 2 screws Pivot Hinge Screws 2pcs Bottom Left Hinge ...

Page 34: ...crewdriver Remove the Upper Hinge by unscrewing the Hex Head Srews 4pcs Now carefully lift the Door off the Bottom Hinge with your assistant and gently set it aside It is important to keep the Hinge Washer on the top of Bottom Hinge for re installation Hole Cover Upper Hinge Cover Hex Head Screw 4pcs Upper Hinge Door 2 Move the Hinge Hole Cap at the top of the door from the left side to the right ...

Page 35: ... Hex Head Screw 4pcs Pan Head Screw 4pcs Bottom Hinge Hinge Washer Hinge Washer Bottom Hinge Pan Head Screw 4pcs 4 Hold the Door carefully with your assistant and place it on the top of Bottom Hinge make sure the Pivot Hinge is at correct place through the Hinge Washer Insert the pin of the Upper Hinge into the Bushing on the top right and fix it with Hex Head Screw 4pcs Cover the Upper Hinge and ...

Page 36: ... prying it out gently with small flat screwdriver Handle Hole Cap 6 Gently pull the door gasket to one side to reveal the Handle Screws 2pcs on the left side of the Door Unscrew it with a cross screwdriver and Remove the Handle Leave the Washers as where it is Handle Screw Washer Handle ...

Page 37: ...AL 7Install the Handle to the right side of the door by screwing tightly the Handle Screws 2PCS Handle Washer Handle Screw 8 Push the Handle Hole Cap 2pcs into the Handle Holes on the left side of the Door Handle Hole Cap ...

Page 38: ... by arrows and marked as A in Fig 14 Then locate the four black fitting screws These are packaged inside the appliance with the door reversing hinge 5 If present remove the screws shown by arrows and marked as B in Fig 15 These are not needed 6 Offer up the plinth ensuring it is the same way up as per Fig 16 Then using a magnetic tipped screwdriver insert two of the black fitting screws through th...

Page 39: ... 36 INSTRUCTION MANUAL ...

Page 40: ...lowing the steps below Perform these steps once the appliance is standing on all four feet and do not put weight on the plinth 1 Loosen the two screws on each side of the plinth trim four altogether Fig 17 2 Carefully guide the front trim down until the desired height is achieved Tighten the screws Fig 17 You can find Norwegian Swedish Finnish and Danish user manual from below website 1 You can do...

Reviews: