background image

TEMPUR-Choice

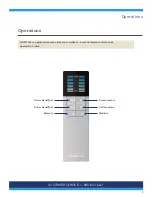
The following table lists the function of each remote control button. 

Button

Function

Medium

This function lets you adjust to a neutral position, which adjusts to 
your unique body weight and shape. 

Lie down on the mattress. Wake the remote by touching any 
button. Press the 

medium

 button once. Each of the air chambers 

on your side will adjust to a neutral position. The remote remains 
lit. The MED letters on the screen blink while the chambers adjust.

Once the bed has finished adjusting to the neutral position, the 
remote light turns off.

Lumbar

This function lets you adjust the lumbar zone. 

Focus on your lumbar area and decide from a comfort perspective 
how you want your Lumbar zone to feel. For example, slightly 
firmer or slightly softer. To find your preference, make the following 
adjustments: 

Wake the remote by pressing any button. Press the up or down 
arrow on the 

lumbar

 button until you have reached the preferred 

setting for the Lumbar zone. 

Release the button. The Lumbar zone begins adjusting. Once you 
have reached your ideal level of comfort, press the opposite action 
on the lumbar button to stop the adjustment. For example, if the 
Lumbar zone is getting firmer, press the down arrow to stop the 
action.

Head/Foot

This function lets you adjust the Head/Foot zones. 

Wake the remote by pressing any button. 

Press the up or down arrow on the 

head/foot

 button until you 

have reached the preferred setting for the Head/Foot zones.

Release the button. The Head/ Foot zones begin adjusting. 
Once you have reached your ideal level of comfort, press the 
opposite action on the head/foot button to stop the adjustment. 
For example, if the Head/Foot zone is getting softer, press the up 
arrow to stop the action.

Memory

This function programs your personalization preferences into 
memory. 

Wake the remote by pressing any button. Press and hold the 

memory

 button until MED on the screen blinks once. This sets 

and keeps the current position as your preferred personalization 
settings.

10

CUSTOMER SERVICE: 1–800–821–6621

Summary of Contents for TEMPUR-Choice Luxe

Page 1: ...User Guide TEMPUR Choice TEMPUR Choice Supreme TEMPUR Choice Luxe Patents pending 2013 Tempur Pedic Management LLC All Rights Reserved Rev 1 0313 ...

Page 2: ...Contents DELIVERY AND SETUP PROCEDURE 3 INSTALLATION OVERVIEW 5 INSTALLATION 6 OPERATIONS 9 SAFETY PRECAUTIONS 12 COMMONLY ASKED QUESTIONS AND ANSWERS 14 TROUBLESHOOTING 15 TEMPUR Choice ...

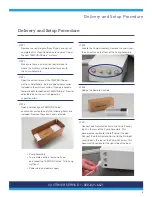
Page 3: ...P 4 Open and check your TEMPUR Choice accessories carton to verify the following items are included Remove these items and set aside Pump Assembly Two remote controls only one if you purchased the TEMPUR Choice Twin Long mattress Power cord and power supply Delivery and Setup Procedure STEP 5 Locate the Pump Assembly Remove the caps from the air nozzles on the front of the Pump Assembly STEP 6 Unb...

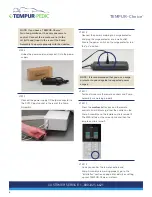
Page 4: ...outlet Ensure the power switch on the surge protector is in the on position NOTE It is recommended that you use a surge protector to guard against unexpected power surges STEP 11 Test and make sure the remote controls and Pump Assembly are working properly STEP 12 Press the medium button once on the remote controls Air will discharge from the nozzles on the Pump Assembly and the remote controls re...

Page 5: ...r Assembly Includes one Pump Assembly and one Remote Control Two built in hoses are also included Split King two individual multi zone Air Chamber Assemblies Includes two Pump Assemblies and two remote controls Split Kings consist of two Twin Long mattresses placed side by side Complete the assembly of one mattress assemble the second and then place them together on your bed frame Four built in ho...

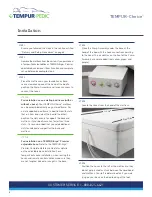
Page 6: ...to step 3 STEP 3 Place the mattress on your foundation or base Leave clearance space at the head of the bed to position the Pump Assembly and for easy access to connect the hoses STEP 3A For installation on an existing bed frame with or without a base Your TEMPUR Choice mattress can be assembled directly on your bed frame For a slat supported bed frame a bed frame with slats that run from one side...

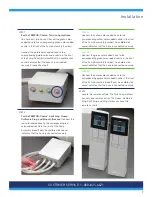
Page 7: ...indicates that the hose is connected securely STEP 8A Connect the yellow color coded hose to the corresponding yellow color coded nozzle in the front of the Pump Assembly Lumbar An audible click sound indicates that the hose is connected securely STEP 8B Connect the green color coded hose to the corresponding green color coded nozzle in the front of the Pump Assembly Lumbar An audible click sound ...

Page 8: ...ueen California King and King mattresses Connect one remote control to the LH left hand input in the rear of the Pump Assembly Connect the other remote control the RH right hand input in the rear of the Pump Assembly You are now ready to operate your new TEMPUR Choice mattress Refer to Operations on page 9 to proceed 8 CUSTOMER SERVICE 1 800 821 6621 ...

Page 9: ...You can personalize each side of your mattress only one remote control can be operated at a time Firmer Head Foot Firmer Lumbar Softer Head Foot Softer Lumbar Memory Medium 9 CUSTOMER SERVICE 1 800 821 6621 Operations ...

Page 10: ...ave reached the preferred setting for the Lumbar zone Release the button The Lumbar zone begins adjusting Once you have reached your ideal level of comfort press the opposite action on the lumbar button to stop the adjustment For example if the Lumbar zone is getting firmer press the down arrow to stop the action Head Foot This function lets you adjust the Head Foot zones Wake the remote by pressi...

Page 11: ...owever this smell can still be noticeable It usually disappears after a few weeks PRODUCT CARE You can unzip and remove the mattress cover to wash it We do not recommend using conventional mattress pads or mattress covers as they can affect the full pressure relieving experience of our proprietary TEMPUR material However Tempur Pedic branded mattress protectors have been specifically designed to p...

Page 12: ...ing on or taking off parts Provide supervision when this furnishing is used by or near children invalids or disabled persons Use this furnishing only for its intended use as described in these instructions Do not use attachments not recommended by the manufacturer Never operate this furnishing if it has a damaged cord or plug is not working properly has been dropped or damaged or dropped in water ...

Page 13: ...intenance free for the user Therefore you are encouraged not to open any components alter the wiring or adjust modify or change the structure of the product as it will void the warranty POWER RATINGS T3 15A 250V MODEL NO F150602 B INPUT AC 100 240 1 8A 50 60 HZ OUTPUT 12 16V 5 0 MAX 60W 12V 50A Small Children and Pets Warning After your TEMPUR Choice mattress has been unboxed immediately dispose o...

Page 14: ...amount of air in the Air Chamber Assembly The temperature in your home can also impact changes in your settings WHERE S THE SERIAL NUMBER ON THE TEMPUR CHOICE MATTRESS The serial number can be found on the law tag attached to the cover and the power supply The serial number is also located on a sticker on the back cover of this guide WHY DOES MY MATTRESS FEELS LIKE IT IS LOSING AIR Make sure the h...

Page 15: ...erify the following you hear the Pump Assembly initialization and the remote controls are powered up If you cannot verify these processes the power supply might be defective Remote Controls are not working Verify that the remote control outputs are connected properly to the inputs LH RH in the rear of the Pump Assembly If remote controls do not operate after checking connections contact Tempur Ped...

Page 16: ...FOR TECHNICAL SUPPORT OR SERVICE QUESTIONS ABOUT YOUR TEMPUR CHOICE MATTRESS 1 800 821 6621 Serial Number ...

Reviews: