background image


Chapter 1 Product Introduction 

1.1 Overview   

The Wireless USB Adapter of W311M series adopts 11n technology, which makes the wireless transmission speed 

up to 150Mbps. It supports soft AP function. That means you can use it as an AP. Installing this product with a 

desktop PC or a notebook establishes a cost-effective wireless network swiftly and conveniently. The compactness 

design makes you take it everywhere. 


  W311M                              W311Ma                                      W311MI 

1.2


Features 


Up to 150Mbps wireless speed 


Complies with IEEE 802.11b, IEEE 802.11g, and IEEE 802.11n standards 


Supports soft AP feature 


USB2.0 port 


Detects wireless network and adjusts transmitting rate automatically                                                                                                               


Provides two working modes: Infrastructure and Ad-Hoc 


Complies with Windows XP/ Windows 2000/ Windows 7/ Windows 8/ Windows Vista 

1.3


LED 

(W311M and W311Ma are equipped with a LED indicator, but W311MI is not.) 

Solid

: Indicates the wireless adapter works properly. 

Blinking

: Indicates the wireless adapter is transmitting data. 

Off

: Indicates the wireless adapter works improperly. 

Summary of Contents for W311M

Page 1: ......

Page 2: ...in any form or by any means without the prior written permission of Shenzhen Tenda Technology Co Ltd Disclaimer Pictures images and product specifications herein are for references only To improve internal design operational function and or reliability Tenda reserves the right to make changes to the products without obligation to notify any person or organization of such revisions or changes Tenda...

Page 3: ... WLAN Program 8 Windows 7 8 Windows 8 10 3 3 Via WPS 10 By WPS Button Available for W311M W311Ma 10 PBC Connection 11 PIN Code Connection 13 Chapter 4 Tenda WLAN Utility 17 4 1 STA Mode 18 Available Networks 19 Link Information 21 Profile 22 Advanced 32 About 32 Help 33 4 2 AP Mode 33 AP Setup 34 Advanced 34 Access Control 35 Connected Devices 36 4 3 STA AP Mode 36 AP 37 Appendix 1 Disable Other W...

Page 4: ...allation 1 This user guide may instruct you to install and configure the device Please read carefully before you start to use this product 2 To avoid possible network conflicts between this Tenda network adapter and those of other manufactures it s recommend that you first disable the network adapters of other manufacturers before installing the driver See Appendix 1 Disable Other Wireless Adapter...

Page 5: ...here W311M W311Ma W311MI 1 2 Features Up to 150Mbps wireless speed Complies with IEEE 802 11b IEEE 802 11g and IEEE 802 11n standards Supports soft AP feature USB2 0 port Detects wireless network and adjusts transmitting rate automatically Provides two working modes Infrastructure and Ad Hoc Complies with Windows XP Windows 2000 Windows 7 Windows 8 Windows Vista 1 3 LED W311M and W311Ma are equipp...

Page 6: ...3 1 4 Button W311M and W311Ma are equipped with a WPS button but W311MI is not WPS button Press it to do a WPS pair with a remote device AP router ...

Page 7: ...rt the Wireless USB Adapter into a USB port of your computer desktop or laptop 2 2 Driver and WLAN Utility Installation After you have finished the physical installation install the driver and Tenda WLAN Utility for a perfect experience 1 Insert the included CD in your PC s CD ROM drive and the CD will run automatically if not double click Tenda exe file attached to the CD Click RUN to start setup...

Page 8: ...5 2 Check I accept the terms of the license agreement and click Next 3 It is recommended to choose Install driver and Tenda WLAN Utility setup And click Next ...

Page 9: ...6 Installing 4 Install Shield Wizard completely Click Finish to get setup done To activate the setup it is recommended to restart your computer now 5 Tenda WLAN utility will run automatically ...

Page 10: ...LAN utility Windows built in WLAN program or WPS feature 3 1 Via Tenda WLAN Utility 1 Click icon to display the available wireless networks 2 Double click the wireless network you will connect Or select the wireless network and click icon and click icon to continue ...

Page 11: ...network requires wireless password Input it and click icon to continue 4 Connected successfully 3 2 Via Windows Built in WLAN Program Windows 7 1 Left click Network or icon on the lower right corner of desktop to display the available wireless networks ...

Page 12: ...9 2 Select a wireless network you want to connect click Conncet and do as the screen prompts Connected successfully ...

Page 13: ...r STA Mode by WPS WPS setting supports PBC and PIN code modes The operations below are for references By WPS Button Available for W311M W311Ma W311M and W311Ma are equipped with a WPS button W311MI is not Process 1 Enable the WPS feature of the remote AP or router and press the WPS button on it 2 In two minutes press the WPS button on the wireless adapter 3 Wait the wireless adapter for getting an...

Page 14: ...WPS PBC feature of the remote router The detailed operations see router manual 2 Double click icon on the desktop to enable Tenda WLAN utility And click icon 3 Click icon to add a WPS profile 4 Select Push Button of WPS Method and click icon ...

Page 15: ...12 5 Click button to start PBC connection The wireless adapter gets an IP address from the remote AP router Connection between the remote AP router and the wireless adapter is established successfully ...

Page 16: ...13 PIN Code Connection Process 1 Click icon 2 Select PIN of WPS Method select the remote AP you want to PIN from the WPS AP List And click icon ...

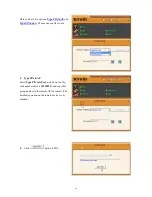
Page 17: ... below Choose one you like to use 3 Type PIN in AP Select Type PIN in AP and note down the Pin code number here is 19559032 and copy this group number to the remote AP or router The detailed operation on the remote device see its manaul 4 Click button to PIN ...

Page 18: ...essfully 3 Type PIN below Select Type PIN below and copy the PIN code number from the remote AP or router into the Pin Code field of the wireless adapter And click icon 4 Click button to PIN WPS Profile If you click this button instead of clicking you can PIN to the remote device by customizing the encryption method The details see Appendix 2 WPS Profile ...

Page 19: ...d successfully 1 Under the WPS connection mode when multiple routers simultaneously enable the WPS function it may cause connection failure 2 If the router connects to the adapter using the WPS only one client can be connected at one time and so if the router needs to connect to multiple clients through WPS you should repeat the WPS operation Note ...

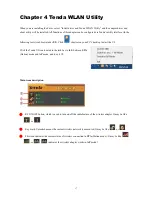
Page 20: ...ut on your PC s desktop to start the UI Click the Tenda UI icon located in the task bar to shift between STA Station mode and AP mode and to exit UI Main icons description RF ON OFF button which is used to turn on off the radio feature of the wireless adapter It may be like or Key mark Unlocked means the current wireless network is unsecured It may be like or This icon indicates the current status...

Page 21: ...tion icons on the interface Icon Description Available Networks Click this icon to display list of the avaliable netwroks Link Information Click this icon to display the current client link status Profile Settings Click this icon to go to profile configuration interface Advanced Click this icon to go to the wireless mode band configuration interface About Click this icon to read more info about th...

Page 22: ...the network will be displayed in AP Information Rescan button Click it to update the network list Add to a Profile Clcik it to add a wireless network to a profile How to connect to an open unencrypted wireless network Select a wireless network which is unencrypted and click icon to connect it Key mark which means the wireless network is secured ...

Page 23: ...nected successfully Authentication Knowledge WEP Supports 10 26 bit Hex characters and 5 13 bit ASCII WPA PSK Supports 8 63 bit ASCII and 8 64 bit Hex characters WPA2 PSK Supports 8 63 bit ASCII and 8 64 bit Hex characters WPA PSK WPA2 PSK Supports 8 63 bit ASCII and 8 64 bit hex characters The Hex characters consist of numbers 0 9 and letters a f ASCII characters consist of any Arabic digitals le...

Page 24: ...hentication encryption network type and channel See below Throughput Click it view the link quality link speed throughput and the signal strength that the wireless adapter receiving Statistics Statistics screen displays the total Rx and Tx data packets including transmitted retransmitted and fail to receive ACK after all retries Reset counter Click this icon to clear statistics ...

Page 25: ...not be scanned then you must manually connect by adding the profile name The main interface is as shown below Add To create a new profile Delete To delete the existing profile Edit To modify the existing profile settings Add WPS Profile It requires that the connecting wireless device supports the WPS function WPS helps you to initiate wireless encryption and secure your wireless network quickly Se...

Page 26: ...eless adapter to an AP or a wireless router select Infrastructure mode 1 Click 2 Select the network type as Infrastructure 3 Define the profile Optional 4 Enter Select the SSID you want to add it to a profile 5 Click 6 Select the authentication and encryption of the SSID added above And click 7 Enter the wireless password of the SSID and click ...

Page 27: ...etwork requires that each computer should be equipped with a wireless network adapter By connecting these wireless adapters computers are able to share the resources Note that Ad Hoc feature is unavailable for Windows 8 Instance PC1 Desktop is sharing some files with PC2 Desktop or Laptop Now Ad Hoc mode is working If the SSID of the wireless router or AP you wish to connect is hidden then the wir...

Page 28: ...dapter of PC1 a Click b Select Ad Hoc Network Type c Define the profile Optional d Specify a network name in the SSID field to identify the wireless network like Tenda e Configure the channel f Click g Configure the authentication and encryption type and click ...

Page 29: ...select it and icon on the lower right corner 2 Configure a static IP address for the wireless adapter of PC1 You must allocate a static IP for each wireless adapter to be connected in Ad hoc mode a Right click on the lower right corner of your computer s desktop and click Open Network and Sharing Center b Click Change adapter settings ...

Page 30: ...30 c Right click Wireless Network Connection and select Properties d Double click Internet Protocol Version 4 TCP IPv4 e Configure an IP address as you like such as 192 168 1 6 And click OK to save ...

Page 31: ...is 192 168 1 6 then you should set that of PC2 to be 192 168 1 x x can be any number from 2 255 4 Connect the SSID you have set to PC1 s wireless adapter Windows 7 1 Left click Network or icon on the lower right corner of desktop to display the available wireless network 2 Select the wireless network you set Here is Tenda click Conncet and do as the screen prompts Connected successfully And you ca...

Page 32: ...32 Advanced This wireless adapter supports 2 4GHz About This screen mainly displays the version information of the UI s different programs as well as Tenda s copyright statement ...

Page 33: ...nts to access the network Right click the UI icon on the taskbar of your computer desktop and select Switch to AP Mode The main interface of AP mode is different from that of STA mode When it is switched to AP mode the wireless adapter will automatically set its IP address as 192 168 123 1 and other clients that connected to this AP will automatically obtain the IP addresses of 192 168 123 X X is ...

Page 34: ...eration Back Click this icon to return to the previous operation Next Click this icon to go to the next operation Advanced Here you can set the advanced parameters of the wireless adapter when working in AP mode No forwarding among wireless clients This feature isolates the communications among the wireless clients that are connected to the wireless adapter in AP mode Click this button to save and...

Page 35: ... included in the list from accessing the wireless network other hosts whose MAC addresses have not been added to the list will be permitted by default MAC Address To input the client s MAC address you want to filter in this field Add To add the MAC address to the list Delete To delete an existing MAC address in the list Remove All To delete all clients MAC address in the list How to set the wirele...

Page 36: ...t s MAC address and Tx Rate can be recorded here 4 3 STA AP Mode In STA AP mode the wireless adapter can serve as a client to receive wireless signal from a wireless router or AP also it can serve as an AP to send wireless signal for other wireless clients connecting Note that this mode is available for windows 7 or higher version OS If you want to do access control for multiple clients just repea...

Page 37: ... And click OK to apply the settings It comes to the main STA AP mode interface AP Here you can configure AP parameters of this wireless adapter and check the connected wireless clients AP configuration SSID Configure the wireless network name of AP WPA2 Pre Shared Key Configure the wireless password ICS WAN Select a WAN for Internet sharing ...

Page 38: ...wireless MAC address of the AP In MAC table the MAC info of clients connecting to the AP will be displayed here Note Other icon features are most similar to that of STA mode and AP mode Please take the responding for references ...

Page 39: ...ther operation systems take that of Windows 7 for reference 1 Right click Computer and select Manage 2 On the Computer Management screen select Device Manager Network adapters and right click the network adapter you want to disable and click Disable 3 Click the Yes on the dialogue box to disable the network adapter ...

Page 40: ...n Type PIN below Method can help customize a profile Customize the SSID as you like Default SSID ExRegNW266140 also you can change the authentication and encryption Click to continue Customize the wireless password and click to continue Click to PIN ...

Page 41: ...41 Connected successfully Note that after you have set the WPS profile the wireless info you have customized above will be applied to the remote AP or router Note ...

Page 42: ...nce with the instructions may cause harmful interference to radio communications However there is no guarantee that interference will not occur in a particular installation If this equipment does cause harmful interference to radio or television reception which can be determined by turning the equipment off and on the user is encouraged to try to correct the interference by one of the following me...

Reviews: