background image

08

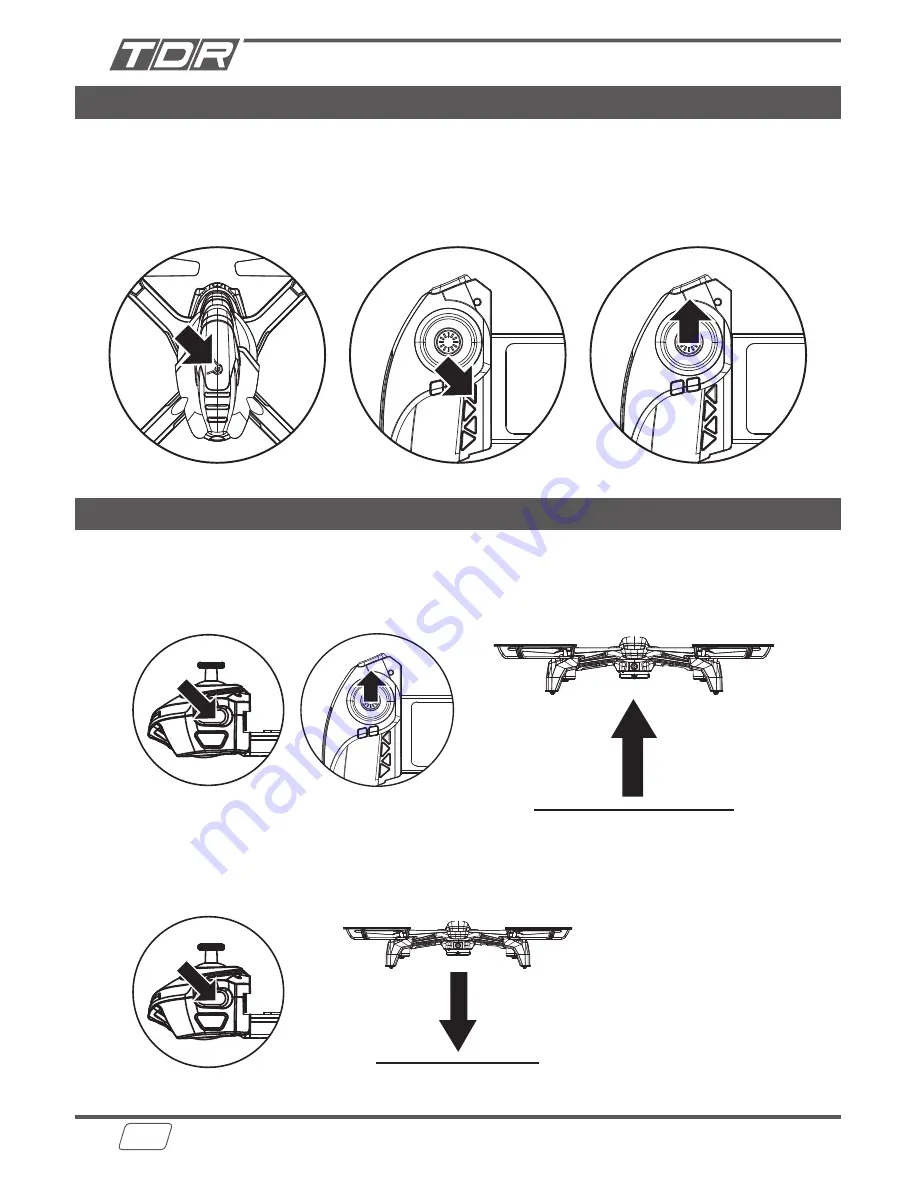
Binding drone to the controller

Start / Stop the motors

1. Power on the drone unit and place on level surface, the LED on drone will flash continuesly.
2. Turn on the controller.
3. Push the Throttle Stick to the up position, the LED light on the drone will change from flashing to 

solid on after binding has been successful.

Step 1

Step 2

Step 3

Start the motors (Takeoff):
Press the Auto Takeoff button, the blades will start to spin. You can now push the Throttle 
Stick up slightly to takeoff.

Stop the motors (Landing):
Press the Auto Takeoff button during the flight, the drone will automatically land. Blades will 
stop spinning after landing.

Summary of Contents for 61336

Page 1: ...14 Item 61336 1x Phoenix 4x Blade Guard 4x Blade 1x Camera 1 x Obstacle Avoidance Module 1x Screw Driver 1x USB Charging Cable 1x Controller 1x Battery For questions or difficulties operating your TDR devices please contact service tenergy com Keep the Instruction Guide for future reference Do not discard ...

Page 2: ...well clear of and do not interfere with manned aircraft operations and you must see and avoid other aircraft and obstacles at all times Do not intentionally fly over unprotected persons or moving vehicles and remain at least 25 feet away from individuals and vulnerable property Contact the airport and control tower before flying within five miles of an airport or heliport Do not fly in adverse wea...

Page 3: ...les in your area please reference the instructions of the battery manufacturer WARNING Batteries are harmful if swallowed Please keep away from children Waste Electrical and Electronic Equipment WEEE The crossed out dust bin symbol indicates that batteries primary rechargeable button cells packs etc must not be put in household waste These items may be composed of hazardous materials Please help p...

Page 4: ...gies 6 axis Flight Control System WiFi real time video streaming 0 3MP WiFi camera Advance headless flight mode 4 way 3600 stunt rolls left right forward backward Capable of outdoor flight Modular design for easy upgrades and maintenance Obstacle avoidance flight technologies ...

Page 5: ...r Stick 3 Left Right Turning Trimmer 4 Power Switch 5 Camera Lens Up 6 Camera Lens Down 7 360 Roll 8 Charging Port 9 Headless On Off 10 LED On Off drone 11 Backward Trimmer 12 Forward Trimmer 13 Left Right Side Fly Trimmer 14 Elevator Aileron Direction Stick 15 Power Indicator 16 Auto Takeoff Auto Landing 17 Speed Sensitivity Switch 18 Photo Short Press Video Long Press 19 Auto Return 15 14 18 19 ...

Page 6: ... 7 minutes 1 Turn off the controller connect the USB Charging Cable to the charging port of controller 2 Connect the USB Charging cable to a USB power source e g USB adapter USB port on a computer to start charging the battery The red charging light will turn on when charging is complete Charging time approximately 60 minutes Run time approximately 60 minutes Battery Release Button Cautions Always...

Page 7: ... every time the drone crashes Replace the Blade Guard right away if it is broken Accessories installation Obstacle Avoidance Module installation 1 Match the Obstacle Avoidance Module with the socket at the bottom of the drone 2 Push the Obstacle Avoidance Module according to the direction shown on the module to mount Camera Module installation 1 Push the Camera Moduel all the way into the socket a...

Page 8: ...ition the LED light on the drone will change from flashing to solid on after binding has been successful Step 1 Step 2 Step 3 Start the motors Takeoff Press the Auto Takeoff button the blades will start to spin You can now push the Throttle Stick up slightly to takeoff Stop the motors Landing Press the Auto Takeoff button during the flight the drone will automatically land Blades will stop spinnin...

Page 9: ...trols Basic operation Left stick controls altitude and direction Right stick controls the rotation forward backward left or right movement Photo Taking Video Taking Short press the button to take a photo Long press the button to shoot a video ...

Page 10: ...ll the Throttle Stick down to descent the drone Note The 360 roll function will not work if the drone is mounted with Obstacle Avoidance Module and Camera Module make sure take out these two module before using this function Turn off the controller and drone before removing the modules The 360 roll function can not be used when battery power is low 360 Roll 1 Bring the drone to a mid air hover wit...

Page 11: ...from your viewpoint no matter which direction the drone is flying E g if you push the controller to left the drone will fly to left from your viewpoint regardless of what direction the drone is facing pointing Which allows you to give up worrying about orientation of the drone altogether To enter headless mode 1 Before taking off position the drone in such a way that its front is your front 2 Pres...

Page 12: ...1x120x50mm 8 7x4 7x2inch Weight 154g 5 4oz Operating Temperature 0 C to 40 C Built in Battery Capacity 200mAh Charging Method USB Run Time approx 60 min Charge Time approx 60 min Auto Return Press the Auto Return button during the flight the drone will trace the shortest way flying back to the takeoff point For best retults align the drone body with contoller toward the same direction before durin...

Page 13: ...river to tighten the screw Blades must be installed as shown Front use Yellow Blade A and Yellow Blade B Rear use Black Blade A and Black Blade B Front Yellow Blades Rear Black Blades A Yellow B Yellow B Black A Black Note The letters A and B are printed on front side of blades ...

Page 14: ...on as you makes flying easier and more intuitive Stay 2 to 3 feet away from walls and ceilings as the drone will be drawn towards them if you fly too close If the propeller blades come in contact with another object or you crash throttle down immediately to prevent further damage If anything prevents the drone s blades from spinning or they become jammed THROTTLE DOWN IMMEDIATELY Do not attempt to...

Page 15: ...king off the ground LEDs are flashing Battery power level is too low Fully recharge the battery 5 Unstable drone flying strong vibration Damaged blade s Replace the blade s 6 All blades spin but drone does not take off the ground or not flying properly Blades are not installed correctly Reinstall the blades following the Blade Installation section on page 13 7 Drone crashes immediately Blades are ...

Page 16: ...16 Thank You Happy Flying ...

Reviews: