TM
TM
Page <22>
V1.0
27/12/19
Newark.com/exclusive-brands
Farnell.com/exclusive-brands
Element14.com/exclusive-brands
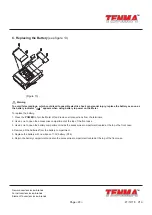
B. Replacing the Fuses
(see figure 12)
(Figure 12)
Warning
To avoid electrical shock or arc blast, or personal injury or damage to the Meter, use specified fuses ONLY in
accordance with the following procedure.
To replace the Meter’s fuse:
1. Press the
POWER
to turn the Meter off, disconnect the power cord and remove all connections from the terminals.
2. Fuse 1: Remove the screws from the power socket at the rear of the Meter. Remove the fuse by gently prying one end loose,
then take out the fuse from its bracket. Then install the replacement fuse. Fuse 2 and 3: Use a coin to open the accessories
compartment at the top of the front cover, then you will see a fuse compartment. Open the fuse compartment to replace
fuse 2 and 3. Remove the fuse by gently prying one end loose, then take out the fuse from its bracket. Then install the
replacement fuse. Fuse 4:It is located at the PCB. Remove the fuse by gently prying one end loose, then take out the fuse
from its bracket. Then install the replacement fuse
3. Install ONLY replacement fuses with the identical type and specification as follows and make sure the fuse is fixed firmly in
the bracket.
Fuse 1: 500mA, 125V, fast type, ɸ5 × 20mm (AC125V)
Fuse 2: 10A, 250V, fast type, ɸ5 × 20 mm (μA, mA)
Fuse 3: 500mA, 125V, fast type, ɸ5 × 20 mm (A)
Fuse 4: 200mA, 250V, fast type, ɸ5 × 20 mm (hFE)
Replacement of the fuses is seldom required. Burning of a fuse always results from improper operation.


