www.element14.com
www.farnell.com
www.newark.com
www.cpc.co.uk
TM
TM
Page <10>
V1.0
26/04/18
6.2 -
Power On and Off
To turn the Thermal Imager on or off, push and hold the Power ″ ″ Button for three seconds. When Thermal Imagers power
on, there is another way to power off, do the following:
1 -
Push and hold the Power ″ ″ Button for two seconds, popup the menu.
2 -
Slide ″ ″to the right, the device will be power off.
When Thermal Imagers power on, Push the Power ″ ″ Button to the LCD
power on or off. If the Screen Off feature is on, the LCD power off after the
setting time of inactivity. If the Power off feature is on, the Thermal Imager power
off after the setting time of inactivity.
Note:
Thermal Imager needs sufficient warm-up time for the most accurate
temperature measurements and best Image quality. This time can often vary by
environmental conditions. It is best to wait a minimum of 10 minutes if the most
accurate temperature measurement is very important to your application.
6.3 -
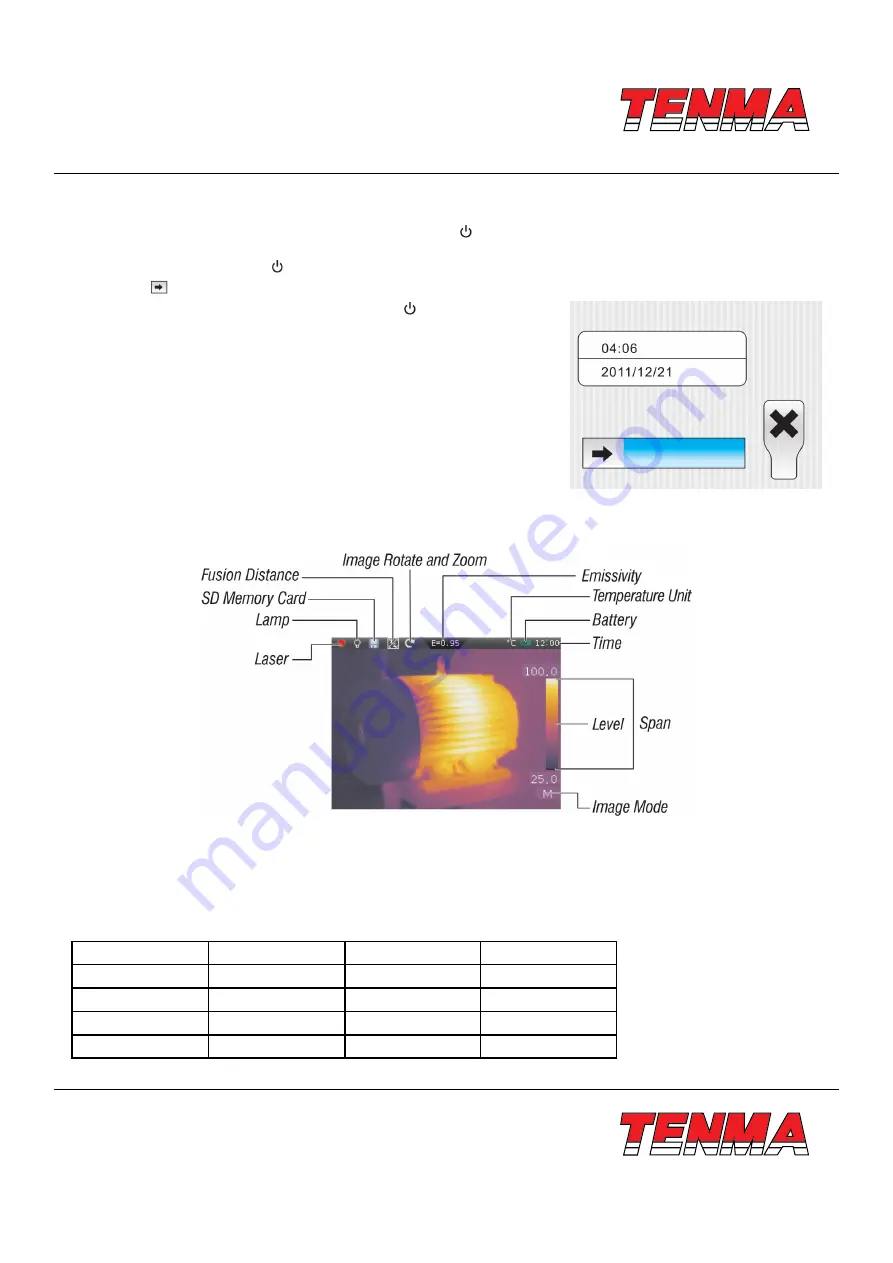
Main Interface
The Main Interface Is as follow
6.4 -
Optical Lens
The Thermal Imager has 4 kinds of Optical Lens. To change lens, Anti-clockwise rotates the
Infrared Camera Lens Lock
to
unlock the lens, then pull out lens, put the new lens, clockwise rotates the Infrared
Camera Lens Lock
to lock lens.
Different lens has different field of view (FOV).
FOV
is the area that your Imager can see at distance. This table lists the
horizontal FOV, vertical FOV and IFOV for every lens.
Focal Length
Horizontal FOV
Vertical FOV
IFOV
7.5mm
29.8°
22.6°
3.33mrad
11mm
20.6°
15.5°
2.27mrad
22mm
10.4°
4.8°
1.14mrad
33mm
6.9°
5.2°
0.76mrad


