


OPERATION
2-15
242E MM243 (5---92)
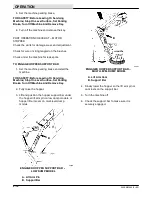
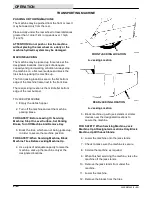
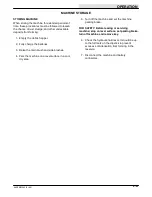
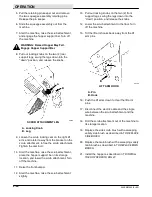
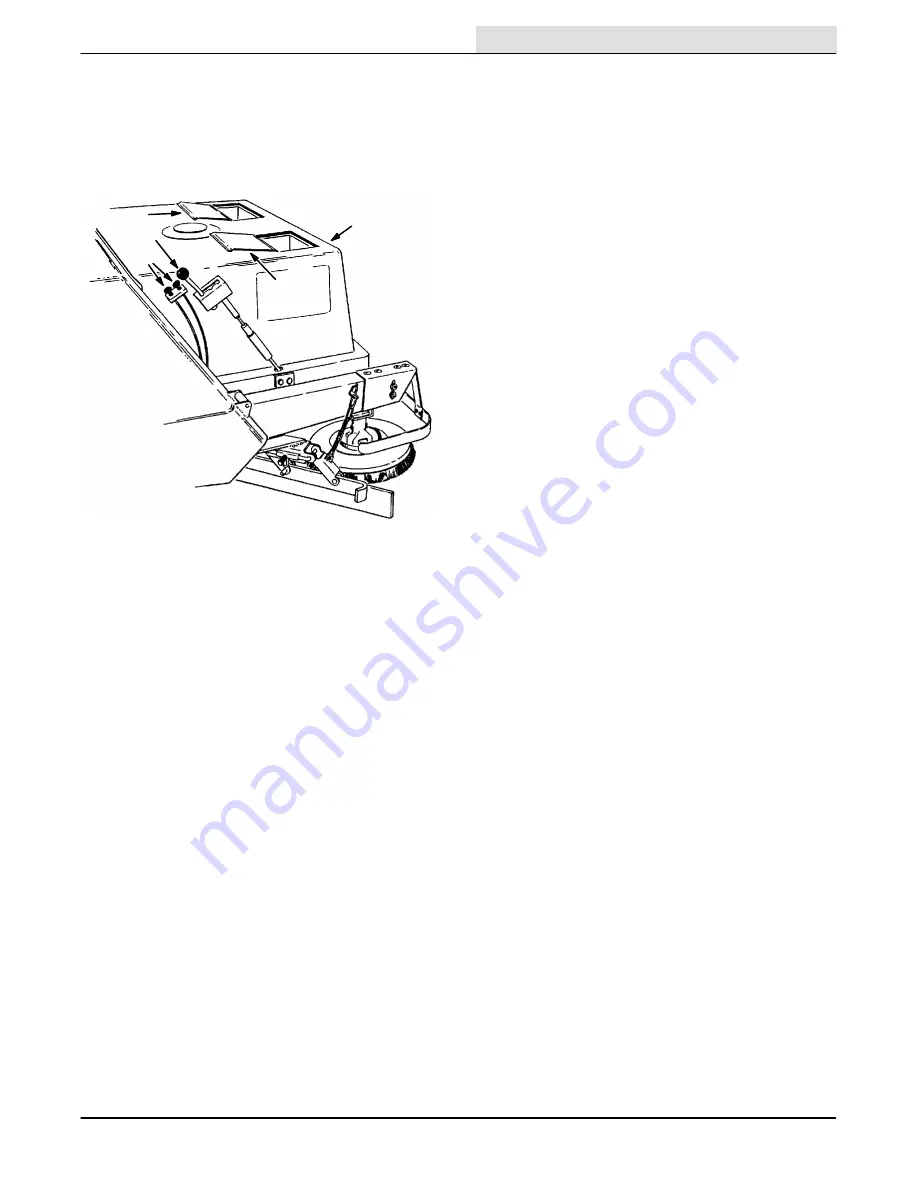
3. Open the solution tanks covers. There are two
solution tanks. One or both tanks may be used
for detergent solution or rinse water. The water
flow can be almost doubled by using both
tanks at the same time, but this will require
more frequent filling.
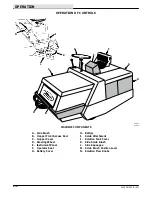
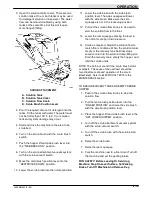
C
D
A
B
B
05540
SCRUB ATTACHMENT
A. Solution Tank
B. Solution Tank Cover
C. Solution Flow Knob
D. Scrub Brush Position Lever
4. Pour the required amount of detergent into the
tanks. Fill the tanks with water. The water must
not be hotter than 130
_
F (54
_
C) or solution
tank and system damage may occur.
5. Start and drive the machine to the area to be
scrubbed.
6. Turn on the scrub brush with the scrub brush
switch.
7. Push the hopper lift and side brush lever into
the “SIDE BRUSH ON” position.
8. Turn on the scrub attachment vacuum system
with the scrub vacuum switch.
9. Move the main brush position lever into the
“RESTRICTED DOWN” position.
10. Lower the scrub brush into the normal position.
11. Lower the side brush with the side brush
position lever. The side squeegee will lower
with the side brush. Make sure the side
squeegee is not in the locked up position.
12. Pull out the solution flow knobs to be used to
start the solution flow to the floor.
13. Lower the rear squeegee placing the lever in
the notch for proper down pressure.
14. Scrub as required. Adjust the solution flow to
match floor conditions. When the solution tanks
empty or the recovery tank ball float stops
vacuum, return to the solution dump/filling site.
Drain the recovery tank, empty the hopper, and
refill the solution tank.
NOTE: The horn will sound if the scrub brush motor
overheats. The cause of the overload should be
found before continued operation of the scrub
attachment. Refer to ELECTRICAL TESTS in the
MAINTENANCE section.
TO DRAIN RECOVERY TANK AND EMPTY DEBRIS
HOPPER
1. Push in the solution flow knobs to stop the
solution flow.
2. Pull the main brush position lever into the
“RAISED POSITION” and raise the side brush
with the side brush position lever.
3. Place the hopper lift and side brush lever in the
“OFF LOWER HOPPER” position.
4. Turn off the scrub attachment vacuum system
with the scrub vacuum switch.
5. Turn off the scrub brush with the scrub brush
switch.
6. Raise the scrub brush.
7. Raise the rear squeegee.
8. Park the machine next to a floor drain. Turn off
the machine and set the parking brake.
FOR SAFETY: Before Leaving Or Servicing
Machine; Stop On Level Surface, Set Parking
Brake, Turn Off Machine And Remove Key.
Summary of Contents for 242E
Page 1: ......
Page 10: ...SPECIFICATIONS 242E MM243 9 89 1 2 ...
Page 14: ...SPECIFICATIONS 242E MM243 9 89 1 6 ...
Page 16: ...OPERATION 242E MM243 5 92 2 2 ...
Page 62: ...MAINTENANCE 242E MM243 5 92 3 22 05805 ELECTRIC SCHEMATIC ...
Page 88: ...MAINTENANCE 242E MM243 5 92 3 48 ...
Page 90: ...APPENDIX 242E MM243 9 89 4 2 ...


