background image

Page 7 of 7

KIT NO. 9006309--5680, 9006310--5700/5700XP

5680/5700/5700XP

ec-H2O

Kit

INSTALLATION INSTRUCTIONS --

Continued

9005074 Rev. 01 (07--09)

Tennant Company

Customer Service: (800) 553--8033 or (763) 513--2850
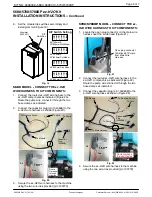
APPLY THE

ec- H2O

LABELS:

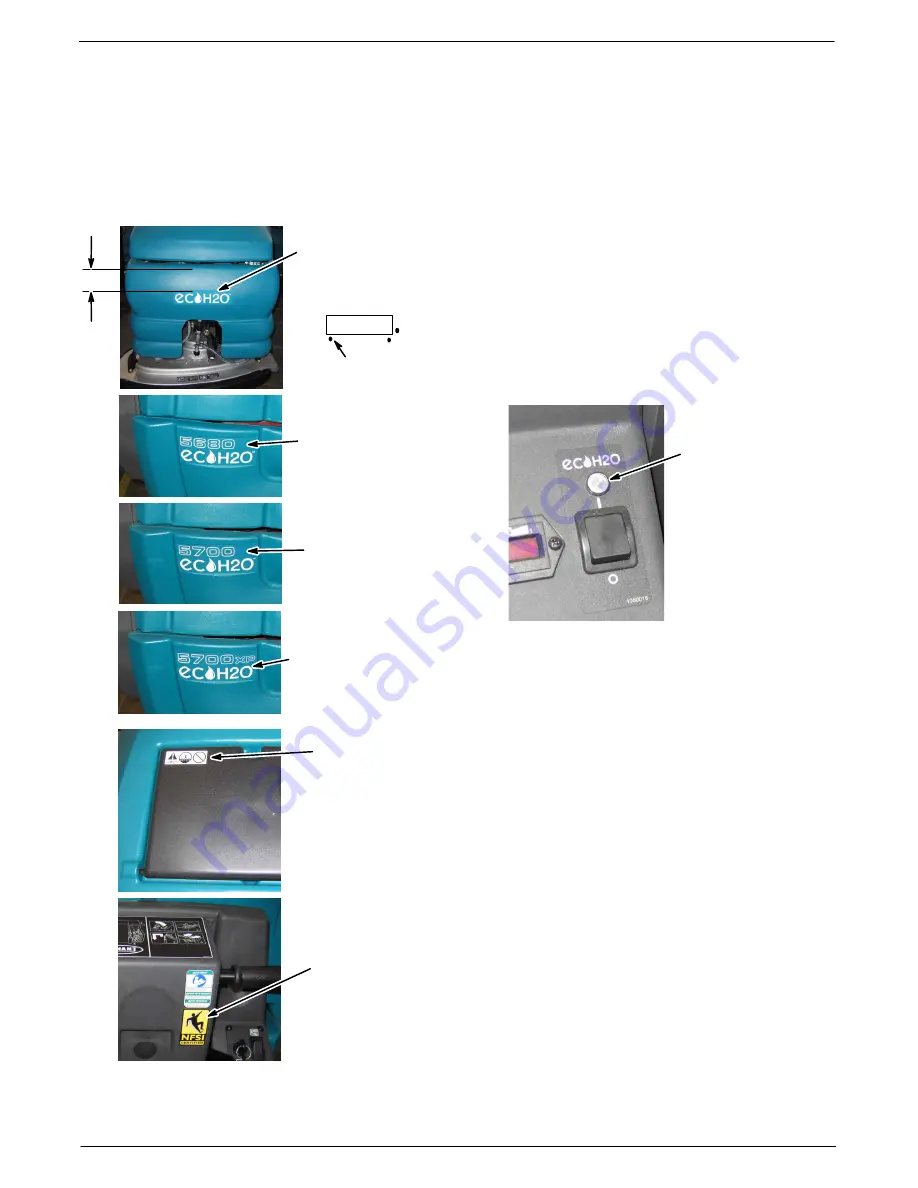
Remove the existing labels and apply the new

ec--H2O

labels on the machine as described below

(Figure 26).

Label, 5680 ec--H2O, Side

[p/n 1050013 Qty 2]
Kit 9006309

Label, NFSI

[p/n 1015012]

Label, Attention Fill,

ec--H2O [p/n 1050003]

Label, 5700 ec--H2O, Side

[p/n 1050017 Qty 2]
Kit 9006310

Label, 5700XP ec--H2O, Side

[p/n 1050018 Qty 2]
Kit 9006310

Label, ec--H2O, Front

[p/n 1050014]

Align label w/ tick

marks in plastic

Tick Marks

Label

5”

12.7cm

Fig. 26

OPERATE THE

ec- H2O

SYSTEM:

To ensure the

ec--H2O

system is operating properly,

perform the following:

1. Fill solution tank with cool clean water (less than

70

°

F/21

°

C). Do not add any conventional floor

cleaning detergents, system failure may result.

2. Turn the key to the on ( I ) position.

3. Press the

ec--H2O

system button to the on ( I )

position.

4. The

ec--H2O

system indicator light will not turn

on until you begin scrubbing with the machine

(Figure 27).

Solid Green Light =

Normal operation

Solid Red Light =

System fault

ec--H2O

System

Indicator Light

Fig. 27

4. Check all hose connections for water leaks.

If storing the machine in freezing temperatures, make

sure all water is removed from the machine, including

the the

ec--H2O

module.

Summary of Contents for ec- H2O 5680

Page 1: ...2 ec H2O Pump Bracket 1002603 M8x1 25x20 Screw 4 12273 M8x1 25x16 Screw 15675 Clamp 2 53466 Clamp 69234 Flat Washer 5 01685 ec H2O Module Bracket 1044803 NOTE Do not tighten the top screws w clamps at...

Page 2: ...own Locate the factory installed wires Gray 8 Green 25 and connect to ec H2O switch Figure 7 Green 95 Black 13V Gray 88 Green 25 factory installed Gray 8 factory installed Blue 46 Gray 48 Brown 2C ec...

Page 3: ...e pump to the pump bracket Figure 13 Use a thread sealer tape on all fittings Fitting 150418 Fitting 150709 Fitting 150006 Pump 1042495 Fitting 1005630 Clamp 43844 Fitting 150515 Clamp 43555 Fasten pu...

Page 4: ...333 Hose C410165 1 ft cut to 2 25 5 7cm Clamp 54333 Fitting Tee 63245 1 Hose C410165 1 ft Disk cut to 2 25 5 7cm Cyl cut to 4 10cm Clamp 54333 Fig 16 6 Mount the ec H2O module and the horn to the modu...

Page 5: ...rness as shown Figure 20 To Pressure Switch To Module To Pump Capacitor Plug 1040868 Pressure Switch Red Blk To Horn Route Harness through clamps Fig 20 3 Secure the ec H2O wire harness to the machine...

Page 6: ...Brush Model 1 Remove the hose guide bracket and the T fitting from the scrub head and discard Figure 24 Remove T Fitting Remove Hose Guide Bracket NOTE Install a 50 Flat Washer 32486 in its place not...

Page 7: ...Align label w tick marks in plastic Tick Marks Label 5 12 7cm Fig 26 OPERATE THE ec H2O SYSTEM To ensure the ec H2O system is operating properly perform the following 1 Fill solution tank with cool c...

Reviews: