2.1.5 DDNS
Setting:
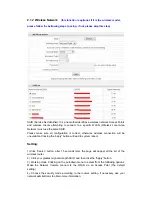
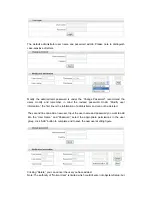
1. Please enable DDNS;
2.Please choose the DDNS Service provider that you have applied from, if you do not
apply the DDNS service, please select one service provider and then press register, there
is a link to the service provider’s network and register, as to the apply, please check the
service provider’s help document.
Note: the DDNS service provider is DYNDNS (English). Refer to the following links to
apply a dynamic domain account when selecting other DDNS
Providers:
Dyndns.org (Dynamic) / Dyndns.org (Custom) visit http://www.dyndns.com
After a host name has been successfully created, you will see a successful message in
the DDNS Registration Result column, indicating that you have successfully
registered a domain name.
3. Please input the domain that you have applied from DYNDNS, input the user name and
password, this user name and password should be the same with the name and password
that you have applied from the http://www.dyndns.com.
4. Please enter your router and then forward the port. The router’s setting please see the
help file of your router, you may have to contact the router's Tech Support area.
5. After all the setting finished, you can open your IE to browse the network camera. The
format of the camera’s address is http://+webport. Such as:
http://ipcamceshi.dyndns.org:667 (the web port please see user’s manual 2.1.1 TCP/IP
setting)


