background image

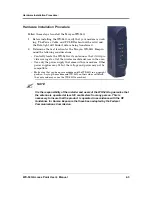
Hardware Installation Procedure:

2-8

WX-54G Access Point User’s Manual

3.

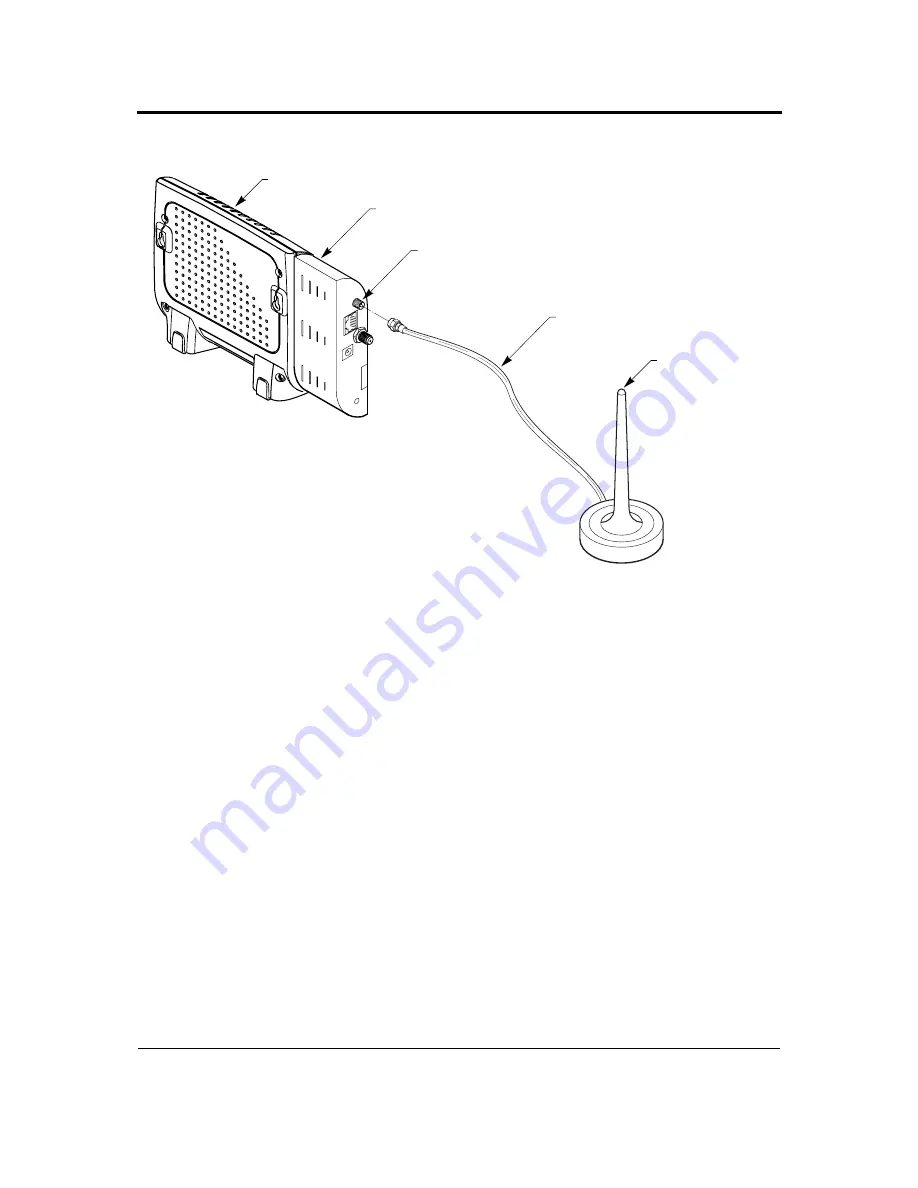
Thread the coax cable antenna onto the antenna nut.

4.

Make sure there is at least two feet of separation between the antenna and the 
modem.

5.

Power up the modem and check for connectivity.  The modem should register with 
the cable network in approximately 60 seconds.  When the modem is working, the 
Power, Cable, and PC LEDs should be solid, while the Data LED should blink as 
data is being transferred.

700x SERIES MODEM

WG-54G WIRELESS EXTENSION

ANTENNA CONNECTOR

CABLE ANTENNA

ANTENNA CABLE

Cable antenna must be placed a minimum of 2 feet (60.9 cm)
away from the WX-54G Wireless Extension.

ANTENNA

LAN

CABLE

DC IN

RESET

RE

ADY

W

IR

EL

ES

S

ET

HE

RNE

T

Summary of Contents for WX-54G

Page 1: ... LUHOHVV FFHVV WHQVLRQ NSTANTLY ADD WIRELESS CAPABILITY TO ANY 4 X CABLE MODEM 4ERAYON OMMUNICATION 3YSTEMS NC LL RIGHTS RESERVED 8VHU V XLGH ...

Page 2: ...esigned to provide reasonable protection against harmful interference when the equipment is operated in a commercial environment This equipment generates uses and can radiate radio frequency energy and if not installed and used in accordance with the instruction manual may cause harmful interference to radio communications Operation of this equipment in a residential area is likely to cause harmfu...

Page 3: ...866 483 7296 or 408 235 500 Fax 408 235 5500 Postal mail Terayon Communications 4988 Great America Parkway Santa Clara CA 95054 U S A e mail data support terayon com for technical support marketing terayon com for product information Feedback and suggestions to Technical Publications Group techpubs terayon com Worldwide Web http www terayon com ...

Page 4: ...kage Contents 2 1 WX 54G Status Indicators 2 2 Power Requirements 2 2 Hardware Installation Procedure 2 3 Attaching the Coax Cable Antenna 2 7 Chapter 3 Software Installation 3 1 Software Installation Procedure 3 1 Chapter 4 Configuring the Terayon WX 54G 4 1 Advanced IP Settings 4 2 Chapter 5 Terayon WX 54G Utilities 5 1 Connecting to the Terayon WX 54G Web Manager 5 1 Wired Ethernet Connection 5...

Page 5: ...t Firewall Basics 5 21 Configuring the WAN and LAN Filter for the Internet Firewall 5 22 Configuring the URL Filter for the Internet Firewall 5 24 System Setup 5 25 Changing the Password 5 25 Upgrading the Firmware 5 26 Saving Current Settings to a File or Loading Settings from a File 5 27 Restoring Factory Default Settings 5 28 Displaying System Status and Logging 5 29 System Time 5 30 Displaying...

Page 6: ...WX 54G Access Point User s Guide i iii FCC Radio Frequency Exposure A 3 RF Exposure A 3 Glossary G 1 ...

Page 7: ...i iv WX 54G Access Point User s Guide ...

Page 8: ...s to exist ing wired LANs offering complete mobility while maintaining continuous net work connectivity to both corporate and home Intranets Wireless LANs add a new level of convenience for LAN users PC users stay connected to the network throughout a building without being bound by wires The WX 54G has a built in Internet gateway capability which allows you to share a broadband modem and one ISP ...

Page 9: ...rators and other industrial equipment Signal loss can occur when metal concrete walls or floors block transmission Microwave ovens operate in the same frequency band as the WX 54G Therefore if you use a microwave within range of the WX 54G you may notice network performance degradation However both your microwave and your the WX 54G will continue to function Range Every environment is unique and p...

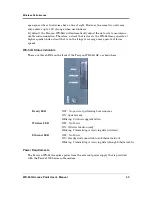
Page 10: ...coverage may operate at lower speeds WX 54G Status Indicators There are three LEDs on the front of the Terayon WX 54G AP as shown here Power Requirements The Terayon WX 54G requires power from the external power supply that is provided with the TeraJet 700 Series cable modem Ready LED OFF No power or performing boot sequence ON System ready Blinking Firmware upgrade failed Wireless LED OFF No Powe...

Page 11: ...Wireless Performance 1 4 WX 54G Access Point User s Manual ...

Page 12: ...inimum require ments A Terayon TeraJet 700 Series Cable Modem An Ethernet 10Base T or 10 100Base TX adapter for wired clients At least one 802 11g 54Mbps or one 802 11b 11Mbps wireless adapter for wireless mobile clients TCP IP and an installed internet browser Package Contents Each Terayon WX 54G comes with One Terayon WX 54G Wireless Access Extension One Terayon WX 54G Quick Start Guide Two exte...

Page 13: ...ly that is provided with the TeraJet 700 Series cable modem Ready LED OFF No power or performing boot sequence ON System ready Blinking Firmware upgrade failed Wireless LED OFF No Power ON Wireless function ready Blinking Transmitting or receiving data wireless Ethernet LED OFF No Power or not connected to an Ethernet network ON Has physical connection to an Ethernet network Blinking Transmitting ...

Page 14: ...overage to all of the wireless mobile devices in the area Use only the power supply that came with your modem Other power supplies may fit but the voltage and power may not be compatible Make sure that you keep your modem and the WX 54G in an upright position Laying the modem and WX 54G on their sides will block the vents and may cause the WX 54G to overheat It is the responsibility of the install...

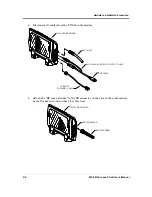
Page 15: ...s from the TJ700x cable modem 4 Attach the RF coax extender to the RF connector on the rear of the cable modem Leave the hex nut and washer off at this time 10 BASE T ETHERNET CABLE USB CABLE RF CABLE AC POWER ADAPTER DC OUTPUT CABLE 700x SERIES MODEM 700x SERIES MODEM RF CONNECTOR RF EXTENDER ...

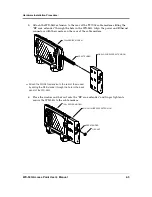
Page 16: ... modem 6 Place the washer and hex nut onto the RF coax extender and finger tighten to secure the WX 54G to the cable modem 700x SERIES MODEM RF EXTENDER WX 54G WIRELESS EXTENSION Attach the WX 54G extension to the rear of the modem by sliding the RF Extender through the hole in the back panel of the WX 54G ANTENNA LAN CABLE DC IN RESET READY WIR ELESS ETHERNET 700x SERIES MODEM WX 54G WIRELESS EXT...

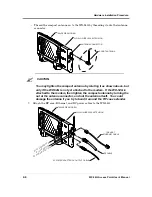
Page 17: ...ing the nut at the antenna connector and not the antenna itself You could damage the antenna if you try to bend it around the RF coax extender 7 Attach the RF coax Ethernet and DC power cables to the WX 54G CAUTION 700x SERIES MODEM WG 54G WIRELESS EXTENSION ANTENNA CONNECTOR SHORT ANTENNA ANTENNA LAN CABLE DC IN RESET READY WIR ELESS ETHERNET 10 BASE T ETHERNET CABLE RF CABLE AC POWER ADAPTER DC ...

Page 18: ...ce interference from the compact antenna on the WX 54G If this is the case your cable modem may not be able to connect with the cable network or may experience poor performance To remedy this you should use the coax cable antenna supplied with the the WX 54G The coax cable antenna can also extend the range of the WX 54G wireless signal because it allows you to place the antenna in a location that ...

Page 19: ...vity The modem should register with the cable network in approximately 60 seconds When the modem is working the Power Cable and PC LEDs should be solid while the Data LED should blink as data is being transferred 700x SERIES MODEM WG 54G WIRELESS EXTENSION ANTENNA CONNECTOR CABLE ANTENNA ANTENNA CABLE Cable antenna must be placed a minimum of 2 feet 60 9 cm away from the WX 54G Wireless Extension ...

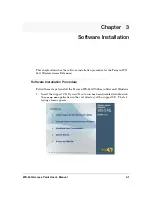
Page 20: ...for the Terayon WX 54G Wireless Access Extension Software Installation Procedure Follow these steps to install the Terayon WX 54G Utilities in Microsoft Windows 1 Insert the support CD If your CD auto run has been disabled double click the setup exe application in the root directory of the support CD The fol lowing screen appears ...

Page 21: ...re Installation Procedure 3 2 WX 54G Access Point User s Manual 2 Click Install WX 54G Utilities The Welcome screen appears 3 Click Next after reading the Welcome screen The license agreement screen is shown ...

Page 22: ...int User s Manual 3 3 4 Click Yes after reading the license agreement The Destination Folder screen is shown 5 Click Next to accept the default program folder or click Browse and select another destination folder The Select Folder Screen is displayed ...

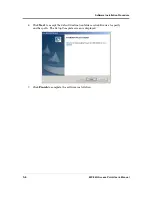
Page 23: ...dure 3 4 WX 54G Access Point User s Manual 6 Click Next to accept the default destination folder or click Browse to specify another path The Setup Complete screen is displayed 7 Click Finish to complete the software installation ...

Page 24: ...y or through a hub and running a web browser as a configuration terminal The con nection can be wired or wireless For the wireless connection you need an IEEE 802 11g b compatible device for example a Terayon WLAN Card WLA 54G installed in your notebook PC You should also disable WEP and set the SSID to default for your wireless LAN device If you want to configure the Terayon WX 54G or want to acc...

Page 25: ...ing procedure 1 Right click on the My Network Places icon on your desktop 2 Select Properties from the drop down menu 3 Double click on the desired local area connection 4 In the Local Area Connection Dialog select Internet Protocol TCP IP 5 Click Properties 6 In the Internet Protocol TCP IP Properties dialog set the IP settings as described above If you are attaching the WX 54G to a network with ...

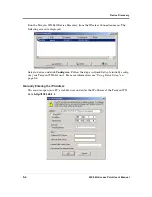
Page 26: ... cable from your com puter to the Terayon WX 54G using either a straight or crossover cable because the WX 54G has auto crossover capability Wireless Connection If you are using a Notebook PC with a wireless adapter you can connect to the Terayon WX 54G Web Manager without a wired Ethernet connection Just make sure your TCP IP settings are set correctly Device Discovery The easiest way to connect ...

Page 27: ...llowing screen is displayed Select a device and click Configure Follow the steps in Quick Setup to initially config ure your Terayon WX 54G unit For more information see Using Quick Setup on page 5 5 Manually Entering the IP Address You can also open your PC s web browser and enter the IP address of the Terayon WX 54G http 192 168 1 1 ...

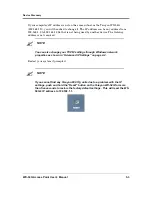
Page 28: ...another device The Gateway address is not required You can also change your TCP IP settings through Windows network properties as shown in Advanced IP Settings on page 4 2 Restart your system if prompted If you cannot find any Terayon 802 11g units due to a problem with the IP settings push and hold the Reset button on the Terayon WX 54G for more than five seconds to restore the factory default se...

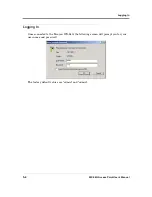
Page 29: ...ng In 5 4 WX 54G Access Point User s Manual Logging In Once connected to the Terayon WX 54G the following screen will prompt you for your user name and password The factory default values are admin and admin ...

Page 30: ...erform the following tasks Using Quick Setup Configuring Advanced Wireless Parameters Using Quick Setup From the WX 54G Home Page click on Next to access the Quick Setup page From here you can configure the basic wireless interface using the following steps Selecting the Time Zone Configuring Wireless Access and Security These are discussed in the following sections ...

Page 31: ...ss Point User s Manual Selecting the Time Zone Use the Select Time Zone screen to enter your local time zone Using the pull down menu select your local time zone Click Next to display the Configuring Wireless Access and Security screen ...

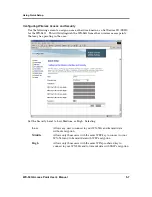
Page 32: ...reless access points that may be operating in the area Set the Security Level to Low Medium or High Selecting Low Allows any user to connect to your WX 54G and transmit data without encryption Middle Allows only those users with the same WEP key to connect to your WX 54G and to transmit data with WEP encryption High Allows only those users with the same WPA pre shared key to connect to your WX 54G...

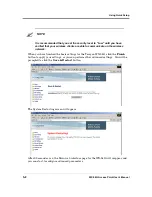
Page 33: ...eless network When you have finished the basic settings for the Terayon WX 54G click the Finish button to apply your settings or you can perform other advanced settings You will be prompted to click the Save Restart button The System Restarting screen will appear After 20 seconds or so the Main web interface page for the WX 54G will reappear and you can start to configure advanced parameters NOTE ...

Page 34: ...ck Setup you can click on the Wireless menu on the Wireless screen to perform advanced wireless configuration A drop down list is displayed allowing you to perform the following tasks Configuring Interface Parameters Setting Up Access Control Setting Advanced Parameters Configuring Interface Parameters Click on the Interface menu item to display the Wireless Interface screen ...

Page 35: ...ications support up to 14 overlapping channels for radio communication But only 11 channels are supported in the United States and therefore on the Terayon WX 54G To minimize interference configure each WX 54G to use non overlapping channels Non overlapping channels have 25Mhz separation beginning at the first channel allowed for that country for the US and most of Europe channels 1 6 11 are the f...

Page 36: ...tho rized devices from associating with an 802 11b g network Enabling WEP can protect your data from eavesdroppers The Terayon WX 54G sup ports both 64 bit and 128 bit encryption algorithms Select the type of encryption you want to use 64 or 128 bit and configure one to four WEP Keys along with setting the Default Key to one of the keys The 128 bit method is considerably more secure than the 64 bi...

Page 37: ...e default key If the Terayon WX 54G and all of its wireless clients use the same four WEP keys set the Network Key Rotation Interval to maximize security Otherwise choose one key shared by all clients as the default key Network Key Rotation Interval Use this field to set the time interval in seconds in which the WPA group key is changed Set this interval only if the Terayon WX 54G and all of its w...

Page 38: ...WX 54G From here you can select from three pull down menu items Disable Set the Access Mode to Disable if you want the WX 54G to allow any wireless client to associate with it This is the default setting Accept Set the Access Mode to Accept if you want only those clients with their MAC addresses listed in the Access Control List to associate with the WX 54G Reject Set the Access Mode to Reject if ...

Page 39: ...1 MAC addresses can be entered into this page so determine which will be greater the number of clients you want to accept or the number of clients you want to reject To remove an entry from the ACL highlight it in the box and click Delete Setting Advanced Parameters Use this screen to set up additional parameters for your wireless connection The default values are recommended however Select the Ad...

Page 40: ...fragments that are sent separately to the destination Using fragmentation can increase the reliability of frame transmissions The default value of 2346 is recommended RTS Threshold Use this field to enable RTS CTS Request to Send Clear to Send by setting a specific packet size threshold RTS CTS is used to minimize collisions among wireless stations If you enable RTS CTS it will wait to send a data...

Page 41: ...he WX 54G as a router with NAT functionality Select Disabled to configure the WX 54G as an access point and disable the WAN port Get DNS Server Automatically Select Yes to have the WX 54G automatically search for available DNS servers Select No to manually enter the IP address es of your DNS server s DNS Server Enter the IP address es of the DNS server s to which the WX 54G connects These fields b...

Page 42: ...ield as it is seen in your local network The default is 255 255 255 0 Configuring NAT Settings Use the following screens to set up Network Address Translation NAT for the WX 54G NAT is a program used to translate an IP address from a private address to a public address in real time This allows multiple PCs in a home network to share a single pub lic IP address It also protects the PCs from being a...

Page 43: ...ine trigger ports and incoming ports When the trigger port is detected the incoming packets to the specified incoming port numbers are redirected to your computer From this screen you may configure the following Enable Port Trigger Select Yes to apply all rules of the Port Trigger List to the WX 54G Select No to dis able the port trigger Trigger Port Enter the port or port range of the outgoing pa...

Page 44: ...coming Port Enter the port or port range of the the incoming packets to be redirected to your com puter Description Enter a brief description of each trigger port rule if desired Configuring the NAT Virtual Server Use this screen to make services such as WWW and FTP which are provided by a server in your local network accessible to outside users The following fields are configurable from this scre...

Page 45: ... Description Enter a brief description of each virtual server rule if desired Configuring the NAT Virtual Data Management Zone DMZ The Virtual Data Management Zone DMZ allows you to expose one computer to the Internet to which all inbound packets will be redirected A Virtual DMZ is basically a group virtual server All traffic that has not already been sent to the NAT virtual server can be sent to ...

Page 46: ...cific packets use the Configuring WAN LAN Filtering web page Configuring the Internet Firewall Basics Use the following screen to do basic configuration of the internet firewall From this screen you can configure the following Enable Firewall Select Yes to enable general Stateful Packet Inspection SPI rules The subsequent options become available once the firewall is enabled Select No to disable t...

Page 47: ... access the WX 54G web server from the Inter net The default value is 8080 Configuring the WAN and LAN Filter for the Internet Firewall Use the following screen to configure the WAN and LAN filters for the internet firewall The LAN to WAN filter allows you to block specific packets between the LAN and WAN You can define The date and time that the filter will be enabled The default action for the f...

Page 48: ... as defined by the rules below Date to Enable LAN to WAN Filter Use this field to define the dates during which the LAN and WAN filtering will be enabled Time of Day to Enable LAN to WAN Filter Use this field to define the time interval during which the LAN and WAN filtering will be enabled Well Known Applications Use this field to define the application s for which the filtering rules apply such ...

Page 49: ...hin a range such as 103 315 100 or 65535 Protocol Use this field to indicate the protocol type of the packets to be filtered either TCP or UDP Description Use this field to provide a brief description of the filter if desired Configuring the URL Filter for the Internet Firewall Use the URL Filter to block specific URL access from your local network For example you could block access to specific we...

Page 50: ...rd List Use this field to specify keywords in URLs to be blocked Enter a keyword in the field and click Add to enter it into the list To delete a keyword highlight it in the list and click Delete System Setup Use the System Setup menus to do the following on the WX 54G Changing the Password Upgrading the Firmware Saving Current Settings to a File or Loading Settings from a File Restoring Factory D...

Page 51: ...actory Default Settings on page 5 28 The password is case sensitive Upgrading the Firmware Select Firmware Upgrade from the System Setup menu The following page is dis played This page displays the Flash Code Firmware version installed in the Terayon WX 54G Periodically new firmware will be available for the WX 54Gs on Terayon s Web site To upgrade the firmware follow the steps as listed on the We...

Page 52: ...will be directed to the home page Saving Current Settings to a File or Loading Settings from a File Use this page to save current system settings to a file or load settings from a file You may wish to reload settings from a known working configuration in the rare case that you experience problems after changing settings Save As a File Move your cursor over the HERE link on the web page Click the r...

Page 53: ...ry Default Settings This section describes the two ways you can restore factory default settings either through the Web Manager or through the hardware Restoring Factory Default Settings via the Web Manager You can reset all settings to their factory defaults through the web manager using the Restoring Factory Default Settings page Click Restore The system will reboot Wait 60 to 90 seconds before ...

Page 54: ...LEDs on the Terayon WX 54G while it is powered on Use a pen or straightened paper clip to hold the Reset button depressed for more than 5 seconds until the Ready LED on the front of the WX 54G starts blinking Displaying System Status and Logging To display the system status select Status from the Status Log submenu System sta tus and logs are useful tools when trying to debug any system problems A...

Page 55: ...ayon WX 54G When getting the IP assignments auto matically it is necessary to go to this page to see the IP address Subnet Mask Displays the IP subnetwork mask of the Terayon WX 54G Gateway Shows the default gateway IP address if entered This can be blank DNS Servers Displays the IP address of the DNS server s used by the WX 54G Link Status Displays the link status of the WX 54G either connected o...

Page 56: ...play the MAC addresses of the wireless stations connected to the WX 54G select Wireless from the Status Log submenu A screen similar to the following is displayed This screen displays a list of the wireless stations connected to the WX 54G by MAC addresses in hexadecimal format Click Refresh to refresh the display ...

Page 57: ...laying DHCP Lease Status Use the DHCP Lease screen to display the DHCP lease status of each machine connected to the WX 54G For each DHCP lease the following information is displayed Host Name MAC Address IP Address Lease Time in seconds Click Refresh to update the list of DHCP leases ...

Page 58: ...warding status which is active when Port Mapping Virtual Server or Virtual DMZ is enabled The following information is displayed for each port forwarding filter The original packet destination The protocol being filtered The port range being filtered The IP address of the computer to which the traffic is forwarded Click Refresh to update the Port Forwarding screen ...

Page 59: ...lay routing information for the WX 54G Static routing rules or dynamic routing rules updated by RIP are displayed on this page This information can be useful when debugging routing problems The following information is displayed Destination Gateway Genmask Flags Metric Ref Use Interface either WAN or LAN Click Refresh to update the routing table ...

Page 60: ...System Log Use this page to view the last 1024 system log entries Log entries are useful when debugging system problems This screen will hold the 1024 most current log entries As newer log entries are added the oldest log entries will be discarded Click Refresh to view the most recent log entries ...

Page 61: ...Configuring Advanced Wireless Parameters 5 36 WX 54G Access Point User s Manual ...

Page 62: ...t communicate with the Terayon WX 54G through a wired network connection The default IP address is 192 168 1 1 Solution Verify the network configuration by ensuring that there are no duplicate IP addresses Power down the device in question and ping the assigned IP address of the device Ensure that no other device responds to that address Check that the cables have proper pin outs and connectors or...

Page 63: ...o press the Reset button located next to the LEDs on the Terayon WX 54G and keep it depressed for more 5 seconds The WX 54G will reboot and the Ready LED will darken and then light up when the reset is successful For more information see Default Factory Settings on page 6 4 4 Problem My WLAN Card will not associate with the Terayon WX 54G Solution Check the following Bring the devices closer toget...

Page 64: ...er second Verify the wired network topology and configuration 6 Problem I cannot find the Terayon WX 54G using the Terayon Device Discovery Solution To configure the Terayon WX 54G through an WLAN Card your computer must be on the same subnet as the Terayon WX 54G You cannot find the Terayon WX 54G on a different subnet from your computer within the same gateway You must change your computer to th...

Page 65: ...econds or if you restore factory settings through the Terayon WX 54G software Name Default Value Wireless Interface SSID default Channel 6 Encryption WEP None Broadcast SSID No Wireless Bridge AP MOD Access Point Only Wireless Access Control MAC Access Mode Disabled IP Config LAN IP Address 192 168 1 1 Get IP Address Automatically Yes Subnet Mask 255 255 255 0 Gateway blank System Setup Password O...

Page 66: ...interference in a residential installation This equipment generates uses and can radiate radio frequency energy and if not installed and used in accordance with the instructions may cause harmful interference to radio com munications However there is no guarantee that interference will not occur in a particular installation If this equipment does cause harmful interference to radio or television r...

Page 67: ... It is the responsibility of the user to correct any interference caused by such unauthorized modification substitution or attachment Manufacturer and its authorized resellers or distributors will assume no liability for any damage or violation of government regulations arising from failing to comply with these guidelines Safety Information In order to maintain compliance with the FCC RF exposure ...

Page 68: ...w the FCC radio frequency exposure limits Nevertheless this device shall be used in such a manner that the potential for human contact during normal operation as a mobile or portable device but use in a body worn way is strictly prohibit When using this device a certain separation distance between antenna and nearby persons has to be kept to ensure RF exposure compliance In order to comply with th...

Page 69: ...A 4 WX 54G Access Point User s Manual ...

Page 70: ...in the 802 1i standard to improve WLAN security AES will require new hardware unlike Temporal Key Integrity Protocol TKIP that can be used on existing wireless devices B Basic Service Area BSS A set of stations controlled by a single coordination function Broadband A type of data transmission in which a single medium such as cable carries several channels of data at once C Channel An instance of m...

Page 71: ...s encoding scheme and error correction Each sub channel in the COFDM implementation is about 300 KHz wide At the low end of the speed gradient BPSK binary phase shift keying is used to encode 125 Kbps of data per channel resulting in a 6 000 Kbps or 6 Mbps data rate Using quadrature phase shift keying you can double the amount of data encoded to 250 Kbps per channel yielding a 12 Mbps data rate An...

Page 72: ...ancy within the chipping sequence enables the receiving wireless mobile client to recreate the original data pattern even if bits in the chipping sequence are corrupted by interference The ratio of chips per bit is called the spreading ratio A high spreading ratio increases the resistance of the signal to interference A low spreading ratio increases the bandwidth available to the user The wireless...

Page 73: ...cal network s IP addresses from the Internet A Firewall prevents anyone outside of your network from accessing your computer and possibly damaging or viewing your files G Gateway A network point that manages all the data traffic of your network as well as to the Internet and connects one network to another I IEEE The Institute of Electrical and Electronics Engineers The IEEE sets standards for net...

Page 74: ...lled OFDM orthogonal frequency division multiplexing The 802 11b spectrum is plagued by saturation from wireless phones microwave ovens and other emerging wireless technologies such as Bluetooth In contrast 802 11a spectrum is relatively free of interference The 802 11a standard gains some of its performance from the higher frequencies at which it operates The laws of information theory tie freque...

Page 75: ...t set of frequenciesPARA802 11g is a proposed to be finalized new extension to 802 11b used in a majority of wireless LANs today that broadens 802 11b s data rates to 54Mbps within the 2 4 GHz band using OFDM orthogonal frequency division multiplexing technology 802 11g allows backward compatibility with 802 11bdevices but only at 11 Mbps or lower depending on the range and presence of obstruction...

Page 76: ...nnect the PCs together M MAC Media Access Control Address A MAC address is the hardware address of a device connected to a network N Network Address Translation NAT NAT masks a local network s group of IP addresses from the external network allowing a local network of computers to share a single ISP account This process allows all of the computers on your home network to use one IP address This wi...

Page 77: ... The international unit for measuring frequency is Hertz Hz equivalent to the older unit of cycles per second One megahertz MHz is one million Hertz One gigahertz GHz is one billion Hertz The standard US electrical power frequency is 60 Hz the AM broadcast radio frequency band is 0 55 1 6 MHz the FM broadcast radio frequency band is 88 108 MHz and wireless 802 11LANs operate at 2 4 GHz Routing Inf...

Page 78: ...ta to a process on another Software implementing usually resides in the operating system and uses the IP to transmit information across the network Temporal Key Integrity Protocol TKIP TKIP is used in WPA to replace WEP with a new encryption algorithm that s stronger than the WEP algorithm but that uses the calculation facilities present on existing wireless devices to perform encryption operation...

Page 79: ...b network Wireless Local Area Network WLAN This is a group of computers and other devices connected wirelessly in a small area A wireless network is referred to as LAN or WLAN Wi Fi Protected Access WPA Wi Fi Protected Access is a specification which offsets encryption and authentication improvements that are stronger than the Wireless Encryption Protocol WEP which it is meant to replace Wi Fi Pro...

Reviews: