background image

Operator's Manual Supplement


First Edition • Second Printing


Installation Instructions 


12 Lift 

Guard

 Contact Alarm


Part No. 1288739GT 


Note: Perform this procedure on a firm, level 
surface. 

1


Turn the key switch to ground control and pull 
out the red Emergency Stop button to the on 
position at both ground and platform controls. 

2


Raise the platform 7 to 8 feet / 2,1 to 2,4 m. 

3


Lift the safety arm, move it to the center of the 
scissor arm and rotate down to a vertical 
position. 

4


Lower the platform onto the safety arm. 


Crushing hazard. Keep hands 
clear of the safety arm when 
lowering the platform. 

5


Turn the key switch to the off position and push 
in the red Emergency Stop button to the off 
position at the ground controls. 

6


Open the ground control compartment. 

7


Cut and discard any cable ties securing the 
harnesses from the ground controls. 

8


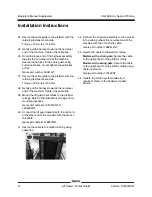
Disconnect the gray J1 connector from the 
back of the ground controls. 


models without 
outriggers 

models with 
outriggers 

J1 connector 


9


Disconnect the opposite end of the harness 
from the 6 pin connector. Remove the harness 
from the machine. 

10


Remove the receptacle locks from both 
connectors and set aside. 


11


Remove the white wire from the harness 
assembly and discard. 

12


Remove the white plug from connector J1 pin 
11 and discard. 

13


Connect the black wire of the ESTOP splice 
harness to connector J1 pin 11. 

Genie part number 1288573GT. 


14


Connect the white wire of the harness to J1 pin 
3 and pin 2 of the 6 pin connector. 

15


Install the receptacle locks set aside in step 10. 

16


Secure the harness inside the wire loom. 

17


Install the harness back into the machine. 
Secure the harnesses using cable ties. 

Genie part number 6578GT. 

18


Following the existing cables and harnesses 
route the 2 pin connector of the chassis to 
platform cable down through the top of the 
drive chassis and into the ground controls 
compartment. 

Model 

Genie part number 

GS-1530 / GS-1532 

1288571GT 

GS-1930 / GS-1932 

1288726GT 

GS-2032 / GS-2046 

1288727GT 

GS-2632 / GS-2646 

1288728GT 

GS-3232 / GS-3246 

1288729GT 

GS-4047 1288730GT 


WARNING

1

RD

WH

GR

OR

BR

2

3

5

4

6

11

1

2

3

4

5

1

2

WH

BK

Summary of Contents for Genie Lift Guard GS-4047

Page 1: ...Operator s Manual Supplement Lift Guard Contact Alarm GS 30 GS 32 GS 46 GS 47 First Edition Second Printing Part No 1288739GT...

Page 2: ...he operator can acknowledge the hazard and continue operating the machine The operator must release the function enable switch and return the joystick to the center position Functions will resume oper...

Page 3: ...is manual should be considered a permanent part of your machine and should remain with the machine at all times The contact alarm assembly should never be mounted above the decal plate of the extensio...

Page 4: ...Platform up function resumes at a reduced speed The beacons flash and the alarm sounds 3 Release the joystick and the contact alarm Activate platform up Normal platform function speed resumes the bea...

Page 5: ...acknowledged machine functions will resume operation at reduced speeds Platform Controls Operation 1 Return the joystick to the center position and release the function enable switch to acknowledge th...

Page 6: ...n Read understand and obey the safety rules and operating instructions in the appropriate operator s manual Be sure that all necessary tools and parts are available and ready for use Read this procedu...

Page 7: ...8 ZAG 824078GT 4 Assembly lift guard 1287673GT 2 Harness GS30 platform 1288570GT 1 Chassis to platform cable 1288571GT 1 Cable 20 inch link 1288572GT 1 Harness E STOP splice 1288573GT 1 Cable 45 inch...

Page 8: ...4GT 1 Chassis to platform cable 1288726GT 1 Cable guide forming 1290504GT 1 Cable guide forming 1291461GT 1 Assembly contact alarm 1292500GT 2 Manual Supplement 1288739GT 1 Contents of Kit 1288738GT G...

Page 9: ...1 Harness GS32 platform 1288740GT 1 Cable guide forming 1290505GT 1 Cable guide forming 1291462GT 1 Assembly contact alarm 1292500GT 2 Manual Supplement 1288739GT 1 Contents of Kit 1289294GT GS 3232 1...

Page 10: ...1288727GT 1 Harness GS46 platform 1288741GT 1 Cable guide forming 1290506GT 1 Cable guide forming 1290507GT 1 Assembly contact alarm 1292500GT 2 Manual Supplement 1288739GT 1 Contents of Kit 1289421GT...

Page 11: ...1 Harness GS46 platform 1288741GT 1 Cable guide forming 1290506GT 1 Cable guide forming 1290507GT 1 Assembly contact alarm 1292500GT 2 Manual Supplement 1288739GT 1 Contents of Kit 1289295GT GS 4047...

Page 12: ...ith outriggers 1 J1 connector 9 Disconnect the opposite end of the harness from the 6 pin connector Remove the harness from the machine 10 Remove the receptacle locks from both connectors and set asid...

Page 13: ...the provided retaining fasteners Do not tighten at this time Genie part numbers 824078GT 824027GT 26 Mark and drill the location for the cable guide at the steer end of the machine 27 Secure the cable...

Page 14: ...machine Tighten the cable ties 39 Mount the lift guard assemblies to the platform railings Refer to the illustrations on page 16 for mounting locations Genie part numbers 1287673GT or 1292500GT 40 Co...

Page 15: ...First Edition Second Printing Operator s Manual Supplement Installation Instructions Part No 1288739GT Lift Guard Contact Alarm 15 GS 30 and GS 32 models GS 46 and GS 47 models...

Page 16: ...Operator s Manual Supplement First Edition Second Printing Installation Instructions 16 Lift Guard Contact Alarm Part No 1288739GT...

Page 17: ...ground and platform controls Result The PCON LCD will show CH Result The GCON LCD will show the machine model and hour meter information After 3 seconds the machine model will not show on the display...

Page 18: ...procedure to complete the software upgrade 8 Download the Instructions and follow the procedures to update the machine software Note After the control system software has been updated the contact alar...

Page 19: ...display will show the following 4 Use the ground control menu buttons to select machine Options Follow the menu structure indicated on the ground control LCD display to activate the contact alarm 5 I...

Page 20: ......

Reviews: