6
Installing EZALIGN
™
Mast
Now, you’re ready to install the antenna mast at the
location you’ve chosen in Step 2 and align it to be plumb
(perfectly straight up).
Plumbing the mast is critical
for
the Multi-Satellite Dish antenna to receive optimal signals,
and failure to align it properly will result in difficulty
acquiring signals as well as a greater tendency for signal
outages in adverse weather.
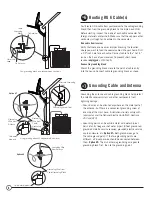
Mount the base securely
The mast base must be sturdy so antenna does not shift under
various weather conditions and its own weight. Mounting is
preferable on wood or masonry. Unsuitable sites may be
handrail, aluminum or vinyl siding, composite paneling, and
fiber/particle/strand boards.
CAUTION!
When installing mast base, avoid placing finger
between mast bottom and base to prevent being pinched or cut.
Align the mast
•
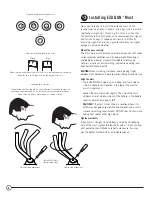
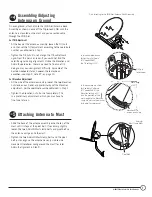
The EZALIGN Mast pivots up and down, and from side to
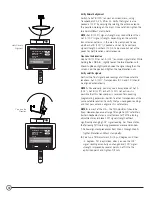
side. A bubble level is located in the top of the mast to
assist in alignment.
•
Loosen the four mast bolts slightly. Then move the mast
up/down or twist side-to-side until the bubble in the bubble
level is centered as shown at left.
CAUTION!
If the mast is mounted in a location where it is
difficult or dangerous to view the bubble level, use a small
mirror or plumbing level instead. DO NOT reach out and risk
falling from roof or other high place.
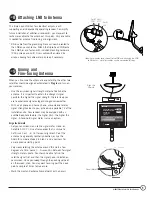
Tighten mast bolts
When mast is straight up (plumbed), and while still keeping
hold of the mast, tighten the four bolts with a 7/16" nut driver
with your other hand. Make sure bolts are secure. You may
want to tighten further with an adjustable wrench.
STEP
3
View of bubble level on top of mast
Wrong
Right
Looking down into mast
The patented mast has two slots at the the bottom that allow it to move up
and down and side to side. This aids the centering the bubble level even
when the mast base is mounted on an uneven surface.
Tighten Mast Bolts
(two on each side)
Up and Down Movement
Side to Side Movement
Side view of bubble level in the mast
Wrong Right
Make sure the bubble level frame in the mast is seated properly by pressing
down flat on it so it’s even with the top edge of the mast.

