background image

3

EN

Electric radiator

Guide to safe installation

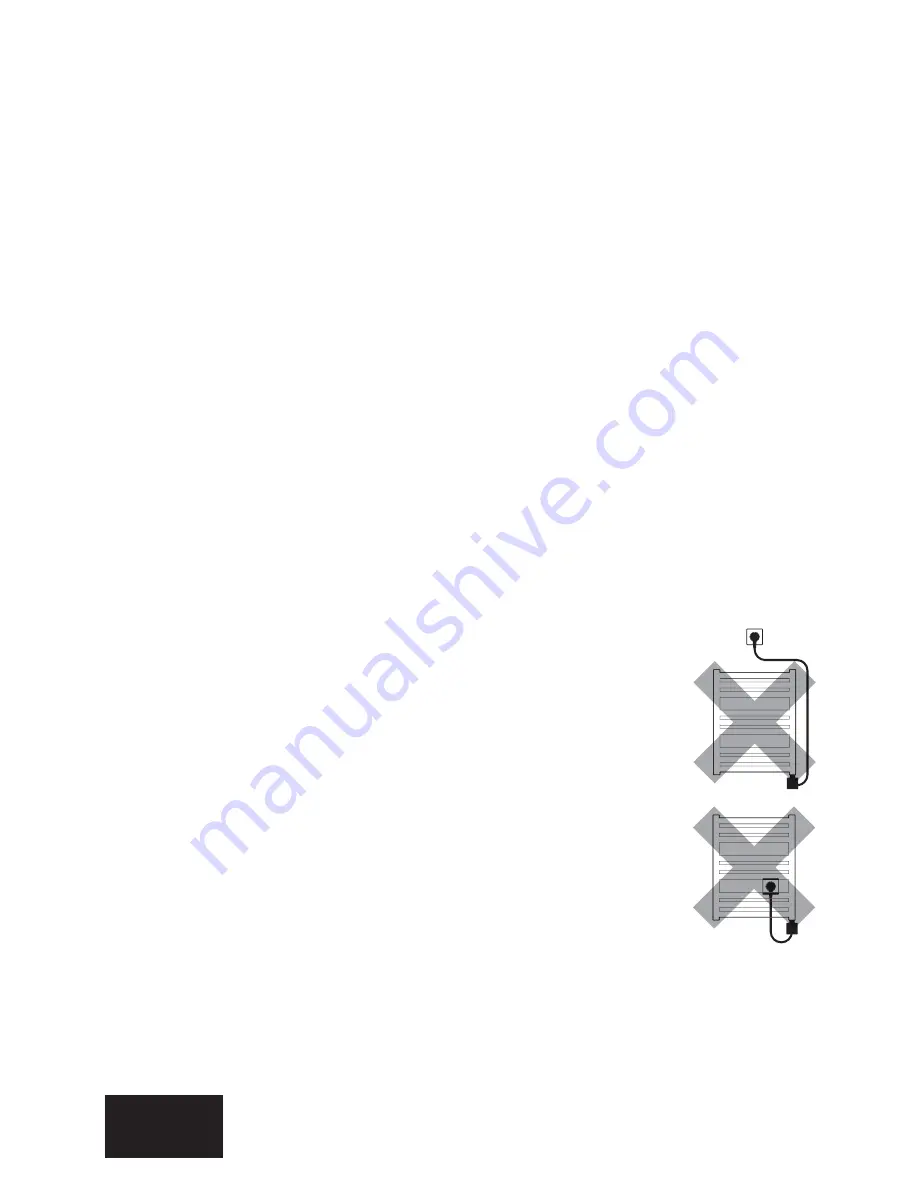
1. Do not install the radiator over or under 

an electrical socket point. 

2.  Your electric heater should be filled with 

a carefully measured amount of liquid. In 

the case of loss of heating medium, or in 

any other case which demands its supple

-

mentation, contact your supplier. 

3.  If the device is not equipped with an exter

-

nal temperature controller do not use the 

device in a small room while unsupervised 

disabled or incapacitated individuals are 

inside it. Only use the device if those indi-

viduals are under constant supervision.

Summary of Contents for ONE

Page 1: ... Grzałka i grzejnik elektryczny Betriebsanleitung Heizpatrone und Elektroheizkörper Mode d emploi Kit résistances et radiateur électrique série ONE Manuale d uso Elemento elettrico riscaldante e radiatore elettrico serie ONE Инструкция по применению Нагревательный элемент и электрический радиатор ONE ...

Page 2: ...2 User manual ONE ...

Page 3: ...asured amount of liquid In the case of loss of heating medium or in any other case which demands its supple mentation contact your supplier 3 Ifthedeviceisnotequippedwithanexter nal temperature controller do not use the device inasmallroomwhile unsupervised disabled or incapacitated individuals are inside it Only use the device if those indi viduals are under constant supervision ...

Page 4: ...and overcurrent relay R C D of 30 mA An Omni polecut outisrequiredfordisconnectingthedeviceon all poles via joints positioned at least 3 mm apart 6 Thedeviceissuitableforconnectioninzone3ofabath room as defined by applicable regulations unless oth erwise specified by regulations applicable in the coun try of installation and use Attention the device must be installed out of reach of persons in the...

Page 5: ...untry of installation and use 9 Extension leads or electric plug adapters should not be used in order to supply pow er to the heater 10 The device is intended for home use only Use it solely as described in the manual 11 Fitting and Installation of the device must be carried out in accordance with all local regulations for electrical safety including installation within permissible locations only ...

Page 6: ...ration 16 It is permitted to test the heating element in the open air but never inside the empty radiator for a period not longer than 3 seconds CAUTION The heating element and radiator can heat up to high temperatures Handle with caution do not touch the hot device 17 Never turn the heating element on in an empty radiator 18 Before installing or removing the device make sure it is disconnected fr...

Page 7: ...lowed to operate the heater except the cleaning when it has been properly installed and con nected The child must be under adult supervision or have been trained to safely operate the device while understanding the risks 23 Children above the age of 8 and people with disabili ties are allowed to operate the device But they must be under adult supervision or have been trained to safely operate the ...

Page 8: ...tailed information on all possible ways of the device installation or disassembly is avail able from the manufacturer or importer of the item see footer at the bottom of the man ual Below are the most important requirements and guidelines which should be strictly followed in order to ensure a long term unfailing operation of device Before installation 1 Read chapter Guide to safe installation 2 If...

Page 9: ...ncern devices preinstalled at the manufacturer s or heater versions built in inside the radiator 10 When connecting the device to installation follow below instructions a Brown wire connection to live circuit L b Blue wire connection to neutral circuit N c Yellow green wire connection to earth PE 11 For detailed installation hints see the last pages of this manual Intended use The ONE is an electr...

Page 10: ...see Guide to safe installation p 5 Radiator connection thread G Functions and use Heater One has two radiator temperature settings 45 C and 60 C as well as automatic switch off after 2 hours TIMER The on off button is also used for the purpose of chang ing settings while different colours of the LED diode indicate current setting The device has a built in IR receiver for wireless communication wit...

Page 11: ...ressing and holding of the on off button activates the TIMER function the heater works for 2 hours on setting 60 C after which it switches off Active TIMER is indicated by pulsat ing diode Regardless of whether the heater is currently on or off the TIMER can be activat ed by pressing and holding the button A quick press of the button then turns the device off Anti freeze function When the device i...

Page 12: ... the device will automatically turn off with the antifreeze func tion still active until the connection is reached again TIMER function can be used also in remote mode in such a case after the timer operation has seized the heater will not turn off but it will return to the remote control operation Malfunction alerts The device constantly monitors all parameters which may indicate its damage or an...

Page 13: ...the radiator and installation does not cause any damage close the valves empty the radiator etc if required Utilization This product should not be disposed of as general waste but should be brought to the ap propriate collection point for recycling of electric and electronic devices This information is present on the product user manual and on packaging Information on the appropriate point for use...

Page 14: ... this is not a malfunction 2 If lasts longer check the lever of heating agent level THREE flashes Overheating Check and reduce the water temperature in the central heating system must not exceed 82 deg Check and confirm that the heating element s output does not exceed the recommended output of your radiator Turn the heating element off with the ON OFF button and wait for 20 min If the radiator is...

Page 15: ...rogrammer or the Dryer mode in the element Note Turning the controller OFF will not ter minate the connection between the heating element and the controller the only way to do this is to remove the batteries from the controller or move it to another room BLUE diode pulsing The heating element is no longer communi cating with the IR controller Is the controller still in line of site of the heating ...

Page 16: ......

Page 17: ...EN IT FR DE RU PL Instrukcja użytkowania Grzałka elektryczna 30 30 30 ONE ...

Page 18: ...18 Instrukcja użytkowania ONE ...

Page 19: ...rzoną ilością cieczy W przypadku stwierdzenia ubytku czynnika grzewczego oraz w każdym innym wyma gającym jego uzupełnienia skontaktuj się ze sprzedawcą 3 Jeśli urządzenie nie jest wyposażone w re gulator temperatury pomieszczenia to nie używaj go w małych pomieszczeniach gdy znajdują się w nich osoby niezdolne do sa modzielnego opuszczenia pomieszczenia chyba że jest zapewniony stały nadzór ...

Page 20: ...t urządzenie posiadał właściwy wyłącz nik nadmiarowo prądowy oraz różnicowo prądowy R C D o czułości 30 mA Obowiązkowy jest również wyłącznik umożliwiający rozłączenie urządzenia na wszystkich biegunach za pomocą styków o odstępie 3 mm 6 W łazience urządzenie może być zainstalowane wy łączniewstrefie3 zdefiniowanejprzezwłaściweprze pisy chyba że odrębne regulacje stanowią inaczej UWAGA Grzejnik mu...

Page 21: ...dzenie powinny być zgodne z wła ściwymi przepisami obowiązującymi na danym obszarze 9 Do zasilania urządzenia nie wolno stosować przedłużaczy ani adapterów gniazdek elektrycznych 10 Podłączaj urządzenie tylko do prawidłowo wykonanej instalacji elektrycznej patrz dane znamionowe na grzałce 11 Urządzenie przeznaczone jest do użytku domowego Stosuj je wyłącznie zgodnie z jego przeznaczeniem opisanym ...

Page 22: ...ntami grzałki lub grzejnika 15 Element grzejny podczas pracy musi być w pełni zanurzony w cieczy 16 Dopuszcza się krótkie jednorazowe włączenie zimnej grzałki na wolnym powietrzu na okres nie dłuższy niż 3 sekundy UWAGA grzałka może być bardzo gorąca Postępuj ostrożnie 17 Bezwzględnie nie wolno włączać grzałki w pustym grzejniku 18 Podczas montażu lub demontażu grzałka nie może znajdować się pod n...

Page 23: ...ia wyłącznie gdy jest on prawidłowo zainstalowane i podłączone a dzieci są pod nadzorem lub zostały nauczone bezpiecznej obsługi i zrozumiały istniejące zagrożenia 23 Urządzenie może być używane przez dzieci powyżej 8 rokużyciaorazosobyoograniczonejsprawnościumy słowej lub fizycznej wyłącznie pod nadzorem lub po przeszkoleniu dotyczącym zasad bezpiecznej obsługi i zagrożeń wynikających z użytkowan...

Page 24: ...nstalacji otwarty aby nie dopuścić do nagłego wzrostu ciśnienia na skutek rozszerzalności cieplnej cieczy Instalacja lub demontaż Szczegółowe informacje o różnych sposobach instalacji lub demontażu grzałki w grzejniku dostępne są u producenta lub importera patrz stopka na końcu instrukcji Poniżej zesta wione zostały podstawowe wymagania i zasady których należy bezwzględnie przestrzegać aby zapewni...

Page 25: ...ie jest w pełni za lany cieczą Grozi to przepaleniem bezpiecznika termicznego i nie podlega naprawie gwarancyjnej 10 Przy podłączaniu urządzenia na stałe do instalacji stosuj się do następujących wytycznych a Żyła brązowa podłączenie do obwodu fazowego L b Żyła niebieska podłączenie do obwodu neutralnego N c Żyła żółto zielona podłączenie do uziemienia PE 11 Szczegółowe wskazówki instalacyjne znaj...

Page 26: ...zyłącze grzejnikowe gwint G Dostępne funkcje i obsługa Sterownik One posiada dwie nastawy temperatury grzejnika 45 C i 60 C oraz funkcję au tomatycznego wyłączenia grzania po upływie 2 godzin Funkcja TIMER Przycisk sterujący umożliwia przełączanie pomiędzy poszczególnymi nastawami natomiast kolor świecenia diody LED wskazuje aktualnie włączoną funkcję kabel zasilający klawisz odbiornik IR dioda LE...

Page 27: ...lawisza uruchamia funkcję TIMER grzałka pracuje przez 2 godz na nastawie 60 C po czym się wyłącza Uruchomioną funkcję TIMER wskazuje pulsująca dio da Niezależnie od tego czy grzałka jest włączona czy wyłączona TIMER można uruchomić poprzez dłuższe przytrzymanie przycisku natomiast krótkie naciśnięcie wyłącza go Funkcjazabezpieczeniaprzeciwzamarzaniowego Jeżeli sterownik jest wyłączony a temperatur...

Page 28: ... urzą dzenie przejdzie w stan oczekiwania na sygnał Dioda niebieska zacznie równomiernie pul sować a urządzenie wyłączy się utrzymując jedynie ochronę przeciwzamarzaniową do cza su aż uda się ponownie nawiązać połączenie W trybie zdalnym można aktywować funkcję TIMER w tym wypadku po zakończeniu od mierzania czasu grzałka nie wyłączy się a powróci do odbioru komunikatów ze zdalnego programatora Sy...

Page 29: ...iony cieczą może być bardzo ciężki Przed demontażem grzałki z grzejnika c o upewnij się że woda czynnik znajdująca się w instalacji i wewnątrz grzejnika nie spowoduje szkody w razie potrzeby zakręć właści we zawory opróżnij grzejnik itp Utylizacja Niniejszy produkt jest urządzeniem elektrycznym i podlega specjalnym wymaganiom doty czącym gospodarowania odpadami elektrycznymi i elektronicznymi Nie ...

Page 30: ...eżeli sygnalizacja nie jest jednorazowa krótko po włączeniu to upewnij się że w grzejniku jest właściwy poziom czynnika grzewczego 3 krotne mignięcie przegrzanie sprawdź i ew obniż temperaturę wody w insta lacji c o lub upewnij się że moc grzałki nie jest zbyt wysoka w stosunku do mocy grzejnika Wyłącz grzałkę przyciskiem ON OFF i odczekaj 20 minut Jeżeli grzejnik nadal będzie gorący mimo wyłączen...

Page 31: ...e nasta wionej na sterowniku naściennym prawidłowe zachowanie grzałki Chcąc włączyć grzałkę na grzanie można uruchomić tryb Turbo w sterowniku lub timer 2H w grzałce ustawienie sterownika naściennego na OFF nie powoduje wyłączenia ste rownika i rozłączenie komunikacji aby permanentnie zablokować komunikację IR należy wyjąć baterie ze sterownika lub schować go w innym pomieszczeniu dioda grzałki pu...

Page 32: ......

Page 33: ...EN IT FR DE RU PL 30 30 30 ONE Betriebsanleitung Heizpatrone und Elektroheizkörper 30 30 30 ...

Page 34: ...34 Betriebsanleitung ONE ...

Page 35: ...eit befüllt werden Im Falles des Verlustes des sich im Heizkörper befindlichen Heizmediums oder bei jedem weiteren Ergänzen wenden Sie sich bitte an Ihren Verkäufer 3 Wenn das Gerät nicht mit einem Raumtem peraturregler ausgestattet ist darf es nicht in kleinen Räumen verwendet werden in den sich Personen befinden die den Raum nicht selbständig verlassen können es sei denn es besteht eine ständige...

Page 36: ...rstromschutzschalter und einen FI R C D mit ei nerEmpfindlichkeitvon30mAverfügen Obligatorisch ist darüber hinaus ein Schalter der die Trennung des Gerätes auf allen Polen mit Hilfe von Kontakten um mindestens 3mm ermöglicht 6 In Badezimmern darf das Gerät ausschließlich in Zone 3 dieindengültigenVorschriftenfestgelegtist instal liert werden es sei denn gesonderte Bestimmungen sehen etwas anderes ...

Page 37: ...st müssen den in Ihrem Land gel tenden Vorschriften entsprechen 9 Zum Anschluss des Gerätes dürfen keine Verlängerungskabel oder Adapter verwendet werden 10 Schließen Sie das Gerät ausschließlich an eine ordnungsgemäß ausgeführte Installation an Beachten Sie die Kennzeichnung auf der Heizpatrone 11 Das Gerät ist nur für den Hausgebrauch vorgesehen Verwenden Sie das Gerät aus schließlich zweckgemäß...

Page 38: ...eizkörpers kommt 15 Das Heizelement muss im Betrieb vollständig in die Flüssigkeit eingetaucht sein 16 Es ist möglich die kalte Heizpatrone außerhalb des Heizkörpers einmalig für einen Zeitraum von nicht länger als 3 Sekunden einzuschalten ACHTUNG Die Heizpatrone kann sehr heiß sein Gehen Sie vorsichtig vor 17 Auf keinen Fall die Heizpatrone in einem leeren Heizkörper verwenden 18 Während der Mont...

Page 39: ...eingehenderSchulung überdiesiche re Bedienung und die bestehenden Gefahren benut zen wenn das Gerät ordnungsgemäß installiert und angeschlossen wurde 23 Das Gerät darf von Kindern ab 8 Jahren und Perso nen mit eingeschränkter geistiger oder körperlicher Leistungsfähigkeit nur unter Aufsicht oder nach einer Schulung in den Grundsätzen über die sichere Benut zung und die Risiken verwendet werden 24 ...

Page 40: ...leibt um einen Druckanstieg aufgrund der thermischen Ausdehnung des Heizmediums zu verhindern Installation und Demontage Detaillierte Informationen über die verschiedenen Möglichkeiten der Installation und Demontage der Heizpatrone im Heizkörper sind beim Hersteller oder Importeur verfügbar siehe Fußzeile am Ende des Handbuchs Nachstehend sind die Anforderungen und Regeln beschrieben die befolgt w...

Page 41: ...t 9 Verwenden Sie das Gerät nicht falls die Gefahr besteht dass das Heizelement nicht komplett mit Flüssigkeit bedeckt ist Dies kann zur Beschädigung der Thermosicherung führen und unterliegt nicht der Gewährleistung 10 Beim Anschluss des Gerätes an das Stromnetz beachten Sie bitte folgende Richtlinien a Braune Ader Anschluss an Phasenleiter L b Blaue Ader Anschluss an Neutralleiter N c Gelb Grüne...

Page 42: ...ionen und Bedienung Die Steuerung ONE bietet zwei unterschiedliche Heiztemperatureinstellungen 45 C und 60 C und eine automatische Abschaltfunktion nach Ablauf von 2 Stunden Timer Funktion Mittels der Steuertaste können Sie zwischen den verschiedenen Einstellungen wechseln während Ihnen die Farbe der LED anzeigt welche Funktion aktuell aktiviert ist Stromkabel Steuertaste LED Diode IR Empfänger Da...

Page 43: ...rücken der Taste startet die Timer Funktion die Heizpatrone arbeitet für 2 Stunden mit der Einstellung 60 C und wird danach ausgeschaltet Ein laufender Timer wird durch die blinkende LED angezeigt Unabhängig davon ob die Heizpatrone ein oder ausgeschaltet ist kann der Timer durch längeres Drücken gestartet und durch kurzes Drücken der Taste ausgeschaltet werden Antifreeze Funktion Im dem Fall dass...

Page 44: ...ein Steuersignal vom Sender empfangen schaltet das Gerät au tomatisch auf Signalsuche um Dabei beginnt die blaue LED an zu pulsieren und das Gerät schaltet auf die Antifreeze Funktion bis eine neue Verbindung hergestellt werden kann Im Fernbedienungsmodus können Sie die Timer Funktion aktivieren nach Ablauf des Timer wird die Heizpatrone nicht ausgeschaltet sondern kehrt in den Fernbedienungsmodus...

Page 45: ...eizkörper können sehr schwer sein Vor der Demontage einer Heizpatrone aus einem wasser elektrischen Heizkörper stel len Sie sicher dass das im Heizkörper und der Anlage befindende Wasser keine Schäden verursachen kann ggf die entsprechenden Ventile schließen den Heizkörper entleeren etc Entsorgung Dieses Produkt ist ein elektrisches Gerät und unterliegt den besonderen Anforderungen für die Entsorg...

Page 46: ...ieren dies ist keine Fehlfunktion 2 Wenn es länger blinkt überprüfen Sie den Füll stand des Heizmediums 3 MAL Blinken Überhitzung Prüfen und reduzieren Sie die Wassertemperatur in der Zentralheizung darf nicht höher als 82 C Prüfen Sie dass die Leistung des Heizelements die empfohlene Leistung des Heizkörpers nicht überschreitet Schalten Sie das Heizelement mit der Ein Aus Taste aus und warten Sie...

Page 47: ...g oder Elektronik beschädigt Wenden Sie sich an den Verkäufer BLAUE Diode leuchtet aber Heizkörper ist kalt Raum tempera tur ist gleich oder höher als in der Fernsteuerung Alles funktioniert Damit das Heizelement heizt müssen Sie den ON Modus in der Fernsteuerung ein schalten oder die Trockenfunktion an der Heizpatrone Hinweis Das Ausschalten der Fernsteuerung been det nicht die Verbindung zwische...

Page 48: ......

Page 49: ...EN IT FR DE RU PL 30 30 30 ONE Mode d emploi Kit résistances électrique 30 30 30 ...

Page 50: ...50 Mode d emploi ONE ...

Page 51: ...itêtresoigneusementremplidelaquan tité appropriée du liquide caloriporteur En cas de perte du liquide ou chaque autre cas nécessitant son remplissage veuillez contacter le revendeur 3 Si l appareil n est pas équipé d un régu lateur de température ambiante ne pas l utiliser dans les petits espaces dans la pré sence des personnes incapables de quitter lapièceindépendemment saufsilasurveil lance cons...

Page 52: ... de courant et d un disjoncteur à minimum de courant R C D de responsivité 30 mA Il est rappelé qu un dispositif de coupure omnipolaire à l aide des contacts de 3 mm est obligatoire 6 Dansunesalledebains l appareildoitêtreinstalléuni quementdanslazone 3 définie parlesrèglementsen vigueur à moins que des règlements distincts en dis posent autrement ATTENTION Il faut que le radiateur sèche serviette...

Page 53: ...ppareil est raccordé doivent être conformes aux règle ments du pays en vigueur 9 Pour l alimentation de l appreil il est interdit d utiliser des rallonges ou des adaptateurs de prises électriques 10 Raccorder l appareil uniquement à l installation électrique correctement préparée cf les données sur la plaque signalétique 11 Utiliser l appareil uniquement à des buts auquels il a été destiné et conf...

Page 54: ...tre totalement immergé dans le liquide 16 Il est admissible de mettre le ki résistances en marche une seule fois en plein air pen dant une durée n excédent pas 3 secondes ATTENTION le kit résistances peut être trèche chaud Garder la prudence 17 Il est interdit de mettre en marche l appareil dans un radiateur muni du liquide 18 Ne pas mettre sous tension le radiateur lors du montage ou du démontage...

Page 55: ...surveillance ou après avoir été formé sur l usage de l appareil en toute sécurité 23 L appareil peut être utilisé par des enfants de plus de 8 ans et des personnes de mobilité réduite que sous la surveillance ou après avoir été formé sur l usage de l appareil en toute sécurité 24 Sileradiateurélectriqueestutilisépoursécherdesve têments il faut y sécher uniquement des tissus lavés dans l eau 25 Le ...

Page 56: ...sistances dans le radiateur sont disponibles auprès du fabricant ou de l importateur voir le pied de page du présent manuel Voici la liste des exigences et des principes de base à respecter afin d assurer à l appareil le fonctionnement fiable à long terme Si vous installez le sèche serviettes ONE passez à l étape 9 ci dessous Avant d installer l appareil 1 Prendre connaissance du chapitre CONSIGNE...

Page 57: ...t du liquide Risque de brûlure du fusible thermique le cas non couvert par la garantie 10 Brancher le kit résistances selon le schéma a Fil marron phase L b Fil bleu neutre N c Fil jaune vert mise à la terre PE 11 Des consignes détaillées se trouvent à la fin du présent mode d emploi Objectif de fonctionnement Kit résistances One est un appareil électrique destiné à être installé uniquement dans d...

Page 58: ... G Usage et fontions disponibles Le boîtier One possède deux niveaux de réglage de la température du radiateur 45 C et 60 C et la fonction de la mise en arrêt automatique après 2 heures fonction TIMER Bouton de contrôle permet de basculer entre les différents réglages et la couleur de diode LED indique la fonction actuellement active Câble d alimentation Bouton Récepteur IR Diode LED L appareil es...

Page 59: ...nction TIMER active est indiquée par une diode clignotante Le kit allumé ou éteint il est possible d activer TIMER à tout moment en appuyant plus longtemps le bouton Afin de l éteindre il suffit d appuyer brièvement Fonction protection hors gel anti freeze Si l appareil est éteint et la température à l intérieur du radiateur baisse au dessous de 6 C l appareil se mettra automatiquement en marche a...

Page 60: ...pareil se met en mode d attente de signal La diode bleue commence à cligno ter régulièrement et l appareil se met en arrêt tout en gardant la protection contre le gel active jusqu au moment ou la connextion entre les deux appareils sera établie à nouveau Il est toujours possible d activer la fonction TIMER en mode à distance dans ce cas une fois deux heures passées le kit résistances ne se mettra ...

Page 61: ... diateur n est plus chaud Attention Le sèche serviettes électrique rempli du liquide peut être très lourd Avant le démontage du radiateur mixte fermer les vannes et enlever l eau du radiateur Recyclage Ce produit est un appareil électrique soumis à des exigences spéciales pour la gestion des équipements électriques et électroniques usés Ne pas jeter l appareil avec des déchets mé nagers Après l ut...

Page 62: ...fois juste après la mise en marche s assurer si le niveau du liquide dans le radiateur est correct 3 cli gnote ments Surchauffe Verifier et baisser eventuellement la tempéra ture de l eau dans l installation ou s assurer si la puissance du kit résistances n est pas trop éle vée pour la puissance du radiateur Mettre le kit résistances en arrêt via le bouton ON OFF Patienter 20 minutes Si le radiate...

Page 63: ... veut régler le kit sur la position chauffage il est pos sible de mettre en marche la fonction Turbo dans le programmateur ou timer 2H dans le kit résis tances réglage du programmateur mural sur la position OFF n égale pas la perte de communica tion entre les appareils Afin de bloquer la com munication IR il faut enlever les piles du pro grammateur mural ou le mettre dans une autre pièce de l habi...

Page 64: ......

Page 65: ...EN IT FR DE RU PL 30 30 30 ONE Manuale d uso Elemento elettrico riscaldante 30 30 30 ...

Page 66: ...66 Manuale d uso ONE ...

Page 67: ... del liquido di riscaldamento o per qualsiasi al trainformazione contattareilrivenditore 3 Se un dispositivo non è dotato di un re golatore di temperatura ambiente non utilizzare il dispositivo in piccole stanze mentre ci sono disabili senza supervione Utilizzare il dispositivo solo se queste per sone sono sotto un controllo costante 4 Installare lo scaldasalvietta in modo ta le che il tubo più ba...

Page 68: ...positivo su tutti i poli la cui di stanza di separazione deve essere di almeno 3 mm 6 Installato nel bagno il dispositivo è adatto all installa zione nella zona 3 come definito dalle normative vi genti se non diversamente specificato dalle normati ve vigenti nel paese dove questo viene installato ed utilizzato Attenzione il dispositivo deve essere installato a con dizionechenonsiaraggiungibiledape...

Page 69: ...stallazione che per l utilizzo 9 Prolunghe di cavi elettrici o adattatori elettrici non devono essere utilizzati per alimen tare il dispositivo 10 Collegare l unità ad un appropriato impianto elettrico consultare i dati sulla targhetta 11 L apparecchio è destinato solo all uso domestico Il dispositivo è raccomandato per gli usi unicamente descritti nel manuale 12 Assicurarsi che il dispositivo sia...

Page 70: ... resistenza all aria aperta per un periodo non superiore a 3 secondi ATTENZIONE l elemento riscaldante e il radiatore possono riscaldare fino a temperatu re elevate Maneggiare con cautela non toccare il dispositivo caldo 17 Mai accendere l elemento riscaldante in un radiatore vuoto 18 Prima di installare o rimuovere il dispositivo assicurarsi che sia scollegato dall impian to elettrico 19 Non apri...

Page 71: ... controllo Ai bambini dai 3 agli 8 anni do vrebbeesseresoloconsentitodiazionareildispositivo tranne la pulizia quando questo è correttamente in stallato e collegato 23 I bambini sopra gli 8 anni e la gente con disabilità pos sono utilizzare il dispositivo ma devono essere sotto la supervisione di un adulto o devono essere stati ad destrati ad operare in sicurezza avendone compreso i rischi 24 Seil...

Page 72: ... radiatori elettrici assi curarsi di lasciare un adeguata quantità d aria cuscino d aria mentre nei radiatori mi sti cioè collegati agli impianti di riscaldamento lasciare una valvola aperta Installazione o disassemblaggio Le informazioni dettagliate su tutte le possibili modalità di installazione o di disassemblag gio del dispositivo sono disponibili dal produttore o dall importatore dell articol...

Page 73: ... 9 Non accendere il dispositivo se la resistenza non è immersa in acqua o altri liquidi di ri scaldamento del radiatore poiché potrebbe causare il danneggiamento del fusibile ter mico e non sarà soggetto a reclamo sotto garanzia 10 Seguire le seguenti istruzioni quando si collega il dispositivo all impianto elettrico a Filo marrone Collegamento alla fase L b Filo blu Collegamento al neutro N c Fil...

Page 74: ...legamento al radiatore filetto da G Funzioni ed utilizzo Il riscaldatore della serie One ha due impostazioni della temperatura del radiatore 45 e 60 C e lo spegnimento automatico dopo 2 ore TIMER Il pulsante on off viene utilizzato an che per la modifica delle impostazioni mentre i diversi colori del diodo LED indicano l im postazione corrente Cavo di alimentazione Pulsante on off Ricevitore IR Di...

Page 75: ... premuto il pulsante on off si attiva la funzione del TIMER il dispo sitivo funziona per 2 ore sull impostazione a 60 C dopo di che si spegne L attivazione del TIMER viene indicato dal diodo LED con luce pulsante Indipendentemente dal fatto che il dispositivo sia attivo o meno il TIMER può essere attivato premendo e tenendo premuto il pulsante e al termine spegne il dispositivo Funzione antigelo I...

Page 76: ...ora attiva fino a rinstabilire un nuovo collegamento La funzione del TIMER nel dispositivo della serie One può essere utilizzata anche in moda lità remota in questo caso al termine dell operazione del timer il dispositivo non si spe gne ma tornerà al funzionamento del controller remoto Avvisi di malfunzionamento Il dispositivo monitora costantemente tutti i parametri che potrebbero indicare un suo...

Page 77: ...può essere molto pesante Assicurarsi di tutte le necessarie misure di sicurezza 3 Prima di disassemblare assicurarsi che l acqua contenuta all interno del radiatore e dell impianto di riscaldamento non causi alcun danno chiudere le valvole svuotare il radiatore se necessario Utilizzo Questo prodotto non deve essere smaltito come un rifiuto generico ma deve essere portato nel punto di raccolta per ...

Page 78: ...ccadere una o due volte dopo l accensio ne non si tratta di malfunzionamento 2 se dura più a lungo controllare il livello del li quido di riscaldamento triplo lampeggio surriscaldamento Controllare e ridurre la temperatura dell acqua nell impianto o verificare se la potenza d uscita termica dell elemento riscaldante non sia trop po elevata per il radiatore Spegnere il disposi tivo tramite il pulsa...

Page 79: ...o Tutto è ok Per azionare l elemento scaldante si può attivare la modalità ON nel programmatore esterno o la modalità Dryer nel dispositivo Nota l impostazione dello stato OFF del pro grammatore non lo spegne e non termina la co municazione per terminare la comuncazione tirare fuori le batterie nel programmatore o na sconderlo in un altra stanza Il diodo Led blu lampeggia Il dispositivo mo stra ch...

Page 80: ......

Page 81: ...EN IT FR DE RU PL Инструкция по применению Нагревательный элемент и электрический радиатор 30 30 30 ONE ...

Page 82: ...Инструкция по эксплуатации ONE 82 ...

Page 83: ... полнен определенным количеством те плоносителя В случае недостатка тепло носителя который требует пополнения необходимо связаться с Продавцом 3 Если устройство не оснащено регулято ром температуры помещения то данное устройство нельзя использовать в малых помещениях если в них находятся люди неспособные самостоятельно покинуть помещение где не обеспечен постоян ный надзор ...

Page 84: ...надлежащимивыключателямито ка R C D с чувствительностью 30 мА Обязатель ным также являетсяналичие выключателя позво ляющего отключить устройство на всех полюсах при помощи клемм расположенных на расстоя нии 3 мм 6 В ванной комнате устройство может быть уста новленоисключительновзоне3 всоответствиис нормами Но возможны исключения если в реги оне где устанавливается конструкция существу ют другие но...

Page 85: ... и правилам обязывающим на данной территории 9 Для подключения электронагревателя нельзя использовать удлинитель или адап теры для электрических розеток 10 Подключать устройство следует только к соответствующим образом подго товленной системе следует обратить внимание на номинальные данные электронагревателя 11 Устройство предназначено для использования в домашних условиях Следует ис пользовать ус...

Page 86: ...ент во время работы должен быть полностью погружен в теплоноситель 16 Допускается кратковременное единоразовое включение холодного электронагре вателя вне радиатора и теплоносителя но не более чем на 3 секунды ВНИМАНИЕ нагревательный элемент может быть очень горячим следует соблю дать осторожность 17 Категорически запрещается включать электронагреватель в пустом радиаторе 18 Во время монтажа или д...

Page 87: ...ем чистки только если оно правильно установлен и подключен а дети на ходятся под присмотром или же ранее были науче ныкакбезопаснопользоватьсяустройствомикаков риск 23 Детиввозрастестарше8лет атакжелюдисограни ченными умственными и физическими возможно стями могутсамостоятельнопользоватьсярадиато ром если находятся под присмотром или же ранее были научены как безопасно пользоваться устрой ствомика...

Page 88: ...енном к системе Ц О 1 вентиль открытым чтобы не допустить роста давления по причине рас ширения теплоносителя Монтаж и демонтаж Более подробную информацию о различных способах монтажа или демонтажа элек тронагревателя в радиаторе можно получить у Производителя или Дистрибутора адрес в конце инструкции Ниже перечислены основные требования и принципы которых следует придерживаться для долгосрочной и...

Page 89: ... герметично 9 Не следует включать электронагреватель если есть риск что нагревательный эле мент не полностью погружен в теплоноситель Это грозит повреждением термо предохранителя и не относится к гарантийным случаям 10 При подключении устройства к сети следует помнить а Провод коричневый фаза l б Провод голубой нейтрал n в Провод желто зеленый заземление pe 11 Подробные рекомендации касающиеся мон...

Page 90: ...к электрической сети Резьба радиатора filetto da G Доступные функции и обслуживание Электронагреватель ONE оснащен двумя режимами температуры нагрева 45 C и 60 C и функцией авто выключения по истечении 2 часов Функция ТАЙМЕР Клавиша позволяет выбрать желаемую функцию а цвет светодиода сигнализирует текущую настройку Кабель питания Клавиша IR Датчик Светодиод Устройство оснащено инфракрасным модуле...

Page 91: ... режим ТАЙМЕР указывает мигающий светодиод Независимо от того электронагреватель включен или выключен ТАЙМЕР может быть запущен с помощью нажатия и удерживания кла виши Нажатие клавиши выключает ТАЙМЕР Функция АНТИФРИЗ Если электронагреватель подключен к сети а температура в радиаторе опускается ниже 6 C устройство автоматически включится и начнет нагрев защищая теплоноси тель от замерзания и ради...

Page 92: ...ючитсядомоментавосстановлениясвя зи с спрограмматором активными останутся модули защиты от перегрева и замерзания В режиме дистанционного управления можно включить функцию ТАЙМЕР в данном слу чае по истечении 2х часов электронагреватель не выключится а вернется в режим сов местной работы с программатором дистанционного управления Аварийное состояние Устройствоконтролируетпараметры которыемогутуказ...

Page 93: ... не станет причиной какого либо ущерба при не обходимости следует закрыть вентили слить теплоноситель из радиатора Утилизация Данный продукт является электрическим устройством и не может быть утилизиро ван вместе с другими коммунальными отходами После окончания использования следует оставить устройство в пункте сбора и переработки электроники и электри ческих устройств Подробную информацию об утил...

Page 94: ...сителя всухую Если мигание не одноразовое вскоре после включения убедитесь что в радиаторе соот ветствующий уровень теплоносителя 3 е мигание Перегрев Проверите и если это необходимо понизи те температуру теплоносителя в системе ото пления или убедитесь что мощность нагревательного элемента не слишком выше по отношению к мощности радиатора Выключите нагрева тельный элемент кнопкой ON OFF и подо жд...

Page 95: ...ратуре установленной на настенном программаторе Правильная работа электронагревательного элемента Желая включить его в режим рабо ты можно включить режим Turbo в програм маторе или таймер 2 ЧАСА в электронагрева тельном элементе настройка программатора в положение OFF не отключает праграммато ра и связи чтобы постоянно блокировать ИК инфракрасные лучи выньте батарейки или положите его в другой ком...

Page 96: ...ller un raccord en T si nécessaire le kit résistances après Visser le avec la main ne pas utiliser des outils tranchants 3 Remplir le radiateur avec de l eau Purger le et laisser une des vannes ouverte NE JAMAIS METTRE EN MARCHE LE KIT RÉSISTANCES SI LES DEUX VANNES SONT FERMÉES 4 Brancher l appareil à la source d alimentation 5 Radiateur est prêt à fonctionner NE PAS OUBLIER utiliser le kit résis...

Page 97: ...visser le kit résistances avec la main ne pas utiliser des outils tranchants 3 Remplir le radiateur avec du fluide caloriporteur approprié voir Conseils à la page 56 4 Poser le radiateur sur le mur raccorder à la source d alimentation 5 Mettre le kit en marche durant 30 minutes maximum le pur geur ouvert 6 Vérifier le niveau du fluide caloripor teur Le compléter si nécessaire le niveau présenté su...

Page 98: ......

Page 99: ......

Page 100: ...MPGKE 129 20150413KosLu ...

Reviews: