background image

15

41. The power socket must be easy to reach so the plug can be removed quickly in

case of emergency.

INSTALLATION

After removing the packing materials, check the integrity of the heater; if you are

unsure, do not use it and ask for qualified professional help. The packing materials

(plastic bags, polystyrene foam, nails, etc.) must be kept out the reach of children

because they are potential sources of danger.

Before connecting the appliance, check that the voltage values shown on the data

plate correspond to those of the electricity supply network.

Don’t use adapters or extension cords for installation.

The power socket must be easy to reach so the plug can be removed quickly in case

of emergency.

Never place the appliance near sinks or other container of liquids (minimum distance

to avoid the risk of contact.

Keep the fan far away from clothes (curtains, etc.) or flying materials that could

obstruct the air intake grille; make sure that the front is free of flying materials (dust,

etc.).

Make sure that the electric cord is not touching rough, hot or moving surfaces and

not twisted or wrapped around the appliance.

Do not use the appliance with a timer or a programmer or with a system that can

switch on the appliance automatically, to avoid risk of fire, since a fire risk exists if

the heater is covered or positioned incorrectly.

To not place the appliance near sinks or other container of liquids (minimum distance

of 2 meters) to avoid the risk of it falling in.

Do not place the appliance near an open flame, cooking or other heating appliance.

Keep the fan far away from fabrics (curtains, etc.) or unstable materials that could

obstruct the air intake grille; make sure that the front is free of unstable materials

(dust, etc.). • Do not place the wall fan into the room to avoid the back-flow of gases

from the open flue of gas or other fuel-burning appliances (for duct and partition fans

Do not use the appliance with a timer or a programmer or with a system that can

switch on the appliance automatically, to avoid risk of fire, since a fire risk exists if

the heater is covered or positioned incorrectly.

In the event of a breakdown or poor operation, turn the fan heater off and ask for

professionally qualified help: repairs made by unqualified persons can be dangerous

and render void the warranty.

Summary of Contents for AIRZETA WALL

Page 1: ...VENTILATORE DA MURO AIRZETA WALL cod TZWZ11 MANUALE D ISTRUZIONI Vi ringraziamo per la preferenza accordata avendo scelto un prodotto TERMOZETA ...

Page 2: ...deve essere letto attentamente prima dell utilizzo perché fornisce importanti indicazioni riguardanti la sicurezza di installazione d uso e di manutenzione Conservare quindi con cura Cordialmente Lange Ditribution S r l Leggere attentamente questo manuale d istruzioni poichè all interno vi sono importanti informazioni sulla sicurezza l uso e la manutenzione dell elettrodomestico Conservare il manu...

Page 3: ...ati alla portata di mano di bambini in quanto potenziali fonti di pericolo smaltirli secondo le norme vigenti 4 Questo apparecchio dovrà essere utilizzato solo per l uso domestico come ventilatore secondo le modalità riportate nel presente manuale Ogni altro uso è da considerarsi improprio e pericoloso Il costruttore non potrà essere ritenuto responsabile di eventuali danni derivanti da uso improp...

Page 4: ...hio per pericolo di shock elettrico se necessario rivolgersi al rivenditore od ad un Centro Assistenza 17 Non usare l apparecchio nelle vicinanze di una vasca da bagno doccia piscina 18 Non usare l apparecchio vicino ad elementi e sostanze infiammabili 19 Non inserire alcun oggetto nelle fessure dell apparecchio 20 Prima di collegare il prodotto alla rete elettrica accertarsi che la tensione sia c...

Page 5: ...arecchio ad agenti atmosferici pioggia sole etc Non utilizzare all esterno 33 Mantenere una adeguata distanza da pareti oggetti ecc 34 Non spostare il prodotto quando in funzione 35 In generale è sconsigliabile l uso di adattatori prese multiple e o prolunghe Qualora il loro uso si rendesse indispensabile è necessario utilizzare solamente adattatori e prolunghe conformi alle vigenti norme di sicur...

Page 6: ...ionalmente qualificato Posizionare l apparecchio lontano da fonti di calore ad es fiamme libere fornello gas ecc contenitori di liquidi ad esempio lavelli ecc per evitare schizzi d acqua o che vi possa cadere distanza minima 2 metri tessuti tende ecc o materiali volatili che possano ostruire la griglia di aspirazione verificare che anche la parte anteriore sia sgombra da materiali volatili polvere...

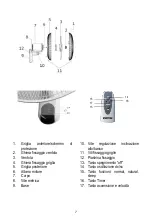
Page 7: ... Griglia posteriore 6 Albero motore 7 Corpo 8 Vite metrica 9 Base 10 Vite regolazione inclinazione alto basso 11 Viti fissaggio griglie 12 Piastrina fissaggio 13 Tasto spegnimento off 14 Tasto oscillazione dx sx 15 Tasto funzioni normal natural sleep 16 Tasto Timer 17 Tasto accensione e velocità 15 13 14 16 17 ...

Page 8: ...siano saldamente accoppiate e fissate al motore Installazione murale l ventilatore deve essere impiegato solo se fissato a parete la cui superficie deve essere piana priva di asperità ben stabile in quanto l apparecchio potrebbe ribaltarsi Posizionare il ventilatore lontano da fonti di calore da materiali infiammabili tende tappezzerie ecc da gas infiammabili o materiale esplosivo bombolette spray...

Page 9: ...ituito dal costruttore o dal suo servizio assistenza tecnica o comunque da una persona con qualifica similare in modo da prevenire ogni rischio Le funzioni del ventilatore possono essere azionate sia con la pulsantiera posta sul pannello comandi che col telecomando Il telecomando deve essere puntato nella direzione del pannello comandi e prima ancora bisogna inserirvi le batterie aprire lo sportel...

Page 10: ...asto varia il tempo impostato e sul pannello comandi si illumina la spia luminosa corrispondente al tempo selezionato 0 5 ora 1 ora 2 ore 4 ore il tempo massimo è di 7ore e 30 Per disattivare il timer spegnere l apparecchio con il tasto 0 OFF Modalità il ventilatore può funzionare sia a velocità costante NOR che a due diverse velocità intermittenti rhy la ventola funziona alternativamente alla mas...

Page 11: ...i decide di non utilizzare più l apparecchio Se si decide di non utilizzare più l apparecchio si raccomanda di renderlo inoperante tagliando il cavo di alimentazione prima assicurarsi d aver tolto la spina dalla presa di corrente e di rendere innocue quelle parti che sono pericolose qualora utilizzate per gioco dai bambini DATI TECNICI Voltaggio 220 240V 50Hz Potenza assorbita 45 W Informazioni te...

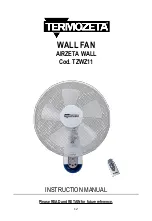
Page 12: ...12 WALL FAN AIRZETA WALL Cod TZWZ11 INSTRUCTION MANUAL Please READ and RETAIN for future reference ...

Page 13: ...unauthorised personnel 4 Don t connect the fan to the power supply until the fan is fully assembled 5 Before connecting the appliance check the electrical data shown in the rating label correspond to the main supply electrical data 6 Unplug the fan before any adjustment or cleaning procedures 7 Never operate the fan if it has damaged or worn parts It should be returned to the manufacturer its Serv...

Page 14: ...h as rain wind snow hail Do not use outdoors 29 Do not move the appliance when it is operating 30 Don t unplug the product pulling the power cable or the product itself 31 Don t pull the power cable to move the product 32 Don t position the product just near the power outlet 33 In general the use adaptors multiple plugs and or extensions is not recommended if they are necessary use only simple or ...

Page 15: ...r moving surfaces and not twisted or wrapped around the appliance Do not use the appliance with a timer or a programmer or with a system that can switch on the appliance automatically to avoid risk of fire since a fire risk exists if the heater is covered or positioned incorrectly To not place the appliance near sinks or other container of liquids minimum distance of 2 meters to avoid the risk of ...

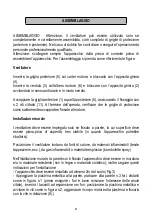
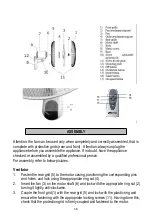
Page 16: ... below pictures Ventilator 1 Fasten the rear grid 5 to the motor casing positioning the corresponding pins and holes and lock using the appropriate ring nut 4 2 Insert the fan 3 on the motor shaft 6 and lock with the appropriate ring nut 2 turning it tightly anti clockwise 3 Couple the front grid 1 with the rear grid 5 and lock with the plastic ring and ensure the fastening with the appropriate lo...

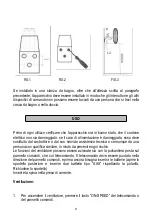
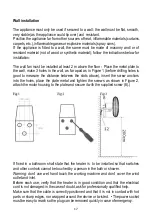
Page 17: ...he distance between the slots above insert the screw anchors into the holes place the plate metal and tighten the screws as shown in Figure 2 attach the motor housing to the plate and secure it with the supplied screw 8 If fixed in a bathroom shall state that the heater is to be installed so that switches and other controls cannot be touched by a person in the bath or shower Warning don t use wet ...

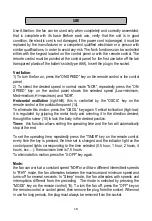
Page 18: ...he pushbutton panel 14 To eliminate this motion press the OSCIL key again Vertical inclination high low it is regulated by gripping the motor body and orienting it in the direction desired throught the screw 10 to lock the body in the desired position Timer this function allows setting the operating time and the fan will automatically stop at the end To set the operating time repeatedly press the ...

Page 19: ...l not be used for long periods it must be protected from dust and humidity we recommend storing it in its original packaging Should you decide not to use the appliance any more we recommend making it inoperative by cutting the power cord after making sure you have disconnected the plug from the socket and make dangerous parts harmless if children are allowed to play with them SPECIFICATION VOLTAGE...

Page 20: ...20 Importato da Lange Distribution S r L Via Treviso 35 20127 Milano Italy Tel 39 02 28506 1 Prodotto in Cina ...

Reviews: