background image

4

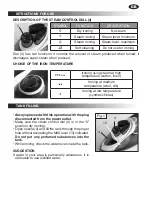
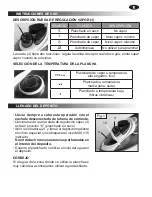
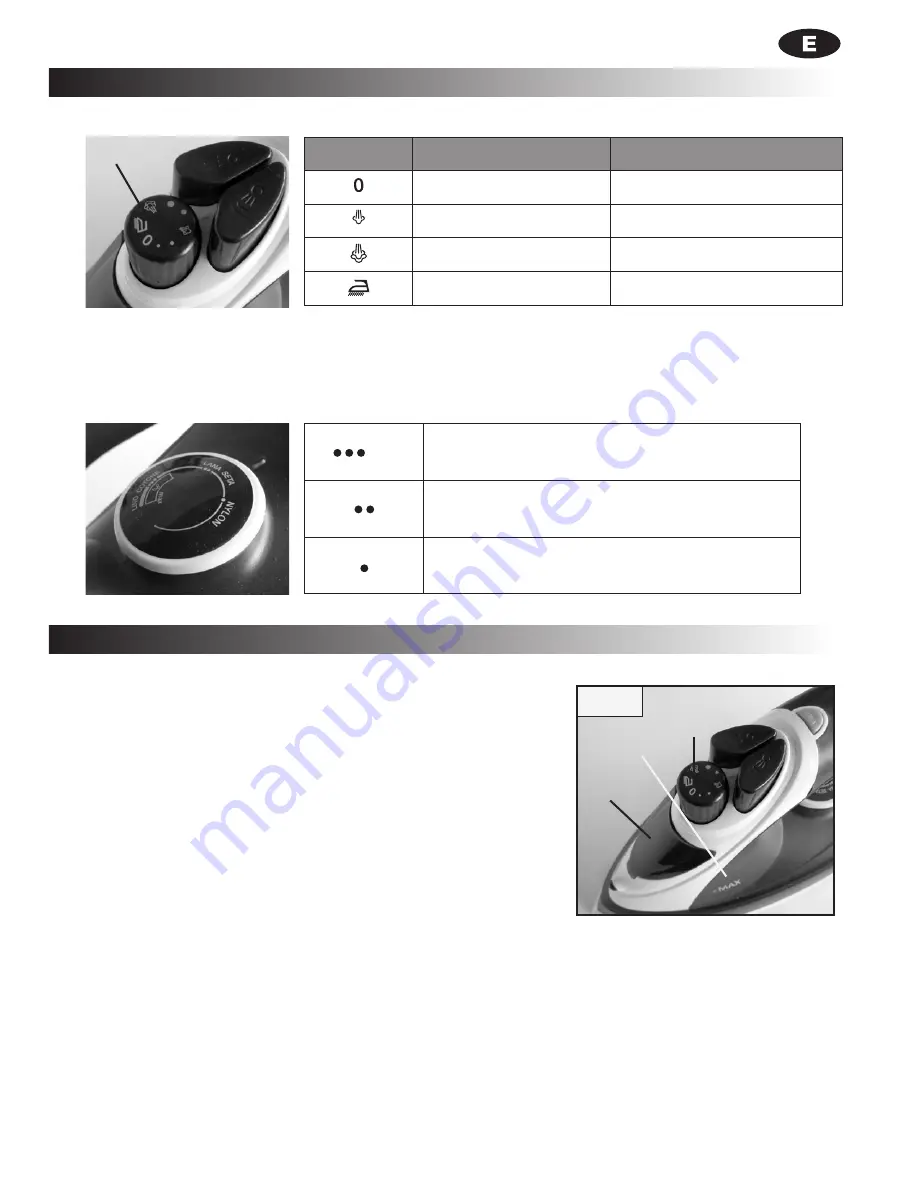
SÍMBOLO

FUNCIÓN

DESCRIPCIÓN

Planchado en seco

No vapor

Planchado de vapor

Nivel vapor: mínimo

Planchado de vapor

Nivel vapor: máximo

Autolimpieza

No utilizar para planchar

     max

Planchado de vapor a temperatura

alta (algodón, lino)


Planchado a temperatura

media (lana, seda)

Planchado a temperatura baja

(fibras sintéticas)

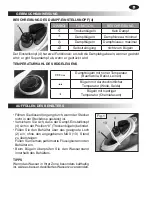
SELECCIÓN DE LA TEMPERATURA DE LA PLANCHA

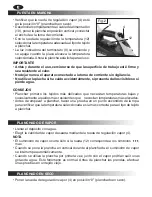
LLENADO DEL DEPÓSITO

•  Llevar  siempre  a  cabo  esta  operación  con  el 

enchufe desconectado de la toma de corriente.

• Cerciorarse de que la rueda de regulación vapor (4) 

esté en posición “0” (planchado en seco).

• Abrir la cobertura (2)  y llenar el depósito mediante 

el orificio especial  sin sobrepasar el nivel MÁX (13) 

indicado. 

  No introducir nunca sustancias perfumadas en 

el interior del depósito.

• Durante el planchado, verificar el nivel del agua en 

el depósito.

CONSEJO

Si el agua de la zona donde se utiliza la plancha es 

muy calcárea, aconsejamos utilizar agua destilada.

4

Fig.1

13

4

INSTRUCCIONES DE USO

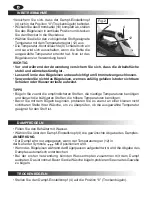
DESCRIPCIÓN RUEDA DE REGULACIÓN VAPOR (4)

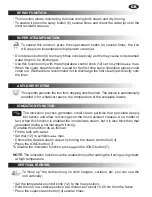
La rueda (4) tiene dos funciones: regula la salida de vapor cuando se gira; emite super 

vapor cuando se presiona.

Summary of Contents for IONO CERAMIC

Page 1: ...Libretto istruzioni Instruction Manual Libro De Instrucciones Gebrauchsanweisung ...

Page 2: ... DATI TECNICI TECHNICAL DATA DATOS TÉCNICOS TECHNISCHE DATEN IONO CERAMIC Steam Iron Type 103022 220 240V 50Hz 2400W Made in China ...

Page 3: ...11 Indicador para la rueda de regulación temperatura 12 Rueda de regulación de la temperatura 13 Indicador del nivel máximo agua en el depósito DESCRIPTION 1 Soleplate 2 Spray nozzle 3 Tank filling hole covering 4 Steam control dial super steam button 5 Spray button 6 Shot of steam button 7 IONO button 8 Ergonomic handle 9 Thermostat light 10 Power cord 11 Indicator for temperature knob 12 Tempera...

Page 4: ...to ad un efficace impianto di messa a terra come previsto dalle vigenti norme di sicurezza elettrica TERMOZETA non può essere considerata responsabile per eventuali danni causati dalla mancanza di messa a terra dell impianto elettrico Prima di collegare la spina alla presa di corrente verificare che la tensione di funzionamento dell apparecchio corrisponda a quella della propria abitazione In caso...

Page 5: ...re usato da persone bambini compresi le cui capacità fisiche sensoriali o mentali siano ridotte oppure con mancanza di esperienza o di conoscenza a meno che esse non abbiano potuto beneficiare attraverso l intermediazione di una persona responsabile della loro sicurezza di una sorveglianza o di istruzioni riguardanti l uso dell apparecchio I bambini devono essere sorvegliati per sincerarsi che non...

Page 6: ...o assicurarsi che il piano di lavoro sia stabile e resistente al calore Non lasciare mai incustodito il ferro da stiro collegato alla rete di distribuzione elettrica Non utilizzare il ferro da stiro se è caduto accidentalmente o se presenta danni visibili o perdite d acqua Non tentare mai di stirare gli indumenti indossati da una persona il vapore è molto caldo e si potrebbero causare gravi scotta...

Page 7: ...rarsi che il comando di regolazione del vapore 4 sia in posizione 0 stiratura a secco Aprire la copertura 2 e riempire il serbatoio attraverso l apposito foro senza superare il livello MAX 13 indicato Non inserire mai sostanze profumate all interno del serbatoio Durante la stiratura controllare di tanto in tanto il livello dell acqua all interno del serbatoio CONSIGLIO Se l acqua della propria zon...

Page 8: ...zione verticale e collegare la spina alla presa della corrente Con la manopola di regolazione della temperatura 12 selezionare la temperatura idonea al tipo di tessuto da stirare La spia del termostato 9 si accende e si spegnerà quando la piastra avrà raggiunto la temperatura selezionata Aquesto punto il ferro è pronto per l uso IMPORTANTE Prima e durante l uso assicurarsi che il piano di lavoro s...

Page 9: ...a funzione è attiva il ferro genera un vapore meno denso rispetto a quello di una normale stiratura a vapore Per attivare questo processo occorre Riempire con acqua il serbatoio Posizionare la manopola 12 in corrispondenza dei simboli max Scegliere attraverso il comando di regolazione del vapore 4 l erogazione di vapore desiderata Premere il tasto IONO 7 Per disattivare la funzione di ionizzazione...

Page 10: ...eratura Scollegare la spina dalla presa della corrente quando il ferro è pronto Posizionare il comando di regolazione del vapore 4 sul simbolo della funzione autopulizia agitare il ferro in posizione orizzontale sopra a un lavandino o a una bacinella Lasciare che il serbatoio si svuoti La miscela acqua vapore eliminerà una parte dei residui di calcare presenti nella piastra Successivamente riporta...

Page 11: ...ia vita deve essere raccolto separatamente dagli altri rifiuti L utente dovrà pertanto conferire l apparecchiatura giunta a fine vita agli idonei centri di raccolta differenziata dei rifiuti elettronici ed elettrotecnici oppure riconsegnarla al rivenditore al momento dell acquisto di una nuova apparecchiatura di tipo equivalente in ragione di uno a uno L adeguata raccolta differenziata per l avvio...

Page 12: ...onnected to an effective earthing system in compliance with the existing electrical safety standards TERMOZETA shall not be held responsible for any damage caused by the lack of an earthing system Before connecting the plug to the outlet check that the working voltage of the appliance corresponds to the one in your house If in doubt contact professionally qualified staff Use of adaptors multiple o...

Page 13: ...nce or knowledge unless they can benefit from the presence of someone who is responsible for their safety and who is provided with the instructions for use Children should be supervised to ensure that they do not play with the appliance The power cord of the appliance should never be replaced by the user himself In case of necessity contact an assistance centre authorised by TERMOZETA or professio...

Page 14: ... leave the iron unattended when it is connected to the power supply Do not use the iron if it has been dropped if there are signs of damage or if water leaks Do not try to iron clothes if they are worn by a person the steam is very hot you could cause serious burn injuries Do not come into contact with the water coming out of the soleplate since it is very hot and could cause burns Before carrying...

Page 15: ...isconnected from the power outlet Make sure the steam control dial 4 is in the 0 position dry ironing Open nozzle 2 and fill the tank through the proper hole without exceeding the MAX level 13 indicated Do not put any perfumed substances into the tank While ironing check the water level inside the tank SUGGESTION If water in your area is particularly calcareous it is advisable to use distilled wat...

Page 16: ...power outlet With the temperature control knob 12 select the temperature which is most suitable for the type of fabric to be ironed The thermostat light 9 turns on and will then turn off when the soleplate reaches the selected temperature The iron is now ready for use IMPORTANT Before and during use make sure the work surface is stable and heat resistant Never leave the iron unattended when it is ...

Page 17: ...is function is enabled the iron delivers steam but it is less thick than that generated during a normal steam ironing To enable this function do as follows Fill the tank with water Set dial 12 to symbols max Choose the desired steam output by turning the steam control dial 4 Press the IONO button 7 To disable the ionization function press again the IONO button 7 NOTE The ionization function can be...

Page 18: ... soleplate to the maximum temperature When the iron is ready disconnect the plug from the power outlet Set the steam control dial 4 to the symbol of the self cleaning function shake the iron in a horizontal position over a sink or a basin until the tank is empty The water and steam mixture will eliminate a part of the limestone residues that are present in the soleplate Then set dial 4 again to th...

Page 19: ...use of dangerous substances in electric and electronic equipment as well as their waste disposal The barred symbol of the rubbish bin shown on the equipment indicates that at the end of its useful life the product must be collected separately from other waste Therefore any products that have reached the end of their useful life must be given to waste disposal centres specialising in separate colle...

Page 20: ...o a una instalación con toma de tierra eficaz como está previsto por las normas de seguridad eléctrica vigentes TERMOZETA no se puede considerar responsable por eventuales daños causados por la falta de toma de tierra de la instalación eléctrica Antes de conectar el enchufe a la toma de corriente comprobar que la tensión de funcionamiento del aparato corresponde a la de la vivienda donde se debe u...

Page 21: ...mentalmente o que carezcan de experiencia excepto si están vigilados por una persona responsable de su seguridad y si están provistos de las instrucciones de uso del aparato Vigilar a los niños para cerciorarse de que no juegan con el aparato No sustituir el cable de alimentación del aparato Si fuera necesario dirigirse a un centro de asistencia autorizadoTERMOZETA o a personal cualificado En caso...

Page 22: ...aparato conectado a la toma de corriente sin vigilancia No utilizar la placha si ha caído accidentalmente si presenta daños visibles o si pierde agua Al planchar la ropa tener cuidado ya que el vapor es muy caliente y puede causar ustiones No entrar en contacto con el agua que sale de la placa ya que está caliente y podría causar quemaduras Antes de efectuar cualquier operación de limpieza descone...

Page 23: ...la toma de corriente Cerciorarse de que la rueda de regulación vapor 4 esté en posición 0 planchado en seco Abrir la cobertura 2 y llenar el depósito mediante el orificio especial sin sobrepasar el nivel MÁX 13 indicado No introducir nunca sustancias perfumadas en el interior del depósito Durante el planchado verificar el nivel del agua en el depósito CONSEJO Si el agua de la zona donde se utiliza...

Page 24: ...el enchufe a la toma de corriente Con la rueda de regulación de la temperatura 12 seleccionar la temperatura adecuada al tipo de tejido a planchar La luz indicadora del termostato 9 se enciende y se apaga cuando la placa alcanza la temperatura seleccionada Ahora la plancha está lista para el uso IMPORTANTE Antes y durante el uso cerciorarse de que la superficie de trabajo esté firme y sea resisten...

Page 25: ...n normal planchado de vapor Para activar este proceso hay que Llenar el depósito con agua Seleccionar los símbolos max mediante la rueda de regulación de la temperatura 12 Seleccionar la cantidad de vapor deseada mediante la rueda de regulación del vapor 4 Presionar el botón IONO 7 Para desactivar la función de ionización presionar otra vez el botón IONO 7 NOTA La función de ionización se puede ac...

Page 26: ...atura máxima Cuando la plancha está lista desconectar el enchufe de la toma de corriente Poner la rueda de regulación vapor 4 en correspondencia del símbolo autolimpieza agitar la plancha en posición horizontal encima de un lavabo o una palangana Dejar vaciar el depósito La mezcla agua vapor elimina una parte de los residuos de cal de la placa Sucesivamente poner el mando 4 en posición 0 Conectar ...

Page 27: ...eberá depositarse en un lugar separado de los demás residuos Por lo tanto el usuario deberá entregar el aparato cuando deje de utilizarse a los adecuados centros de recogida diferenciada de residuos electrónicos y electrotécnicos o deberá devolverlo al vendedor en el momento de compra de un nuevo aparato de tipo equivalente uno a cambio de otro La adecuada recogida diferenciada del aparato inutili...

Page 28: ...ektrische Sicherung dieses Geräts ist nur dann gewährleistet wenn es über eine wirksame Erdung gemäß den geltenden Vorschriften für elektrische Sicherheit verfügt TERMOZETA kann nicht für eventuelle Schäden haftbar gehalten werden die durch die fehlende Erdung der Elektroanlage verursacht sind Vor Einstecken des Steckers in die Steckdose prüfe man ob die technischen Daten auf dem Typenschild des G...

Page 29: ...Steckdose zu ziehen das Gerät nie unbeaufsichtigt am Stromnetz angeschlossen lassen das Gerät nie in Wasser oder andere Flüssigkeiten tauchen Das Gerät darf nicht von Personen Kinder eingeschlossen mit eingeschränkten physischen oder geistigen Fähigkeiten oder von unerfahrenen Personen benutzt werden außer wenn sie überwacht sind bzw Gebrauchsanweisungen gründlich kennen Die Kinder müssen überwach...

Page 30: ...nsachgemäße Benutzung zurückzuführen sind Vor und während der Anwendung versichern Sie sich dass die Arbeitsfläche stabil und wärmebeständig ist Lassen Sie nie das Bügeleisen unbeaufsichtigt am Stromnetz angeschlossen Verwenden Sie nicht das Bügeleisen wenn es zufällig gefallen ist oder sichtbare Schäden oder Wasserverluste aufweist Versuchen Sie nie Kleidungsstücke zu bügeln die eine Person berei...

Page 31: ...st Versichern Sie sich dass der Dampf Einstellknopf 4 sich in der Position 0 Trockenbügeln befindet Füllen Sie den Behälter über das geeignete Loch 2 ein ohne den angegebenen MAX 13 Stand zu übersteigen Füllen Sie niemals parfümierte Flüssigkeiten in den Behälter ein Beim Bügeln überprüfen Sie den Wasserstand innerhalb des Behälters TIPPS Wenn das Wasser in Ihrer Zone besonders kalthaltig ist wäre...

Page 32: ...Sie den Stecker in die Steckdose Wählen Sie die für den zu bügelnden Stoff geeignete Temperatur mit dem Temperaturregler 12 aus Die Temperatur Kontrollleuchte 9 schaltet sich ein und sie wird sich ausschalten wenn die Sohle die ausgewählte Temperatur erreicht hat Nun ist das Bügeleisen zur Verwendung bereit WICHTIG Vor und während der Anwendung versichern Sie sich dass die Arbeitsfläche stabil und...

Page 33: ...ugt das Bügeleisen Dampf der weniger dick als der Dampf der beim normalen Dampfbügeln erzeugt wird ist Um dieses Verfahren zu aktivieren Füllen Sie das Wasser mit dem Tank an Den Temperaturregler 12 i neben den Symbolen max positionieren Wählen Sie durch den Dampf Einstellknopf 4 den gewünschten Dampf Die Taste IONO 7 drücken Um die Ionisation zu deaktivieren drücken Sie die Taste IONO 7 wieder AN...

Page 34: ...leisen normal bis die Bügelsohle die höchste Temperatur erreicht hat Ziehen Sie den Stecker aus der Steckdose wenn das Bügeleisen bereit ist Positionieren Sie den Dampf Einstellknopf 4 auf das Symbol der Funktion Selbstreinigung bewegen Sie das Bügeleisen horizontal über einem Waschbecken oder einer Schüssel Der Behälter sollte sich entleeren Die Mischung Wasser Dampf wird einen Teil der Kalkrücks...

Page 35: ... im Verhältnis eins zu eins übergeben Die angemessene Abfalltrennung und die darauf folgende Verbringung des aufgelassenen Geräts in den Recyclingkreislauf zur umweltverträglichen Verwertung und Entsorgung tragen dazu bei mögliche negative Auswirkungen auf die Umwelt und die Gesundheit zu vermeiden und sie begünstigen das Recycling von Materialien aus denen das Gerät besteht Die rechtswidrige Ents...

Page 36: ...www termozeta com ...

Reviews: