Terra Universal Product Manual
WhisperFlow® Fan Filter Units
©
Copyright 2021 Terra Universal Inc. All rights reserved
•
Revised April 2021
Terra Universal, Inc. • TerraUniversal.com • 800 S. Raymond Ave. • Fullerton, CA 92831 • TEL: (714) 578-6000 • FAX: (714) 578-6020
18
Figure 9: Filter-face grille’s metal tabs
4.
Cleaning
The HEPA filter installed inside the FFU cannot be cleaned and will typically last for at least a few years depending on several
factors such as ambient conditions, total operating time, fan speed setting (airflow rate), and maintenance of the pre-filters.
When the unit is used in an ISO-classified environment, the HEPA filter will often perform sufficiently for a much longer period of
time. However, if air speed is significantly reduced or the HEPA filter fails to pass certification by an independent certifier, the
HEPA filter may need to be replaced. Be sure to verify the proper operation of all other components in the system before
attempting to replace the HEPA filter. A filter replacement alarm system is available to issue a warning alarm when pressure
reaches twice the initial backpressure; system includes an audible buzzer with silencer that sounds when set point level is
exceeded.
Note:
Filter replacement is not time dependent, but performance dependent. The filter should be changed when the fan filter unit can no
longer achieve any of the required conditions such as: particle count, face velocity, room air change rate, and/or room pressure differential.
4.1
Room-Side Filter Replacement (BIBO compatible)
WARNING
:
For applications involving risk of exposure to harmful particulates or pathogens in the filter media, use
appropriate PPE and reference your facility’s protocol for safe removal and disposal of filters.
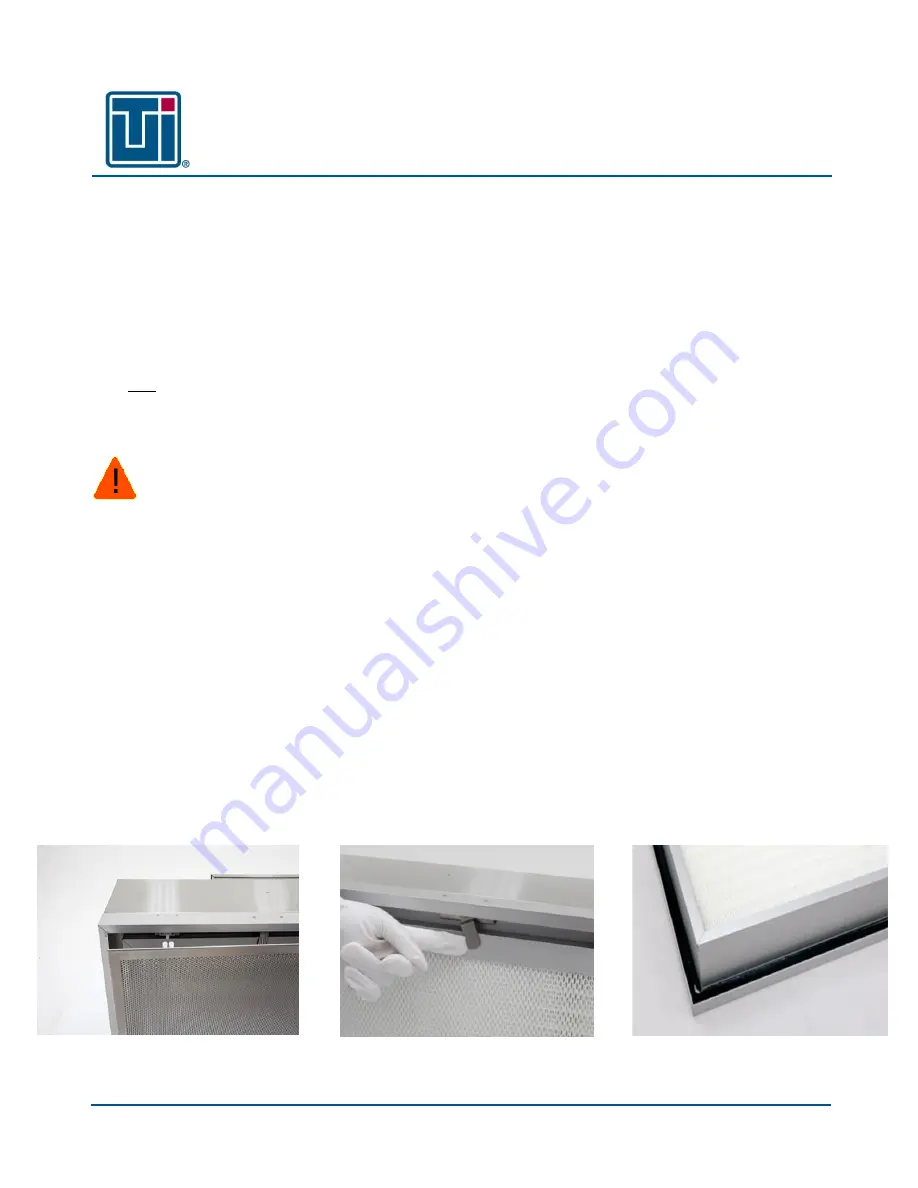
The Room-Side Replaceable (RSR) FFU is designed so that the HEPA or ULPA filter can be replaced from inside the
cleanroom without breaching the controlled environment. The filter assembly is separate from the fan module, which stays
in place in the ceiling grid.
1.
First, you must remove the stainless steel screen covering the filter that is held in place with friction catches (See
Figure 8). This screen protects the filter from damage and enhances airflow uniformity.
2.
Next, rotate the metal tabs that help hold the HEPA filter in place (See Figure 9).
3.
Gently let the used filter drop down, and set aside. The filter assembly is surrounded by a channel containing gel seal.
4.
Wipe any residual gel from the knife-edge of the fan module still in the ceiling to prepare for the replacement filter.
5.
Position your new filter carefully before pushing into place; the knife-edge of the fan module should be centered in the
channel (equal amounts of gel on both sides). Figure 10 shows the gel-filled channel of the RSR filter.
6.
Rotate the metal tabs so that they lock in the new HEPA filter.
7.
Reinstall the stainless steel screen by pushing up on the friction catches until the screen clicks into place.
8.
To replace the pre-filter located at the top of the fan module, slide the old filter out of the two tracks holding it in place
on top of the FFU and then slide in the new pre-filter.
Figure 8: Friction catches hold the screen to the fan
module housing
Figure 10: Gel-filled channel of RSR filter
WARNING


