background image


13


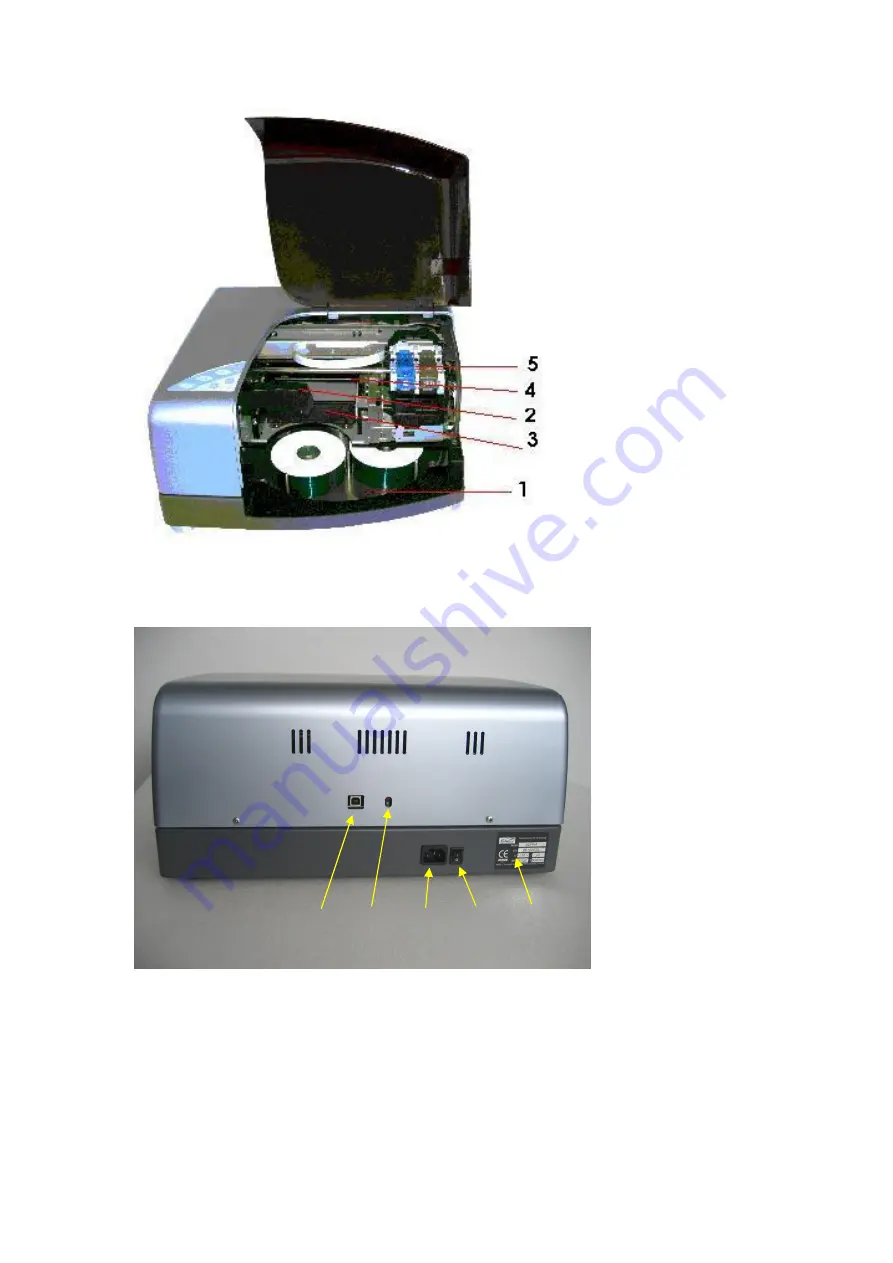
Fig. 1 b - Front view 


Fig. 1 c - Back view 

1 -  Carousel with 5 bins  
2 -  Head 
3 -  Recorder  
4 -  Printer cartridges 
5 -  Printer tray  


1 -  USB port 
2 -  LED indicators 


Red

 - Power 


Green

 - Communication 

3 -  Power port 
4 -  Power switch 
5 -  Type label 

Summary of Contents for ALPHA Office One

Page 1: ...ver 1 07 A AL LP PH HA A O Of ff fi ic ce e O On ne e CD DVD Duplicator and Printer User Manual ...

Page 2: ... the package 11 3 2 Follow these directions 11 4 Installation 12 4 1 Installation and safety instructions 12 4 2 Installation of the system 12 4 2 1 Identifying the parts 12 4 2 2 Connecting the Alpha cables 14 4 2 3 Description of the control panel 15 Installation of duplicator Alpha 16 4 2 3 Driver Installation 16 4 2 4 Printer Driver Installation 16 4 2 5 Installation the software 24 4 2 6 Unin...

Page 3: ... service 44 7 Production 45 7 1 Autoloader Bin Mode 45 7 1 1 Standard input and output bin 45 7 1 2 Sequential control of bins 45 7 1 3 Individual bin mode control 46 7 1 4 Individual bin mode control 46 7 2 Alpha and another devices 46 7 3 Optimal working 46 8 System setting 47 9 Operation 47 9 1 Read in existing CDs DVDs 47 9 2 Create a Print File 48 9 3 Record the CD DVD Image to CD DVD 48 9 4 ...

Page 4: ...ormat and provides higher capacities 1 2 1 Audio CD 1980 the companies Sony and Philips defined all necessary details for building Audio CDs This standard was published in a red covered book so it is called Red Book Standard 1 2 2 CD ROM The Yellow Book published 1983 by Sony and Panasonic defines the standard for CD ROMs The CD ROM Compact Disc Read Only Memory is a non volatile optical disc The ...

Page 5: ...Like a record CD Rs are written to spirally except that CD Rs are recorded from inside to outside The track pitch amounts to 1 6 µm and every track has a width of 0 6 µm The overall length of the track is 7 km 1 2 6 Recording methods of a CD R Single session The CD R is produced at one working cycle The final table of contents TOC is written Every audio CD is a single session CD Multi session The ...

Page 6: ...5 Pic A 1 Dimension of the disc ...

Page 7: ... much thinner layer of super purity aluminium layer which is protected by a film of lacquer or printable surface The dye is located between polycarbonate and aluminium layer See Pic A 2 Pic A 2 Description of the disc 1 Inner hole 2 Polycarbonate disc 3 Under ring 4 Upper ring 5 Dye 6 Reflection layer 7 Protective layer ...

Page 8: ...most important dimensions of the disc General dimensions Disc diameter 120 mm 0 3 0 1 mm Disc thickness pos E 1 2 mm 0 05 mm Disc hole pos A 15 mm 0 1 mm High of the under ring pos D minimal value is 0 2 mm This is the most important dimension On this proportion depends correct work of the autoloader head See Pic A12 Centre lines of the upper ring and under ring pos H They mustn t be in axis Typic...

Page 9: ...owing pictures show detail pick CD and DVD disc by head of the autoloader See the method how the head takes disc Pic A 6 Pic A 7 Pic A 8 Pic A 9 The Pic A 6 and Pic A 8 show pick one disc by head The Pic A 7 and Pic A 9 show pick two discs by head In this case they can glued up and head can t takes no one disc ...

Page 10: ...you set some speed and CD or DVD is recorded by lower speed it can be caused by insensitivity of your media and your recorder 1 4 Legal instruction Copying of copy protected CDs or DVDs with non standard formats or CD Rs DVD Rs with other programs and data without a valid licence is illegal Please pay attention to any Copyrights being in force either for standard or custom CD Rs and DVD Rs IG Alli...

Page 11: ...e recorded and gathered from the recorder for passing on to the printer or putting them in the output bin Faulty CDs DVDs are recognized and sorted out Input bins load up to 120 blank CD R s DVD R s at one time 2 3 Hardware requirements Min PC requirements Processor Pentium 1GHz 256 MB RAM USB 2 0 OS Win2000 or XP The manufacturer recommends connect the duplicator to the Uninterrupted Power System...

Page 12: ...4 Put the Alpha on the horizontal desk and let it acclimate 5 Plug in the USB cable from Alpha to computer 6 Plug in the power cord 7 Switch on the main switch situated near by power cord 8 Open the cover 9 Insert cartridges into the Alpha according to the cartridge No on the carriage see chapter 8 4 10 Press shortly button 5 Power Switch on on the control panel for switch on Remark The cartridges...

Page 13: ...ble surface Around the Alpha duplicator must be 20 cm free space for guaranteeing fast intervention on the power switch and good ventilation Do not switch off the Alpha duplicator while running Wait about 15 seconds after powering down before switching on again 3 4 Installation of the system 3 4 1 Identifying the parts This illustration shows the Alpha its buttons LED s input output and reject bin...

Page 14: ...ront view Fig 1 c Back view 1 Carousel with 5 bins 2 Head 3 Recorder 4 Printer cartridges 5 Printer tray 1 USB port 2 LED indicators Red Power Green Communication 3 Power port 4 Power switch 5 Type label 1 2 3 4 5 ...

Page 15: ... is used to control the Alpha action The Power Port is for the connection to your 110 230V power source 3 4 1 1 Marking bins default settings Bin 1 light green input bin for CD Bin 2 dark green output bin for CD Bin 3 light blue input bin for DVD Bin 4 dark blue output bin for DVD Bin 5 red reject bin 3 4 2 Connecting the Alpha cables The fig 2 shows the connecting of the Alpha duplicator Follow t...

Page 16: ...s for switch off 6 Exchange of INK cartridges Button Press this button to start ink cartridges exchange and than on the end again 7 Printer Cartridge Status LED It blinks when a cartridge needs to be replaced 8 Resume Button Press it for 2 seconds for eject or closing the printer tray 9 Printer tray Status LED It lights if you are pressing the Resume Button It blinks if the printer tray is moving ...

Page 17: ...irst Installation Plug Play Connect the Alpha to the power supply Switch on is not necessary since the personal computer recognizes the printer also in idle status The printer is based on the CDP 5000 Pro printer and uses the same driver Connect the printer with an USB cable to the PC The Plug Play function recognizes now automatically that a new printer is connected and starts the installation ro...

Page 18: ... driver is installed and all files were copied This can take some minutes This dialog field informs you that the driver is not registered officially with the manufacturer of the operating system It does not state however anything about the quality of the driver You can be sure that the driver is programmed and tested with the latest programs and tools You can continue the installation without any ...

Page 19: ...18 3 4 4 2 Manual Installation Please open the dialog Printers and Faxes Run the Add Printer Wizard by pressing the button Add a printer ...

Page 20: ...19 Click Next to continue Select the option Local printer attached to this computer and press the Next button to continue Select a free USB Port ...

Page 21: ...20 Again click Next to continue Press the button Have Disk to select the path to the installation file Search the path by clicking on the button Browse ...

Page 22: ...21 Select the drive Select the path Select the installation file ...

Page 23: ...22 To continue the installation press Next Press OK to continue It is not necessary to print a test page ...

Page 24: ...Add Printer Wizard and start the installation by pressing the button Finish This dialog field informs you that the driver is not registered officially with the manufacturer of the operating system It does not state however anything about the quality of the driver You can be sure that the driver is programmed and tested with the latest programs and tools ...

Page 25: ...g In order to uninstall the printer driver the personal computer must be restarted first of all This is necessary so that all files which are used by the old printer driver are not blocked by other applications or by the operating system Blocked files can not be removed during the uninstallation This may cause problems in the case of a later reinstallation All programs must be closed before uninst...

Page 26: ...he OK button This window comes up when some files could not be deleted by the Uninstaller Please restart the Personal Computer and run this uninstaller application again If no problems occur during the installation you get this Information dialog The uninstalling is finished after the restart of the Personal Computer ...

Page 27: ...h different options The printing driver software consists from well known MS Windows functions and some special functions in the Maintenance dialog CD PRINTER 5000 PRO Properties Dialog General With the button Printing Preference you can reach the special printer properties Dialog Advanced If the CDP will be driven in an CD DVD autoloader environment the option Print directly to the printer should...

Page 28: ...with the option Print Task Quick Sets The CDP supports 120 mm 120 mm CD and DVD formats Smaller media is possible with proper templates and settings The possible print modes Standard Premium and Photo and also the possible print qualities Normal Best und Maximum dpi will be explained in the chapter How to set print quality and mode The dialog hp Digital Photography enables the possibility to optim...

Page 29: ...automatically The Colour dialog is the main dialog to modify the colour settings The colour options will be explained later in this manual In this dialog is also the possibility to change the Saturation Brightness Colour tone and Colour space The Advanced Features allows you to set the ink volume and the dry time These settings are depending very much on the chosen print quality and mode The optio...

Page 30: ...t colour and photo pen you can set the option Black Print Cartridge Only This setting is not possible with the print mode Photo Look for information in the chapter How to set print quality This dialog allows you to fit the print image onto the different possible media sizes ...

Page 31: ...30 The dialog Maintenance helps you to set and check the physical options of the CDP 5000 Pro and will be explained in the next chapter Version number of the driver ...

Page 32: ...ysical options of the CD PRINTER 5000 Pro Each option of this dialog will be explained separately The tray of the CD PRINTER 5000 PRO RECORDER can be opened and closed with this two buttons Is the printer busy or in an error state these buttons and the black switch are disabled ...

Page 33: ...pends on the print image print mode and quality This calculated value is stored inside the printer memory The actual ink level inside the cartridge may vary from this calculated value These print image shows the values how much the printing is away from the centre of the printer tray A distance from 1 mm equals a value of 100 steps In this area is shown the ink level and the life time of the cartr...

Page 34: ...ile onto the screen This area is used for the cartridge alignment Press the button Print Alignment File to print a special print image which shows you the alignment plot Choose the values where the lines are straight write values into the proper fields and press the button Save Alignment to store the value inside the printer memory Depending on the installed cartridges the alignment plot and align...

Page 35: ...he cartridge may vary from this calculated value If the level is reached a little Dialog Box appears on the screen The user has to click on the OK button to print further on After pressing OK the printing process is going on It is up to the user to stop the automated process now or not The default value is Early but our experience shows us that the setting Normal is a good choice But this depends ...

Page 36: ...nicoloured backgrounds Notes for the print mode Photo In Photo mode you can use the special Photo cartridge instead of the black cartridge because the printer does not use the black cartridge in Photo mode If you do not use a Photo cartridge you can use the colour cartridge without any other cartridge It is not necessary to use two cartridges If the print image contains photos and graphics you sho...

Page 37: ... will save ink during the cleaning cycle For example you can remove the colour cartridge if you are printing greyscale with the selected option Black Print Cartridge Only If you are printing in Photo mode only with the colour cartridge you can remove the black one You can force the printer to use the black cartridge only when you select it in the Colour options ...

Page 38: ...k Before you will run the calibration you have to close the Disc Manager 4 1 1 Running the calibration To start the calibration program click on icon Calibration it was installed by choosing Software see chapter 4 3 3 At first select the PC COM port connected to the Alpha Fig 4 COM setting Confirm the setting With OK Fig 5 Main Windows appears Main Menu Menu offers these possibilities Loader Reset...

Page 39: ...4 Calibrate recorder Click on the recorder button in the main window The tray moves out from the recorder Put disc on the head and set the bottom position Press OK key to save the adjustment For the middle position adjustment unloose two screws and adjust the position of recorder holder mechanically 4 1 5 Calibrate Head The point of this adjustment is to find the proper distance between the head a...

Page 40: ...t menu Start Programs Alpha Calibration flasher In flasher s window see Picture choose COM port connected to Alpha type the path to new firmware Then select Flash and the firmware will be uploaded Remark Be very careful during uploading to provide uninterruptible power and connection Interruption of connection or power during programming can cause the loader will not work without servicing The man...

Page 41: ...t he right lubricant 5 2 Maintenance CDP Ink Fleece 5 2 1 Required Parts and Tools Screw driver Tweezers Gloves Insert for ink jet head clean Part No 37 9006 01 To make sure that the printer will work without problems the ink fleece should be replaced after 12 used cartridges Remark Before shipping the printer you must replace the ink fleece 5 2 2 Description of Ink Fleece Replacement Connect the ...

Page 42: ...41 Move the cartridges carefully to the left Now you can see the ink fleece at the bottom Now you can see the clamping mechanism Small ink fleece cover Clamper ...

Page 43: ...42 Now remove the ink fleece with the tweezers Lift up the small cover by releasing the bails Lift the cover up to the topmost position ...

Page 44: ...gain and wait until the printer has finished the initialisation Please wait this can take some minutes When the Exchange of ink cartridges LED stops flashing the initialisation has finished Put the new fleece under the service station ...

Page 45: ...g the outside of the device Use distilled water only Do not use household cleaners or detergents Use a soft damp cloth to remove dust smudges stains and spilled ink from the exterior of the printer case 5 3 2 Alpha Interior Caution Do not clean the Alpha s interior Keep all liquids out of the interior 5 3 3 Printer Cradle Bar Do not lubricate the bar on which the print cradle moves It is normal to...

Page 46: ...ght green input bin for CD Bin 2 dark green output bin for CD Bin 3 light blue input bin for DVD Bin 4 dark blue output bin for DVD Bin 5 red reject bin 6 1 2 Sequential control of bins This mode is offering 3 input bins and 1 output bin If the input bin becomes empty this bin will be later used as output bin in the next sequence So Alpha can make much more CDs DVDs without changing discs The syst...

Page 47: ...n 5 is always the reject bin 6 2 Alpha and another devices The Disc Manager is taking 100 power of CPU So don t connect other USB devices to PC in time when Alpha is working This action could make error in Alpha working 6 3 Optimal working For the optimal working it is better first to burn and then to print In the oposit situation first printing than burning the ink on the disc is not dry In the r...

Page 48: ...en 8 1 Read in existing CDs DVDs An existing CD DVD that should be duplicated is named Master CD DVD 1 Put the Master CD DVD into the recorder 2 Start Disc Manager by clicking on desktop icon or clicking at menu Start Programs DiscManager 3 If you want to create a CD DVD image of the Master CD DVD click at Image Read button on the Toolbar 4 Type path and file name 5 Select the drive that you want ...

Page 49: ...diameter of 118 mm the inner one of 38 36 or 18 mm for standard printable media 120 mm 8 3 Record the CD DVD Image to CD DVD You must have a finished CD DVD image recognizable at the file extension nrg or iso on hard disc 1 Start Disc Manager 2 Create new job to the list with File Job Editor Add Enter the Job Name mark Recording Browse and select Image source file If you will print mark Printing a...

Page 50: ...y drawing at the forward end 4 Take a new ink cartridge out of the packing and remove the adhesive tape from the print head 5 Place the cartridges gently into their holders with the contact field backward Do not press down on the cartridges 6 Press the ink cartridge clamps down until they lock in place C Press the INK cartridge exchange button again The printer will lock the cartridges the LED swi...

Page 51: ...with 4800 dpi Supported Client Operating System OS Windows 2000 XP Min PC Requirements 1 6 GHz 512 MB RAM USB 2 0 OS Windows 2000 XP Software Disc Manager Label Designer Nero Interface USB 2 0 Dimension h x w x d 456 x 240 x 453 mm Weight 20 kg Power 110 230 V AC 50 60 Hz Consumption Max 200 W Conditions Operational Storage Temperature 15 to 30 C 15 to 35 C Humidity 15 to 80 15 to 90 ...

Page 52: ...y special condition printer is without the ink cartridges and CD is on the tray inside the printer or empty tray is in the backstop position 1 switch on 2 LED 7 is blinking because no cartridges are installed carousel starts rotation 3 wait until the LED 4 starts slowly blinking cca 45s 4 push the Exchange cartridge button 6 5 the LED 4 starts very fast blinking 6 insert cartridges 7 push the Exch...

Page 53: ...tems Olomoucká 81 627 00 Brno Czech republic 420 548 523 811 É 420 548 423 810 info terra cz WWW www terra cz Sale and service LSK Data Systems GmbH Benzstrasse 21 D 64807 Dieburg Germany 49 6071 9852 0 É 49 6071 9852 52 info lsk de WWW www lsk de ...

Reviews: