background image

15


Attaching a Sanding Paper

WARNING! Never use the sander unless the entire base is fitted with sanding paper.
Note: this tool has a velcro base, only velcro sanding paper can be used on this tool.
1. Select the required grade of sandpaper.
2. Align and stick the sandpaper onto the base of the tool.

Switching on and off 

To start the machine, press the ON/OFF switch at the end marked with “_”; to stop the 
machine, press the switch at the end marked “o”. (Fig.1-2)
WARNING! The sander is designed for dry sanding only and under no circumstances 
should it be used for wet sanding. 

Using the compact orbital sander

WARNING! Never use the sander unless the entire base is fitted with sandpaper.
The sander is designed for sanding wood, metal, plastic and similar material. It can be used 
for sanding and finishing the surfaces.
1. Switch on the sander before you place it on the work piece and move it over the surface to 
be smoothed in a circular motion.
2. Take care to hold the sander with its base parallel to the surface of the workpiece, and use 
only moderate pressure.
3. If there are still marks on your work piece after sanding, try either going back to a coarser 
grade paper and sanding the marks out before resuming with the original choice of grade, or 
try using a new piece of sandpaper to eliminate the unwanted marks before going on to a finer 
grade and finishing the job.

Warning

 Wear safety goggles, a dust mask and hearing protection. The whole sanding pad

must rest on the work piece.

Installing or removing battery pack.

1. To remove the battery pack, withdraw it from the tool while depressing the tabs (Fig.2) 
on both sides of the battery pack. 
2. To insert the battery pack, align the ribs on the top of the battery with the grooves in 
the housing and slide it into place. Always insert it all the way until it locks in place with a 
little click. Lightly pull on the battery pack to ensure it is locked into place and will not 
accidentally fall out of the tool, causing an injury.
3. Do not use force when inserting the battery pack. If the battery does not slide in easily, 
it is not being inserted correctly.

Summary of Contents for T12VOS

Page 1: ...12V Li ion Cordless Orbital Sander T12VOS User Manual Please read and retain for future reference IMPORTANT Read all instructions before use...

Page 2: ...crews M3X6 5 Fixed plate 22 Spring Washer 6 Screws ST3X14 23 Locator card 7 Plate 24 Motor 8 Right sleeve 25 Right housing 9 Rubber ring 26 Switch button 10 Bearing 628 2Z 27 Power generate lug holder...

Page 3: ...2 Exploded Assembly Diagram NOTICE Actual product may vary from pictures shown...

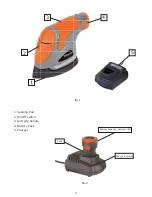
Page 4: ...3 2 3 1 5 4 fig 1 fig 2 1 Sanding Pad 2 On Off switch 3 Soft grip handle 4 Battery pack 5 Charger Tabs Charge indicator Battery capacity indicator LED...

Page 5: ...this product Failure to do so can result in serious injury Save this manual for future reference Copyright 2013 by ACL Group Intl Ltd All rights reserved This manual or any artwork contained herein mu...

Page 6: ...Keep work area clean and well lit Cluttered or dark areas invite accidents Do not operate power tools in explosive atmospheres such as in the presence of flammable liquids gases or dust Power tools c...

Page 7: ...ed surfaces such as radiators cooking ranges and any other fixed appliance with metal surfaces Do not expose your power tool to wet or damp conditions and NEVER use in rain Check regularly the power c...

Page 8: ...SE IN A DANGEROUS ENVIRONMENT Don t use power tools in damp or wet locations or expose them to rain Keep work area well lit 6 KEEP CHILDREN AWAY All visitors should remain at a safe distance from work...

Page 9: ...imes 16 MAINTAIN TOOLS WITH CARE Keep tools clean and in good working condition for maximum safety performance Follow instructions for lubricating and changing accessories 17 DISCONNECT TOOLS BEFORE S...

Page 10: ...their own caution and common sense when using this power tool Following this guide will greatly reduce your risk of electric shock or injury Only use qualified repair agents to service this power too...

Page 11: ...Avoid unintentional switching on Ensure the On Off switch is in the off position before inserting battery pack Carrying the power tool with your finger on the On Off switch or inserting the battery pa...

Page 12: ...be aware of the fact that it can begin to operate at any time Charging the battery pack Fig 2 Note Newly purchased Batteries are not fully charged and must be charged before using in your cordless too...

Page 13: ...injuries A NEVER disassemble the battery B NEVER incinerate the battery even if it is damaged or is completely worn out The battery can explode in a fire C NEVER short circuit the battery D NEVER inse...

Page 14: ...ay cause health complications 1 Do not charge battery pack when temperature is below 10 C 50 F or above 40 C 104 F 2 Do not attempt to use a step up transformer an engine generator or DC power recepta...

Page 15: ...ny other materials that may contain carcinogens A suitable breathing respirator and protective clothing must be worn by all persons entering the work area Work area should be sealed by plastic sheetin...

Page 16: ...to hold the sander with its base parallel to the surface of the workpiece and use only moderate pressure 3 If there are still marks on your work piece after sanding try either going back to a coarser...

Page 17: ...ed of in an environmentally friendly way Only for EC countries Defective or dead batteries must be recycled according to the directive 2006 66 EC Battery packs batteries Disposal of the exhausted batt...

Page 18: ...e any dust particles Wear safety glasses to protect your eyes whilst cleaning 3 Monitor the dust bag if equipped and empty when approximately half full Always empty into an appropriate container REMEM...

Page 19: ...eclaration is to certify that it conforms to CE EMC MD and RoHS directives EN55014 1 A1 2009 EN55014 2 A2 2008 All provisions of Annex 1 of Council Directive 2004 108 EC EMC directive EN60745 1 A11 20...

Page 20: ...mes all risk and liability arising out of his or her repairs or parts replacement to the original product 12 Months Limited Warranty If within 12 months from the date of purchase you experience any pr...

Reviews: