background image

User Manual for UAV PPK Solution v1.0 


2

 / 

26


List of Tables 

Table 1 MARKCONTROL ................................................................................. 10


List of Figures 

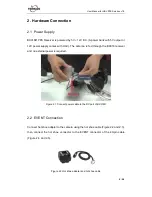
Figure 2.1 Connect power cable to the DC port of BX316R ................................ 5


Figure 2.2 Hot shoe adapter and hot shoe cable ................................................ 5


Figure 2.3 Connect hot shoe adapter to the camera ........................................... 6


Figure 2.4 Outline of the 40-pin cable ................................................................. 6


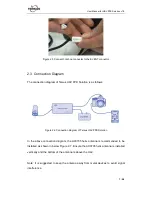
Figure 2.5 Connect hot shoe connector to the EVENT connector ....................... 7


Figure 2.6 Connection diagram of Tersus UAV PPK Solution ............................. 7


Figure 2.7 Recommended installation of AX3705 helix antenna on the UAV ...... 8


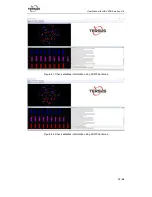
Figure 4.1 Check satellites information using AX3705 antenna ........................ 13


Figure 4.2 Check satellites information using AX3703 antenna ........................ 13


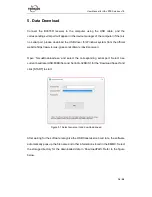
Figure 5.1 Select serial port and download speed ............................................ 14


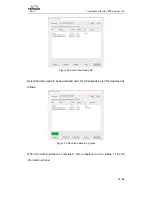
Figure 5.2 Select download path ...................................................................... 15


Figure 5.3 Download data in progress .............................................................. 15


Figure 5.4 Data download is completed ........................................................... 16


Figure 6.1 TersusGeoPix in the Start menu ...................................................... 17


Figure 6.2 Main interface of Tersus GeoPix ...................................................... 18


Figure 6.3 Select a folder for working directory................................................. 18


Figure 6.4 Select base data and rover data without base position .................... 20


Figure 6.5 Select base data and rover data with base position ......................... 21


Figure 6.6 Click RUN to start data processing .................................................. 21


Figure 6.7 Geotagged Result List ..................................................................... 22


Figure 6.8 Check the coordinate information of the tagged pictures ................. 23


Figure 6.9 Positioning results of the GNSS post-processing............................. 24


Figure 6.10 The location information of the EVENT moments .......................... 24


Summary of Contents for AX3705

Page 1: ...Version V1 0 20180928 User Manual For UAV PPK Solution 2018 Tersus GNSS Inc All rights reserved Sales Technical Support sales tersus gnss com support tersus gnss com More details please visit www ters...

Page 2: ...are Configuration 9 3 1 Base Station 9 3 2 Rover on UAV 10 3 2 1 EVENT Configuration 10 3 2 2 Rover Configuration 11 4 Data Quality Check 12 5 Data Download 14 6 GeoPix User Guide 17 6 1 Introduction...

Page 3: ...k satellites information using AX3703 antenna 13 Figure 5 1 Select serial port and download speed 14 Figure 5 2 Select download path 15 Figure 5 3 Download data in progress 15 Figure 5 4 Data download...

Page 4: ...User Manual for UAV PPK Solution v1 0 3 26 Revision History Version Revision Date Change summary 1 0 20180928 Initial Release...

Page 5: ...on after input all necessary data the software provides the result directly as input for image processing software Tersus GeoPix is part of Tersus Tool Suite which can be downloaded from the official...

Page 6: ...V The antenna is fed through the BX316 receiver and no external power is required Figure 2 1 Connect power cable to the DC port of BX316R 2 2 EVENT Connection Connect hot shoe adapter to the camera us...

Page 7: ...User Manual for UAV PPK Solution v1 0 6 26 Figure 2 3 Connect hot shoe adapter to the camera Figure 2 4 Outline of the 40 pin cable...

Page 8: ...s follows Figure 2 6 Connection diagram of Tersus UAV PPK Solution In the above connection diagram the AX3705 helix antenna is recommended to be installed as shown in below Figure 2 7 Ensure the AX370...

Page 9: ...User Manual for UAV PPK Solution v1 0 8 26 Figure 2 7 Recommended installation of AX3705 helix antenna on the UAV...

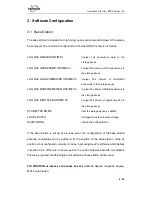
Page 10: ...ephemeris to the storage device LOG FILE BESTXYZB ONTIME 30 output 30s interval of optimal position to the storage device STORETYPE EMMC set the storage device as eMMC LOGFILE AUTO storage mode is aut...

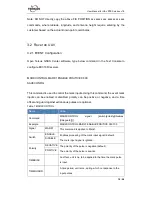
Page 11: ...event mark inputs can be enabled or disabled polarity can be positive or negative and a time offset and guard against extraneous pulses are optional Table 1 MARKCONTROL Name Value Command MARKCONTROL...

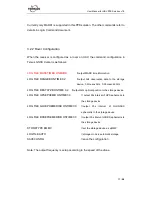
Page 12: ...to the storage device 0 2 means 5Hz 0 05 means 20Hz LOG FILE BESTXYZB ONTIME 0 2 output 5Hz optimal position to the storage device LOG FILE GPSEPHEMB ONTIME 30 output 30s interval of GPS ephemeris to...

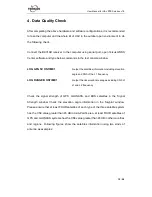
Page 13: ...n including elevation angle and CN0 of the L1 frequency LOG RANGEB ONTIME 1 output the observation messages including CN0 of L1 and L2 frequency Check the signal strength of GPS GLONASS and BDS satell...

Page 14: ...User Manual for UAV PPK Solution v1 0 13 26 Figure 4 1 Check satellites information using AX3705 antenna Figure 4 2 Check satellites information using AX3703 antenna...

Page 15: ...tersus gnss com software david receiver Open TersusDownload exe and select the corresponding serial port Select use current baudrate USB 80KB Second Serial 8 32KB S for the Download Speed and click S...

Page 16: ...5 2 Select download path Select the data needs to be downloaded and click Download to start the download as follows Figure 5 3 Download data in progress When the data download is completed OK is disp...

Page 17: ...User Manual for UAV PPK Solution v1 0 16 26 Figure 5 4 Data download is completed...

Page 18: ...moment photos Tersus GeoPix is part of Tersus Tool Suite The latest version of Tersus Tool Suite can be downloaded from Tersus official website https www tersus gnss com software Install the Tersus T...

Page 19: ...s with geotag if there are pictures in this directory select the folder of the pictures taken by the camera at the time of triggering EVENT as the working directory and the software automatically reco...

Page 20: ...r data supports Tersus Binary dat trs only Note Select Tersus Binary dat trs when the observation data is obtained using Tersus GNSS receiver If the antenna coordinates of base station have been confi...

Page 21: ...er and the camera focus which is the fixed elevation difference of the camera focus elevation minus the antenna phase center elevation Check the pictures according to the needs to determine whether to...

Page 22: ...on v1 0 21 26 Figure 6 5 Select base data and rover data with base position 6 2 3 Data Processing Click the RUN at the bottom to start GNSS post processing as shown in Figure 6 6 below Figure 6 6 Clic...

Page 23: ...s shown as below Figure 6 7 Geotagged Result List 6 2 4 View processing results After the geotag for the pictures is completed the software automatically generate folders named geotag and workingtemp...

Page 24: ...8 Check the coordinate information of the tagged pictures Click ViewPlot at the bottom to view the positioning results of the GNSS post processing data and the location information of the EVENT moment...

Page 25: ...User Manual for UAV PPK Solution v1 0 24 26 Figure 6 9 Positioning results of the GNSS post processing Figure 6 10 The location information of the EVENT moments...

Page 26: ...ONASS GLObal NAvigation Satellite System GNSS Global Navigation Satellite System GPS Global Positioning System PC Personal Computer PPK Post Processing Kinematic PPS Pulse Per Second RINEX Receiver In...

Page 27: ...notice and does not reflect the commitment on Tersus GNSS Inc No part of this manual may be reproduced or transmitted by all means without authorization of Tersus GNSS Inc The software described in t...

Reviews: