background image

- 2 -

Tortuosity or complex vessel anatomy may affect accurate
placement of the coil.

The long-term effect of this product on extravascular tissues has
not been established.  Care should be taken to retain the device in
the intravascular space.

Always advance an appropriately-sized guidewire through the
delivery catheter after deployment to ensure that no part of the coil
remains within the catheter prior to delivering the next coil or
removing the catheter from the patient.

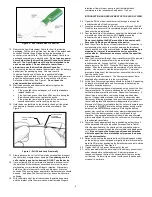
Diagram of Azur System Setup 

PREPARATION FOR USE 

1.

Refer to the setup diagram.

2.

Select the catheter or microcatheter to be used for coil
delivery.  Select a compatible pushing guidewire.

3.

Attach an RHV to the hub of the delivery
catheter/microcatheter.  Attach a one-way stopcock to the
side arm of the RHV and connect the flush solution line to
the stopcock.  (If fluoroscopic roadmapping is being used, an
appropriate guide catheter with attached RHV and flush
solution line must be incorporated as well.)

4.

Open the stopcock and flush the delivery catheter with sterile
flush solution.  Close the stopcock.  To minimize the risk of
thromboembolic complications, it is critical that a continuous
infusion of appropriate sterile flush solution be maintained
into the delivery catheter (and femoral sheath, if present).

CATHETERIZATION OF THE LESION 

5.

Access the parent vessel or vascular structure using
standard interventional procedures.

6.

Position the delivery catheter for pushable coil deployment
as close to the target lesions as possible, using standard
technique.  Remove the guidewire, if used.

COIL SIZE SELECTION 

7.

Measure or estimate the size of the vessel or lesion to be
treated.

8.

Select appropriately sized coils.  The diameter of the first
and second coils placed should never be less than the 
diameter of the vessel to be treated or less than the neck
width of the aneurysm to be treated, or the propensity for the
coils to migrate may be increased.  For vessel occlusion, it is
suggested that the diameter of the initial coil placed be
slightly larger than the actual vessel diameter to prevent
displacement or migration.   For aneurysm treatment, coils

placed within the aneurysm sac must not be larger than the
dome size, or protrusion of the coil from the sac may result.

9.

Correct coil selection increases effectiveness and patient
safety.  Occlusive efficiency is, in part, a function of
compaction and overall coil mass.  In order to choose the
optimum coil for any given lesion, examine the pre-treatment
angiograms.  The appropriate coil size should be chosen
based upon angiographic assessment of the treatment site.
For vessel occlusion, the diameter of the vessel must be
considered.  In the case of aneurysms, diameter of the
parent vessel, aneurysm dome size, and aneurysm neck
width must be considered.
NOTE: The coil has an outer layer consisting of a hydrophilic
polymer.  As a result, the secondary coil diameter
(dimension ‘A’ on the package label) will increase by
approximately 0.5 mm following full hydration (approx. 20
minutes).

PREPARATION FOR DELIVERY 

10. Remove both the coil (in its introducer) and stylet from the

protective pouch.

11. Verify the cap is present and secure on the distal end of the

introducer and that the introducer is free from damage. 

 If

any damage is observed, DO NOT use the system.

12. Verify the coil is properly positioned in the introducer.  If the

coil has migrated proximally into the introducer hub, gently
tap the distal end of the introducer onto a flat surface until
the proximal end is no longer visible in the hub.  If it has
migrated distally into the cap, gently tap the proximal end of
the introducer onto a flat surface until the distal end returns
to the tube.

13. Remove the proximal cap from the introducer hub.
14. Fill a 1-cc syringe with saline.  Connect the syringe to the

introducer hub.  Hold the introducer in a level position and
slowly and gently inject saline until saline emerges from the
vented distal cap.  Allow the coil to remain in the introducer
for 3 minutes, leaving the syringe attached.  This helps

Summary of Contents for Azur CX 35

Page 1: ...gle use only Do not reuse reprocess or resterilize Reuse reprocessing or resterilization may compromise the structural integrity of the device and or lead to device failure which in turn may result in...

Page 2: ...timate the size of the lesion to be treated 9 For aneurysm occlusion the diameter of the first and second coils should never be less than the width of the aneurysm neck or the propensity for the coils...

Page 3: ...otating the delivery pusher may result in a stretched coil or premature detachment of the coil from the delivery pusher which could result in coil migration Angiographic assessment should also be perf...

Page 4: ...ction including but not limited to the transmission of infectious disease s from one patient to another Contamination of the device may lead to injury illness or death of the patient Batteries are pre...

Page 5: ...age or expense directly or indirectly arising from the use of this device Terumo neither assumes nor authorizes any other person to assume for it any other or additional liability or responsibility in...

Page 6: ...use reprocess or resterilize Reuse reprocessing or resterilization may compromise the structural integrity of the device and or lead to device failure which in turn may result in patient injury illnes...

Page 7: ...will allow for fluoroscopic road mapping during the procedure 6 Select a microcatheter with the appropriate inner diameter After the microcatheter has been positioned inside the lesion remove the guid...

Page 8: ...the introducer sheath Excessive tightening could damage the device 23 Push the coil into the lumen of the microcatheter Use caution to avoid catching the coil on the junction between the introducer s...

Page 9: ...e risk of aneurysm or vessel rupture Do NOT advance the delivery pusher once the coil has been detached 43 Verify the position of the coil angiographically through the guide catheter 44 Additional coi...

Page 10: ...not limited to any implied warranties of merchantability or fitness for particular purpose Handling storage cleaning and sterilization of the device as well as factors relating to the patient diagnos...

Page 11: ...ation of the device and or cause patient infection or cross infection including but not limited to the transmission of infectious disease s from one patient to another Contamination of the device may...

Page 12: ...e may be increased For vessel occlusion it is suggested that the diameter of the initial coil placed be slightly larger than the actual vessel diameter to prevent displacement or migration For aneurys...

Page 13: ...catheter tip from moving away from the intended delivery location 20 Once the coil has been deployed and prior to removing the delivery catheter advance the guidewire through the catheter tip to verif...

Page 14: ...sequential loss damage or expense directly or indirectly arising from the use of this device Terumo neither assumes nor authorizes any other person to assume for it any other or additional liability o...

Page 15: ...device and or lead to device failure which in turn may result in patient injury illness or death Reuse reprocessing or resterilization may also create a risk of contamination of the device and or caus...

Page 16: ...er with the appropriate inner diameter After the microcatheter has been positioned inside the lesion remove the guidewire COIL SIZE SELECTION 7 Perform fluoroscopic road mapping 8 Measure and estimate...

Page 17: ...ppropriately sized coil Movement of the coil may indicate that the coil could migrate once it is detached DO NOT rotate the delivery pusher during or after delivery of the coil into the vasculature Ro...

Page 18: ...of the patient Batteries are pre loaded into the Azur Detachment Controllers Do not attempt to remove or replace the batteries prior to use After use dispose of the Azur Detachment Controller in a man...

Page 19: ...not be liable for any incidental or consequential loss damage or expense directly or indirectly arising from the use of this device Terumo neither assumes nor authorizes any other person to assume for...

Page 20: ...PD110323 Rev A 1 MicroVention Inc Instructions for Use Detachable...

Page 21: ...sitioned in the vessel or aneurysm within the specified reposition time from the time the device is first introduced into the microcatheter If the coil cannot be positioned and detached within this ti...

Page 22: ...ation replace the device If the green light remains solid green for the entire three second observation continue using the device 15 Hold the device just distal to the shrink lock and pull the shrink...

Page 23: ...The coil implant has been determined to be MR conditional according to the terminology specified in the American Society for Testing and Materials ASTM International Designation F2503 08 Non clinical...

Reviews: