background image

Preliminaries

Unpack the appliance carefully. If you dispose of the packaging, do so 

having regard to any recycling regulations in your area. 
Inspect the iron carefully.  If any item is missing or damaged please 

contact the Tesco store where you purchased the item, or your nearest 

Tesco store. Please have your receipt ready when you call.

The Soleplate: 


Remove any protective packaging from the soleplate (3) before use. 

Polish the soleplate lightly with a clean soft cloth to remove any resi-

dues. The soleplate is coated. To protect the finish do not use abrasives 

to clean the iron and avoid running the iron over metal surfaces,  but-

tons, zippers, etc.. 

Assembly

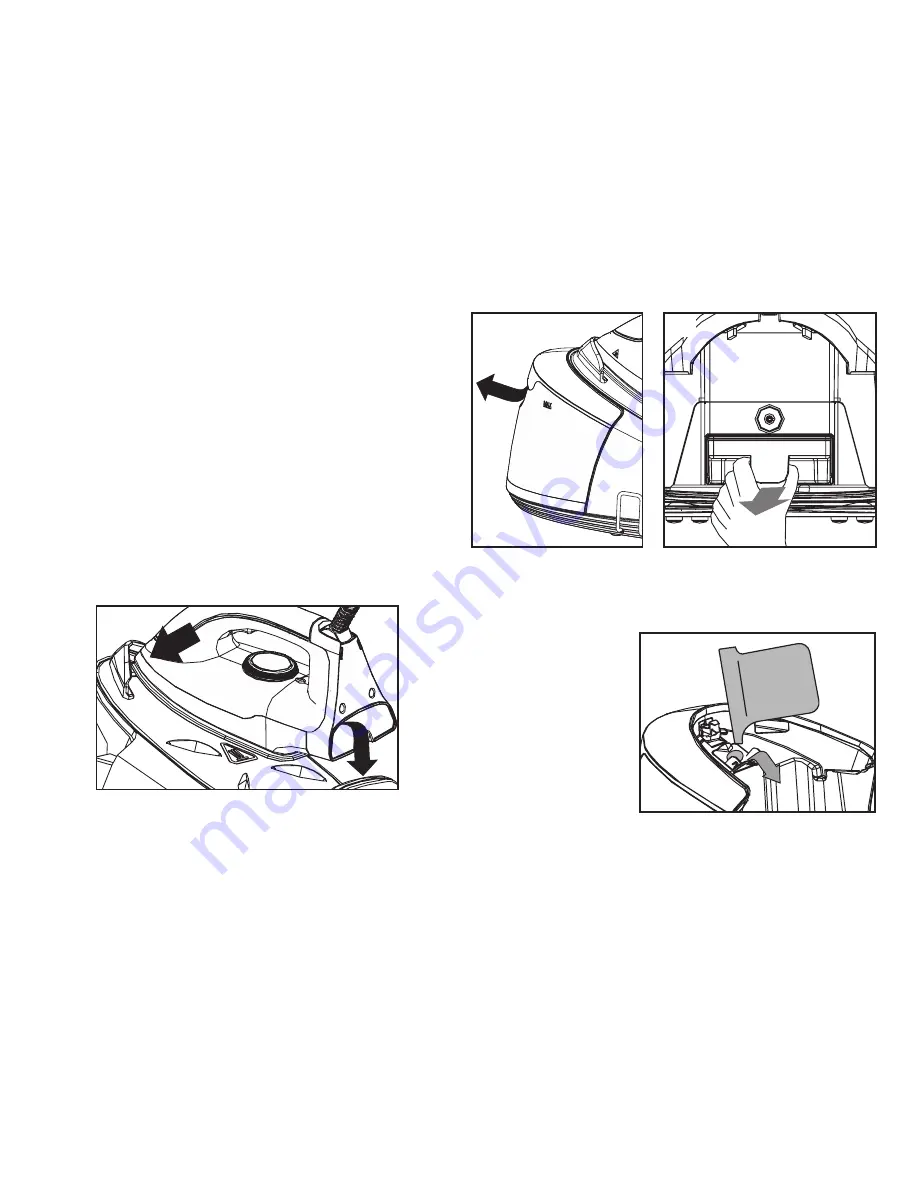
Set the steam station on a firm level surface. To place the Iron on the 

iron rest, angle the iron down and place the front of the iron in the rest, 

then lower the rear of the iron into the rest.

Preparing the Anti-Calc Filter

Refer to the next two illustrations.  
1.  Place your hand under the catch in the water tank. Lift the catch 

up and pull forward to remove the tank.

2.  The anti-calc filter is at the rear of the base. Grasp the anti-calc 

filter and remove it from the housing. Immerse the filter for two 

minutes in clean water and then replace the filter.

Filling the Water Tank

Remove the water tank and 

open the tank cap. Fill the 

tank with fresh water using 

the cup provided.. Do not 

fill the tank  above the MAX 

mark indicated on the side of 

the reservoir. If you live in a 

hard water area, use distilled 

or de-mineralised water.  DO 

NOT use water with soften-

ers, perfumes or additives.
Replace the tank. Hold the rear of the iron rest with one hand and push 
the tank until it clicks securely into place. 

1

2

MA

X

Page 4

Summary of Contents for IRSG2416

Page 1: ...7 Portable DVD Player SteamStation IRSG2416 ...

Page 2: ...e The surface must be strong waterproof and large enough to support the entire steam station Donotuseoutdoorsorindamporwetconditions Donotusethisapplianceforprofessionallaundry Do NOT use this appliance for any purpose not covered by the instructions Use caution when turning the iron upside down there may be residual hot water in the iron Observe all ironing instructions and temperature dot settin...

Page 3: ...er and Steam Cords 7 Rear Support 8 Thermal Insulating Base 9 Front Support 10 Control Panel 11 Power Cord 12 Appliance Base 13 Cord Clamp 14 Anti calc Filter 15 WaterTank 16 MAXWater Mark 17 Filler Cap 18 Drain Hole 19 Filler Cup M A X 1 3 4 5 6 7 8 9 14 12 16 11 10 17 18 15 13 2 UNDERSIDEVIEW 19 Page 3 ...

Page 4: ...st angle the iron down and place the front of the iron in the rest then lower the rear of the iron into the rest Preparing the Anti Calc Filter Refer to the next two illustrations 1 Place your hand under the catch in the water tank Lift the catch up and pull forward to remove the tank 2 The anti calc filter is at the rear of the base Grasp the anti calc filter and remove it from the housing Immers...

Page 5: ... iron glows When the required temperature is reached the pilot light goes off During use the pilot light will go on and off as the thermostat maintains the iron at the correct temperature Steam Ironing Steam Ironing should be carried out at the highest settings on the tem perature dial 1 Press the Steam Selector button to select High Medium or Low steam as required The chosen steam indicator will ...

Page 6: ... safety feature Ironing Temperatures and Hints Check the ironing instructions attached to the article they are on a label showing a symbol of an iron Always follow these ironing instructions The indications on the iron s temperature dial and the table below will help you If there are no ironing instructions but you know the fabric then use the table below The table is valid only for the actual mat...

Page 7: ... tank and reset the appliance After refilling the tank press the Reset Button once to ex tinguish the low water level indicator You can now release steam for ironing Descaling Indicator If the mineral deposits in the anti calc filter have reached a high level the descaling indicator flashes and will continue to flash until the anti calc filter is replaced 1 Depress and hold the On Off button to sw...

Page 8: ...equipped with an anti calc filter As a result you can use tap water as it will be filtered by the cartridge It is necessary to replace the cartridge approximately every 3 6 months depending on the frequency of use and the hardness of the water in your area If the water contains high lenels of scale you will have to replace the cartridge more frequently You can delay the replacement of the cartridg...

Reviews: