background image


testo 545 

– Digital lux meter 

0560 1545 


Instruction manual 


Summary of Contents for 0560 1545

Page 1: ...testo 545 Digital lux meter 0560 1545 Instruction manual...

Page 2: ...onnection to the testo Smart App 10 Using the product 11 Controls on the measuring instrument 11 Implementing settings 12 Opening configuration mode 13 Setting the unit 14 Setting alarm thresholds 14...

Page 3: ...ument settings 22 Configuring the measuring instrument menu 24 Setting Auto Off 25 Activating damping 26 Configuring alarms 26 Display of the readings 27 Adjusting the view 27 Exporting readings 28 Ex...

Page 4: ...the technical data Do not apply any force Do not operate the instrument if there are signs of damage to the housing or connected cables Dangers may also arise from objects to be measured or the measu...

Page 5: ...nformation denoted by the following warnings Implement the precautionary measures specified DANGER Risk of death WARNING Indicates possible serious injury CAUTION Indicates possible minor injury CAUTI...

Page 6: ...fications on probes sensors refer only to the measuring range of the sensor system Only open the measuring instrument if this is expressly described in the documentation for the purposes of maintenanc...

Page 7: ...5 Product description 6 Product description Instrument overview 1 Control keys 2 Display 3 Probe 4 Speaker for alarm sound 5 Battery compartment Explanation of icons Refer to instruction manual...

Page 8: ...nsert or replace batteries 3 x AA batteries Observe the polarity 3 Close the battery compartment When not in use for a long period Take out the rechargeable batteries Symbol explanation Do not allow c...

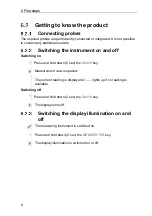
Page 9: ...itching on 1 Press and hold down 2 sec the On Off key Measurement view is opened The current reading is displayed or lights up if no reading is available Switching off 1 Press and hold down 2 sec the...

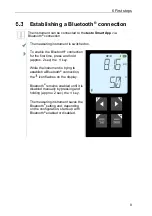
Page 10: ...onnection for the first time press and hold approx 2 sec the key While the instrument is trying to establish a Bluetooth connection the icon flashes on the display Bluetooth remains enabled until it i...

Page 11: ...ument 1 Open the testo Smart App The app automatically searches for Bluetooth devices in the vicinity 2 In the Sensors menu check whether the required instrument is connected If necessary switch the i...

Page 12: ...controls are implemented either on the instrument or via the app If the measuring instrument is connected to the testo Smart App settings can only be made via the app The measuring instrument then re...

Page 13: ...e correct settings all settings are transferred immediately There is no Cancel function Function Setting options comments Bluetooth long press Switch the Bluetooth connection on or off Arrow left Free...

Page 14: ...external printer Arrow right In configuration mode Increase value select option Opening configuration mode The instrument is switched on and is in the measurement view 1 Press MENU ENTER until the dis...

Page 15: ...and confirm with MENU ENTER max is displayed 2 Press to set the upper alarm threshold value and confirm with MENU ENTER Setting the alarm sound Configuration mode is open is displayed 1 Press to enabl...

Page 16: ...n and is in the measurement view 1 Place the measuring instrument into the position in which the measurement is to be carried out Read the measured values on the display Freezing a reading displaying...

Page 17: ...rying out multi point mean calculation 1 Press MODE END flashes The number of readings recorded is displayed in the upper line while the current reading is displayed in the lower line 2 To record read...

Page 18: ...e the mean value Press MODE END and flash The measurement period and the calculated continuous mean value are displayed 5 To switch back to the measuring view Press MODE END Printing data A testo Blue...

Page 19: ...view and settings menus cannot be opened on the measuring instrument Overview of operating controls 1 Choice of applications 2 Switch between the views live graphic table 3 Display of connected measu...

Page 20: ...nt data report Searching Favourite Deleting Further information Display report Multiple selection The Main menu can be accessed via the icon at top left To exit the main menu select a menu or right cl...

Page 21: ...you can find the version number of the installed App 1 Click on 2 Select Help and Information 3 Select Instrument information The version number of the app and the ID are displayed Displaying the tuto...

Page 22: ...Your selected application is displayed Setting favourites 1 Click on A selection of menus for various applications is displayed 2 Select the application you want to set as a favourite 3 Click on The...

Page 23: ...ensors The Sensors menu opens 3 Click on the required measuring instrument Information about the model order number serial number and firmware version is displayed 4 Click on the Settings tab A window...

Page 24: ...pen an input window to enter a specific value or select a unit For details on the settings options see the following sub sections Changes to the measuring instrument settings in the app are transferre...

Page 25: ...tab in the Sensors menu is open 1 Activate Customization instrument menu and click on the blue text Change instrument menu list under the settings heading The Customization instrument menu dialogue op...

Page 26: ...ed in the measuring instrument menu after the next synchronization These settings can be reset via the menu reset M RES and then all settings menus will be displayed on the measuring instrument again...

Page 27: ...nchronization with the app is confirmed on the measuring instrument via SYNC DONE Configuring alarms The standard view with the LIVE tab is open 1 Click on 2 Select Alarm configuration The menu with t...

Page 28: ...o be displayed can be selected by tapping on a reading above the diagram Table view In the table view all readings are displayed in sequence according to date and time Different readings from the indi...

Page 29: ...8 Controls via testo Smart App 28 Exporting readings Export Report Delete 1 Click on 2 Select Memory 3 Click on Select measurement...

Page 30: ...reate PDF with all readings button 3 Click on Create For measurements please be aware that the option Create PDF with all readings is only possible up to 30 pages due to the resulting file size and nu...

Page 31: ...ap lock 2 Insert or replace batteries 3 x AA batteries Observe the polarity 3 Close the battery compartment When not in use for a long period Take out the rechargeable batteries Cleaning the instrumen...

Page 32: ...10 000 lux 1 lux 10 000 lux Measuring range 0 to 100 000 lux Operating temperature 10 to 50 C instrument 0 to 50 C probe Storage temperature 20 to 50 C Operating humidity 0 to 80 RH IP class IP40 Leve...

Page 33: ...ssible measuring range has been exceeded Keep within the permissible measuring range Display UUUU Permissible measuring range has been undershot Keep within the permissible measuring range Display BT...

Page 34: ...nnection If we have not been able to answer your question please contact your local dealer or Testo Customer Service See the back of this document or the www testo com service contact web page for con...

Page 35: ...Testo SE Co KGaA Celsiusstr 2 79822 Titisee Neustadt Germany Phone 49 0 7653 681 0 E mail info testo de www testo com 0970 9545 en 01 10 2022...

Reviews: