background image

Instruction manual

en

testo 325 M/XL

Flue gas analyser

Summary of Contents for 325M

Page 1: ...Instruction manual en testo 325 M XL Flue gas analyser ...

Page 2: ...ch you cannot rectify yourself please consult our Customer Service Department or your nearest distributor We will do our best to help you quickly and competently to reduce downtimes Copyright This documentation is subject to the copyright of Testo AG Reproduction and use contrary to the legitimate interests of Testo AG are prohibited without the prior written consent of the company We reserve the ...

Page 3: ...safety measures are not carried out Caution means minor physical injury or damage to property may occur if the specified safety measures are not carried out Read all the warnings carefully and carry out all the specified safety measures to avoid danger Notes on special cases and peculiarities in the handling of your unit are indicated by an exclamation mark Standards tests The conformity certifica...

Page 4: ...nstructions 12 5 1 Switching on 12 5 2 Selecting menu items 12 5 3 Measuring ambient air temperature 12 5 4 Measuring flue gas temperature 13 5 5 Regular maintenance 13 5 6 Switching off 14 6 Settings 15 6 1 Selecting fuel 15 6 2 Setting display sequence 15 6 3 Selecting units 16 6 4 Setting date time 16 7 Measuring 18 7 1 Measuring flue gases 17 7 2 Measuring pressure 17 7 3 Measuring differentia...

Page 5: ...4 8 5 Cleaning the flue gas probe 24 8 6 Changing the thermocouple 25 8 7 Cleaning the flue gas pump 25 8 8 Changing the measuring cells 26 9 Troubleshooting 29 10 Technical data 31 10 1 Measuring ranges and accuracies 31 10 2 Other instrument data 32 10 3 Calculation fundamentals 32 10 4 Calculation formulae 33 11 Accessories Spare parts 34 Short instructions 35 5 ...

Page 6: ...thin the parameters specified in the technical data Please handle the instrument with care Force should never be applied The temperature data for the probes only refer to the sensor measuring range Never subject handles or pipes to temperatures greater than 70 C unless they are expressly approved for higher temperatures The instrument should only be opened for maintenance and repair work if expres...

Page 7: ...ndensing boilers Gas heaters These systems can be adjusted using testo 325 M XL and checked for their adherence to valid limit valids testo 325 M XL can be used to carry out the following tasks Adjustment of O2 CO and CO2 values in burners in order to guarantee smooth operation Measurement and adjustment of gas flow pressure in gas heaters Measurement and adjustment of flow and return temperatures...

Page 8: ...Battery capacity Flue gas temperature Ambient air temperature Temperature measurement Date Fuel name menu item Parameters Measuring units Pump on Readings Save Battery capacity A warning flashes in the display if the battery is running low during rechargeable batttery battery operation Remaining capacity is then approx 1 hour for batteries approx 1 hour for rechargeable batteries The instrument sw...

Page 9: ...b menu menu item confirm selection Select parameters Print current readings Switch display light on off Connections Mains unit Probes ambient air temperature AT temperature T2 Probes flue gas temperature FT temperature T1 Flue gas red Pressure blue Pressure p Other Infrared interface on front side Gas outlet Battery compartment Condensate trap Filter behind the condensate trap 9 ...

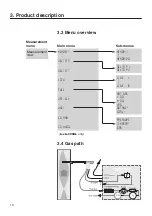
Page 10: ...oduct description 10 3 4 Gas path P CO O2 p testo 325 RGS testoter m 3 3 Menu overview Nat gas L oil H oil LPG Butane1 Coal1 Measurement view Main menu Pressure Temperat Gas delta p1 delta p2 Line 1 Line 12 Measurement menu Sub menus memory1 memory20 1 testo 325XL only ...

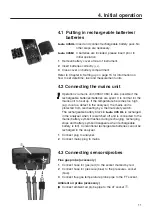
Page 11: ...the temperature becomes too high e g due to a defect in the analyser the mains unit is protected from overheating by a thermal safety switch The rechargeable battery block in testo 325 XL is recharged in the analyser when it is switched off and is connected to the mains battery symbol flashes during recharging recharging stops and battery symbol disappears when rechargeable battery is full Convent...

Page 12: ...ust be located in fresh air during zeroing In the case of error messages refer to Troubleshooting on page 28 The set fuel flashes in the display 2 Use or to select the required fuel and confirm with Selected fuel now applies The analyser changes to the measurement menu and is ready to operate 5 2 Selecting menu items The pump stops automatically when the main menu is opened 1 Open main menu using ...

Page 13: ...ure is measured continuously by this probe 5 4 Measuring flue gas temperature The flue gas temperature is measured via the flue gas probe thermocouple The probe pipe has openings at the side so that the thermocouple is protected and can simultaneously come into contact with the flue gas Ensure that the thermocouple is positioned in the flue gas flow The thermocouple should not be covered by the pr...

Page 14: ...measuring cells should be rinsed with fresh air after each measurement 1 Remove flue gas probe from flue gas duct 2 Start pump using 3 Wait until the O2 level is above 20 0 and the CO level is below 50ppm 4 Press to stop pump You will find more information about servicing and maintaining your analyser in Chapter 8 Maintenance P 23 5 6 Switching off The readings stored in the instrument are lost wh...

Page 15: ...rameters and units for line 1 and 2 are shown 2 Use to select required parameter for line 1 3 Use to change to Line 2 and select required parameter for line 2 with 4 Set up additional parameters for lines 3 to 12 Repeat procedure as described in step 3 5 Confirm settings with Selected settings are accepted and the analyser changes to the measurement menu Selectable parameters O2 Oxygen level Flue ...

Page 16: ...using Selected units are accepted and the analyser changes to the measurement menu 6 4 Setting date time 1 Select Dat Clk in the main menu and confirm selection selection via The set date is shown and Day flashes 2 Set Day using or 3 Change to Month and Year using and set using or respectively 4 Change to time setting via The set time is shown and Hour flashes 5 Set Hour via or 6 Use to change to ...

Page 17: ...ressure set Part no 0554 0315 to measure the gas flow pressure Please observe the following when measuring pressure It is only possible to measure pressure if the pump is switched off When the pump is switched off there is still a dynamic pressure in the hose which first has to be reduced Wait approximately 30 s before starting to measure pressure Remove any condensate in the flue gas probe prior ...

Page 18: ...re Gas flow pressure is measured in the same way as draught is measured Please note the following The silicone hoses from the pressure set should only be connected to the gas heater after the zeroing phase 7 3 Measuring differential temperature Use this function to measure the flow and return temperature in heating systems You will need 2 pipe clamp probes Part no 0628 0020 for the measurement 1 C...

Page 19: ... the instrument until the next COundiluted measurement 7 5 Measuring ambient CO Always carry out an ambient CO measurement before a flue gas measurement since a value for CO retained in the analyser will be written over when ambient CO is measured Carry out zeroing in fresh air preferably outdoors prior to measuring ambient CO 1 Select CO amb in the main menu and confirm selection with The pump st...

Page 20: ...easurement menu before you can start printing and the pump must be switched off Start printing procedure by pressing lights up and the following data is printed Header Device name Date Time Selected fuel Parameters with corresponding reading and unit the printout is completed according to the display sequence set in the instrument See 6 2 Setting display sequence P 15 parameters which occur twice ...

Page 21: ...lect required memory block with or and confirm with 3 Using or choose from Write save readings Read read readings or Delete delete readings and confirm selection with If you select Write Clearance query Really appears if data is already stored on the memory block Answer clearance query Really with The selected memory block name flashes and and date time when saved light up The readings are saved o...

Page 22: ...saved in the instrument Please also follow the instructions in the printer manual 1 Select Memory in main memory and confirm selection with 2 Select required memory block using or and start printout via or Start printout via while the saved readings are displayed is shown is shown and the data is printed ...

Page 23: ...switches off once the rechargeable batteries batteries are inserted 4 Close cover on battery compartment Changing the rechargeable battery block The rechargeable battery block testo 325XL only is changed in the same way as the rechargeable batteries batteries however it must be connected to the white socket in the battery compartment via the plug in connection and held in position in the battery c...

Page 24: ...s or soap solutions can also be used 8 5 Cleaning the flue gas probe Deposits in the flue gas probe pipe can be removed as follows 1 Release knurled nut in the handle of the flue gas probe by turning it anti clockwise and remove flue gas pipe 2 Rinse flue gas pipe with hot water and then purge with air or clean with a brush e g made of brass 3 Push flue gas pipe over the thermocouple pipe of the f...

Page 25: ...strument before opening and empty the condensate trap See 8 2 Emptying the condensate trap P 23 Remove the connected sensors probes and mains units from the analyser Reduce the static charge in your body by touching a conducting and grounded object Avoid contact with instrument electronics 1 Place analyser on its front and open and remove the battery compartment cover at the back of the analyser 2...

Page 26: ...nly the original Testo measuring cells listed opposite should be used Opening the instrument Proceed as described in the paragraph Open instrument in the Chapter 8 6 Cleaning the flue gas pump P 25 and continue as follows 6 Remove the 3 screws at the back of the mounting block and remove the mounting block from the upper part of the housing 7 Carefully remove board with display from mounting block...

Page 27: ... measuring cell in testo 325XL 8 Remove measuring cell holder and measuring cell from the measuring chamber and disconnect the plug in connection from the defective O2 measuring cell 9 Place spare measuring cell in the measuring chamber and place measuring cell holder on the measuring cell thread cable through cell holder 10 Connect plug in connection of spare measuring cell and position plug in c...

Page 28: ...nd is then ready for operation Entering cell coefficients for CO or CO H2 measuring cell The readings will be incorrect if the correct cell coefficients are not entered You will find the cell coefficients on the sheet enclosed with the spare measuring cell If input is incorrect Cancel procedure with and enter cell coefficients once again 1 Switch on analyser by pressing and press and simultaneousl...

Page 29: ...t attached or or check connection starts again incorrectly attached or Thermocouple of flue Change thermocouple gas temperature probe See Chapter 8 6 Changing thermocouple P 25 defective O2 flashes and O2 value too low because Expose probe to fresh air and run zeroing phase again zeroing starts flue gas probe pipe is again in flue gas duct If not successful O2 measuring cell is defect and has to b...

Page 30: ...nd C0 CO H2 measuring Change C0 CO H2 measuring cell appears cell defective See 8 8 Changing measuring cells P 26 Pump stops and CO value is above the Expose probe to fresh air and start pump via CO flashes switch off limit to purge the measuring cells Caution Meas cell can be destroyed if CO value is too high Analyser switches Rechargeable batteries Change rechargeable batteries batteries See Cha...

Page 31: ...Pressure Delta P2 3 0 to 200hPa 50hPa 0 5hPa 0 1hPa 50hPa 1 5 of reading testo 325 XL Measurement type Meas range Accuracy Resolution Adapt time 90 Temperature 1 40 to 1000 C 100 C 0 5 C 0 1 C Depending on 100 C 0 5 of reading probe used Efficiency 0 to 120 0 1 Oxygen 0 to 21 0 2 0 1 Approx 30s Carbon dioxide 0 to CO2max 0 1 Approx 40s Carbon monoxide 0 to 4000ppm 400ppm 20ppm 1ppm Typically 40s 4...

Page 32: ... off threshold for CO 4500ppm Memory testo 325XL only 20 memory blocks Recharging time rech batt pack 4h when recharged in analyser testo 325XL only Warranty Instrument 2 years CO CO H2 measuriong cells 12 months 02 measuring cells 18 months Probes and sensors 24 months Thermocouples 6 months 10 3 Calculation fundamentals Fuels and their calculation formulae Fuel Kgr 1 Knet 1 K1 1 Qgr 1 Qnet 1 MH2...

Page 33: ...sured oxygen level in Air ratio CO Measured carbon monoxide value in CO2 Calculated carbon dioxide value in Carbon monoxide undiluted uCO CO Measured carbon monoxide value in 21 Oxygen level of air O2 Measured oxygen level in Conversion of ppm in mg m3 referred to O2 reference value CO mg m3 x CO ppm x 1 25 21 Oxygen level of air O2 Measured oxygen level in O2ref O2 reference value in fuel specifi...

Page 34: ...0085 CO measuring cell for testo 325 M incl NO filter 0133 0069 0390 0297 CO H2 measuring cell for testo 325 XL 0390 0245 Case Aluminium case 0516 0325 Transport case plastic 0516 3250 System case plastic 0516 0326 Printer Testo printer 0554 0545 Other PE filter 10 off 0554 0040 Printer paper 6 rolls 0554 0569 Spare rechargeable battery for testo 325 XL 0515 0104 Pump membrane 0193 0072 Pump Tool ...

Page 35: ...using or and confirm selection by pressing Instrument changes to measurement menu and is ready to operate Switching off analyser 1 Press to switch off analyser 2 Wait on automatic rinse OFF is displayed for 5 s and then the analyser switches off Switching background light on off Switch background light on or off by pressing Selecting menu item 1 Open main menu by pressing 2 Use to select menu item...

Page 36: ...end measurement Measuring g gas f flow p pressure Pressure set 0554 0315 required Procedure same as for draught measurement Printing r readings t taken Testo printer 0554 0545 required Start printing by activating in measurement menu Saving reading deleting r readings testo 325XL only 1 1 Select Memory in main menu and press to confirm 2 2 Use to select memory block and confirm via 3 3 Select Writ...

Reviews: