background image

EN- English 


Testo Sensor LD pro - V2.00 


Page 1 of 48 

Instruction manual 


Leak meter with camera


Testo Sensor LD pro 


Summary of Contents for Sensor LD pro

Page 1: ...EN English Testo Sensor LD pro V2 00 Page 1 of 48 Instruction manual Leak meter with camera Testo Sensor LD pro...

Page 2: ...Assembly with acoustic trumpet 12 7 8 Assembly with focus tube with focus tip 12 7 9 Assembly with Gosseneck 13 7 10 Assembly with Parabolic mirror 13 8 Commissioning Application Testo Sensor LD pro...

Page 3: ...rt new measurement tool 29 11 2 3 Export Import Customer database 30 11 3 View bitmaps 31 11 4 Device Settings 32 11 4 1 Passwort Settings 32 11 4 2 Device Settings 33 11 4 2 1 Language 33 11 4 2 2 Da...

Page 4: ...and location of leaks compressed air gas steam and vacuum systems condensate drain seals refrigeration systems Documentation storage of leaks with Picture of the leak position Date Time Description o...

Page 5: ...ty setting can be used to reduce the volume Never point the laser directly into eyes Absolutely avoid a direct irradiation of eyes of humans and animals Laser module corresponds to DIN EN 60825 1 2015...

Page 6: ...st per liter or per cubic meter of compressed air can be stored in the device The professional measuring instrument Testo Sensor LD pro finds typical application in leak detection in compressed air sy...

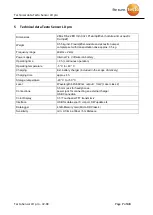
Page 7: ...lithium ion battery Operating time 9 h continuous operation Operating temperature 5 C to 40 C Charging Ext battery charger included in the scope of delivery Charging time approx 4 h Storage temperatu...

Page 8: ...dB leak detection start Leakage found Continue leak search Testo Sensor LDpro Switch off Yes No Yes Yes Yes Data export to USB Stick Save measurement Leaktag Issue attach Selection Measurment tool Par...

Page 9: ...s and controls 7 1 Testo Sensor LD pro Picture 1 Camera Power on off button Headphone volume buttons USB connection 5 TFT Color Display with Touchpanel Foil keypad 4 buttons Battery charging socket Ac...

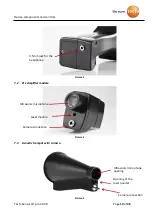
Page 10: ...ge 10 of 48 Picture 2 7 2 Pre Amplifier module Picture 3 7 3 Acoustic trumpet with camera Picture 4 3 5mm jack for the headphone Opening of the laser pointer Ultrasonic microphone Camera connection Ca...

Page 11: ...Device components and controls Testo Sensor LD pro V2 00 Page 11 of 48 7 4 Focus tube with focus tip Picture 5 7 5 Gooseneck Optional Picture 6 7 6 Parabolic mirror Picture 7...

Page 12: ...gging the individual components until easy locking audible plug in to the stop The components are removed in reverse order for unlocking the preamplifier module the release button must be pressed too...

Page 13: ...arabolic mirror is used for measurements at greater distances as well as for high requirements regarding selectivity and location of leakage positions Connection to the Testo Sensor LD pro is via the...

Page 14: ...volume keys increase or decrease the volume in the headphone in 16 levels Continuously pressing the button automatically increases decreases the value Volume up down buttons for headphone volume see...

Page 15: ...he respective menu items occur via short tapping with the finger or a soft round pen Attention Please use no pens or other objects with sharp edges The foil can be damaged Inputs or changes can be mad...

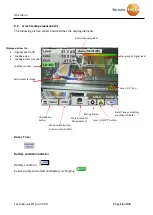
Page 16: ...dition 22 Power supply connected and battery is charging Displayed values for Signal Level in dB Leakage size Leakage costs per year Laser On Icon Date Time and battery condition indicator Bar graph o...

Page 17: ...ip For punctual measurements in directly accessible areas Gooseneck For punctual measurements in hard to reach areas Parabolic mirror For leakage measurements 3m 12m at longer distances Home Configura...

Page 18: ...tube and the gooseneck i e 20 cm and 5 cm Permissible input range for the acoustic trumpet is 1m to 6m for the parabolic mirror 3m to 12m Pressure input range is 0 3bar to max 10bar for vacuum leakage...

Page 19: ...or 1000 Nm or 1000 SCF These inputs and the Operating hours year are used as the basis for the cost calculation The basic costs are entered via the text boxes Cost 1000 Nm for ISO Cost 1000 SCF for US...

Page 20: ...e The individual stages can be selected in manual mode by pressing the Sensitivity setting button The steps are changed to the next step each time the button is pressed The Auto setting allows you to...

Page 21: ...card The measurement data the measurement point and the image of the measurement point are saved as a journal which can be exported later and a report can be created with the Testo Leak Reporter Orde...

Page 22: ...hapter 10 2 All information about the measuring point can be changed by selecting the corresponding text field or the stored measuring points can be loaded from the internal database Then a menu opens...

Page 23: ...ters To do this select the text field Comment and enter the comment Before final storage of the measurement on the internal SD card a summary is created and the correctness is queried once more for sa...

Page 24: ...24 of 48 11 Basic settings menu Testo Sensor LD pro Home 11 1 Configuration Home Configuration See also chapter 10 3 With the button Home you access the basic menu of the Testo Sensor LD pro Return t...

Page 25: ...Export Import recorded journal data can be transferred to a USB stick system settings can be exported as well as imported measuring points company building and location data can be exported as well as...

Page 26: ...nd the dates of the Sundays are as in the calendar red For days on which measurement data was recorded the date numbers are visually exalted If several measurements have been recorded on a date they w...

Page 27: ...r internal SD card with activation of key SdCard or on USB stick with key USB The selection of the desired folder is made by selecting and activating with goto button If a new directory is required th...

Page 28: ...logous to file export Selection of internal SD card with activation of key SdCard or of USB stick with key USB The selection of the desired folder is made by selecting and activating with the goto but...

Page 29: ...s is the same as for export e g system settings Selection of internal SD card with activation of button SdCard or of USB stick withbutton USB Select the desired folder by pressing the goto key and the...

Page 30: ...exported database That means it is also possible to create and import the database externally but the prerequisite is the correct format of the XML file Export Import Export Customers Export Import I...

Page 31: ...n in the display again Please press button Select Screenshot and select the required picture bitmap The pictures are stored and organized in different directories The directory structure is year calen...

Page 32: ...verview of the Settings If an incorrect password is entered there appears Enter password or New password repeat in red font If you can t remember the password please use Master password in order to en...

Page 33: ...pro V2 00 Page 33 of 48 11 4 2 Device Settings Settings Device settings 11 4 2 1 Language Settings Device settings Set language Overview of Device settings Here you can select one of 11 languages for...

Page 34: ...The summer and wintertime switchover is realized by pushing the Daylight Saving button By pressing Reset Logger Database all actual stored data on SD Card will be blocked for use in Testo Sensor LD pr...

Page 35: ...settings System Update check USB Stick for new Updates P1 V033 C1 I1 Update Kan le If it is required to install all files not only the files marked as new you have press the button Force all Overview...

Page 36: ...atus and therefore a unique USB ID can be defined here Relevant for simultaneous connection of several USB devices to the PC If needed with Reboot System the Testo Sensor LD pro could be restarted reb...

Page 37: ...ged here Push Calibrate and it appears 1 left above 2 bottom right 3 bottom left 4 right above and 5 in the middle a calibration cross that must be pushed consecutively If the calibration finished pos...

Page 38: ...ly on in the currently set brightness Here you adjust the desired Backlight 15 100 of the display directly E g Backlight to 39 With the help of the Backlight dimming after button after a definable tim...

Page 39: ...10 Device Brief description of the Hardware and Software Version as well as the Serial Number of the Testo Sensor LD pro This function can be used for cleaning the touch panel during running measureme...

Page 40: ...ensor LD pro and the 230V socket The Testo Sensor LD pro checks the charging status of the battery and starts the charging process automatically if necessary Protection of exhaustive discharge To prot...

Page 41: ...o consisting of 8900 0501 Testo Sensor LD pro leak detector with acoustic trumpet and integrated camera 8900 0502 Sound proof headset 8800 0304 Focus tube with focus tip 8800 0305 Battery charger AC a...

Page 42: ...Appendix Testo Sensor LD pro V2 00 Page 42 of 48 14 Appendix In the appendix on the following pages you will find the Test Report of the Li ion batteries used...

Page 43: ...Appendix Testo Sensor LD pro V2 00 Page 43 of 48...

Page 44: ...Appendix Testo Sensor LD pro V2 00 Page 44 of 48...

Page 45: ...Notes Testo Sensor LD pro V2 00 Page 45 of 48...

Page 46: ...Notes Testo Sensor LD pro V2 00 Page 46 of 48...

Page 47: ...Notes Testo Sensor LD pro V2 00 Page 47 of 48...

Page 48: ...Contact Testo Sensor LD pro V2 00 Page 48 of 48 Testo Sensor GmbH Testo Strasse 1 D 79853 Lenzkirch Mail info testo sensor de Web www testo sensor com...

Reviews: