5
Setup and connection
Setup notes
• Select a stable, level base.
• Make sure that the environment is clean and free from dust.
• Avoid placing the unit close to sources of heat or in direct
sunlight.
• Arrange the connector cables so that they do not pose a trip
hazard.
• Do not place any heavy objects on the cables or the speak-
ers.
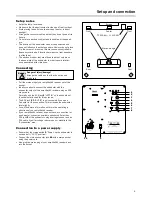
• The location of the subwoofer can be freely selected and
does not in
fl
uence the other speakers. However, do not place
it in the corner of a room as this may cause uncontrollable
frequency overloads. A location between the front speakers
is often ideal.
• The enclosed rubber feet are af
fi
xed to all four corners on
the base plate of the subwoofer in order to avoid interfer-
ence associated with vibrations.
Connecting
Danger
Danger of injury/damage!
Arrange the cables so that they do not pose a
trip hazard.
• Pull the mains plug of your ampli
fi
er/AV receiver out of the
socket.
• Ideally, you should connect the subwoofer with the
subwoofer output of the ampli
fi
er/AV receiver using an RCA
mono cable.
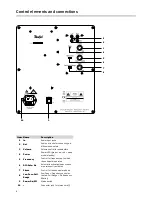
Normally, only the RCA jack
1
“LEFT IN” on the back side of
the subwoofer is used for this purpose.
• The RCA jack
1
“RIGHT IN” is only occupied if you use a
Y adapter for the connection. This increases the subwoofer
level slightly.
• You will
fi
nd more information on this in the operating in-
structions of your ampli
fi
er/AV receiver.
• If your ampli
fi
er/AV receiver does not have a connection for
a subwoofer, connect an available speaker outlet with an
RCA jack
1
of the subwoofer using a voltage reducer and an
RCA cable. We offer voltage reducers on our website in the
“Accessories” area.
Connection to a power supply
• Ensure that the mains switch
9
“Power” on the subwoofer is
switched off (“0 OFF” position).
• Connect the mains connector jack
10
with a mains socket
using the power cord.
• Also plug the mains plug of your ampli
fi
er/AV receiver back
into the socket.
1
2
4
5
3
6
7
8
9
10
Screen
Stereo triangle
Center
T 2300 SW / T 1300 SW
Front
Center
Front
Rear
Rear


