6
Adjusting and use
Adjusting amplifier/AV receiver and
Subwoofer
Most ampli
fi
ers/AV receivers feature a menu with speaker set-
tings (referred to as “Speaker Setup” or similar).
Amplifi er/AV receiver setup
• Subwoofer to “on”
• Crossover frequency for subwoofer:
– 100 Hz, if satellites with 130 mm midrange speakers are
connected.
– 80 Hz, if satellites with 160 mm midrange speakers are
connected.
• Volume of the subwoofer to more than 75 %
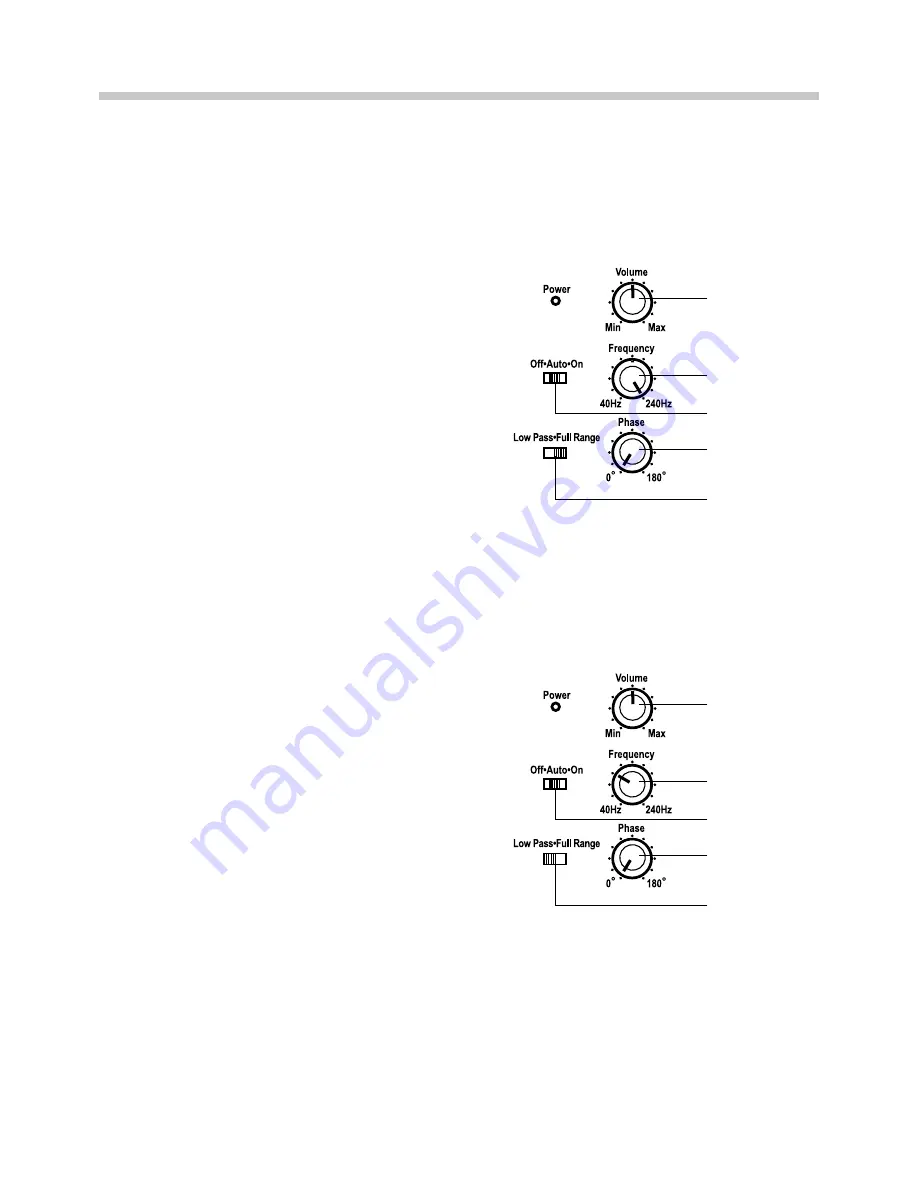
Subwoofer setup
• Switch
6
“Off • Auto • On“ to “Auto“.
• Switch
8
“Low Pass • Full Range“ to “Full Range“ (switch set-
ting: right).
• Control
3
“Volume“ to center position.
• Control
5
“Frequency“ to the right until it stops.
With these settings, the subwoofer will work optimally and
the automatic activation/deactivation is functioning properly.
You can make the
fi
nal
fi
ne tuning later on your ampli
fi
er/AV
receiver.
Subwoofer setup with non-adjustable amplifi er/
AV receiver
If your ampli
fi
er/AV receiver does not provide the above op-
tions, you can make the most important settings directly on the
subwoofer. To do so, you will need a CD or DVD with adequate,
powerful sound.
• Set switch
8
“Low Pass • Full Range” to the left to “Low
Pass”. This activates the controlrs
5
“Frequency” and
7
“Phase”.
• Set the crossover frequency with the controller
5
“Frequen-
cy” to about 100 Hz (fourth mark). This sets the subwoofer to
reproduce only frequencies up to 100 Hz.
• Set the control
7
“Phase“ to “0°“.
• Set the control
3
“Volume“ to center position.
• Now make an audition and then adjust the volume control
3
“Volume” until the subwoofer is clearly audible and adjust
the control
5
“Frequency” until the bass is strong but not
booming.
• Once you have set the best sound, move the control
7
“Phase” several times until it stops in both directions. If you
notice a marked improvement in sound here,
fi
nd the optimal
setting. Otherwise, leave the knob to “0°”
• Optimise the settings with other CDs/DVDs and different
volumes.
Automatic activation/deactivation
With switch
6
“Off•Auto•On” you can switch the operating
state:
Off
Standby
Auto
The subwoofer activates as soon as an audio signal is
present on the input jack
1
“Line In”. If there is no audio
signal for some period of time, the subwoofer switches
to standby.
On:
The subwoofer is continually activated.
3
5
7
8
6
3
5
7
8
6


