background image

14 


Adjustment of the cutting height 

 
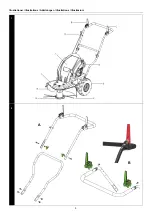
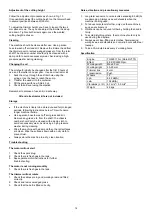
Follow the adjustment procedure as shown in Fig. 10


It is possible to adjust the cutting height on the trimmer head 
in several positions between 45-90 mm. 
 
To adjust the trimmer height, you have to loosen the two 4 
mm allen screws. Then you can adjust the trimmer head up 
and down. Tighten both screws again once the wanted 
cutting height is chosen. 
 

Cleaning  

 
The machine should be cleaned after use. Use a garden 
hose to wash off soil and dirt. Remove the trimmer head from 
the trimmer axel to remove wedged grass etc. from the rotor 
shaft. The chassis number should only be cleaned with a 
damp cloth to avoid unnecessary wear. Avoid using a high-
pressure washer during cleaning. 
 

Changing the oil 

 
The oil should initially be changed after the first 5 hours of 
use, and thereafter once per year.  Use an oil extractor kit. 
1.  Suck the oil up through the oil filler hole using the 

syringe. Use the hose to reach the sump. 

2.  Transfer the used oil to the container. 
3.  Fill the engine with new SAE-30 oil. 
4.  Check the oil level using the dipstick. 
 
Remember to dispose of used oil in a safe way. 
 

Oil and oil extractor kit are not included 


Storage 


If the machine is likely to be stored unused for prolonged 
periods, follow the instructions below. This will ensure 
longer machine lifetime. 


Use a garden hose to wash off soil, grass and dirt. 
Remove any grass, etc. from the shaft. The chassis 
number should only be cleaned with a damp cloth to 
avoid unnecessary wear. Avoid using a high-pressure 
washer during cleaning. 


Wipe the machine with a damp cloth so that all surfaces 
are clean. Wipe the surfaces down with an oily cloth to 
prevent rust.  


Always store the machine in a dry, clean location. 


Troubleshooting 


The motor will not start  


1.  Check the spark plug. 
2.  Check there is fresh gas in the tank. 
3.  See separate motor instructions for further 

troubleshooting. 


The motor is not running smoothly 

1.  Check there is fresh gas in the tank. 


The trimmer will not rotate


1.  Check the cables are in good working order and fitted 

correctly.  

2.  Check and remove wedged grass. 
3.  Check that the belt is fitted correctly. 


Noise, vibration and precautionary measures 

 
1.  Long-term exposure to noise levels exceeding 85 dB (A) 

are damaging. Always use ear defenders when the 
machine is being used. 

2.  To reduce noise levels further, only use the machine in 

an open environment.  

3.  Vibrations can be reduced further by holding the handle 

firmly. 

4.  To avoid disturbing others, the machine should only be 

used during the daytime. 

5.  Always wear close-fitting work clothes, hard-wearing 

work gloves, ear defenders and non-slip boots with steel 
toecaps. 

6.  Take a 30-minute break every 2 working hours. 
 

Specification 


Engine 

TG595 173cc (Rato RV170) 

Effect

2,9 KW/3000 Rpm.

Working width

Max 60 cm 

Working Hight

45-90 mm 

Trimmer line 

4 mm 

Transmission Push 
Wheels

14” 

LpA

84.2 dB(A) 

LwA

104 dB(A) 

Vibrations (L / R)  6,7 m/s

2

 / 5,0 m/s

2


Weight 46 

kgs 


Summary of Contents for PRO TRIM 600TR

Page 1: ...n 21 1 Tel 45 6395 5555 www texas dk post texas dk IMPORTANT REMEMBER TO FILL WITH ENGINE OIL SAE 30 BEFORE START VIGTIGT HUSK AT PÅFYLDE MOTOROLIE SAE 30 FØR START IMPORTANT PENSEZ À AJOUTER DE L HUILE MOTEUR SAE 30 AVANT LE DÉMARRAGE WICHTIG DENKEN SIE VOR DEM START AN DAS BEFÜLLEN MIT MOTORÖL SAE 30 IMPORTANTE RIEMPIRE CON OLIO MOTORE SAE 30 PRIMA DELLA PRIMA ACCENSIONE ...

Page 2: ...tere i alvorlig personskade og død Udvis yderste forsigtighed ved kontakt med benzin Benzin er yderst brandfarlig og dampene er eksplosive Monter aldrig klinger eller andre metal skæredele på maskinen Warning symbols GB PICTOGRAMS Please read this instruction manual carefully especially the safety warnings marked with the symbol Ear muffs and boots with non slip soles with steel jacket is required...

Page 3: ...ämpfe sind explosiv Niemals starre oder metallische Schneidteile montieren Symboles d avertissement FR PICTOGRAMMES Veuillez lire attentivement ce manuel d utilisation en particulier les consignes de sécurité signalées par le symbole Il est indispensable de porter des bottes à semelles antidérapantes et gaine en acier Évitez de porter des vêtements amples Lisez attentivement ce manuel Assurez vous...

Page 4: ... Non mettere le mani o piendi vicino o sotto il filo rotante La testina ruota in senso orario Il materiale tagliato viene espulso verso destra Non consentire mai ad altre persone di sostare davanti al macchinario Mantenere una distanza di sicurezza di 15 metri da altre persone Non accendere il motore al chiuso o in ambienti poco ventilati I fumi di combustione del motore contengono monossido di ca...

Page 5: ...5 Illustrationer Illustrations Abbildungen Illustrations Illustrazioni Illustrationer Illustrations Abbildungen Illustrations Illustrazioni 1 2 A B ...

Page 6: ...6 3 4 A B ...

Page 7: ...7 5 6 7 ON OFF 1 2 3 A B ...

Page 8: ...8 8 9 10 A B ...

Page 9: ...d aldrig mens motoren stadig er varm Aftør spildt benzin før start af motoren Den kan forårsage brand eller eksplosion Vær opmærksom på mulige farer ved arbejde på vanskelig jord Det er påkrævet at bære støvler med skridsikre såler og stålkappe Undgå at bære løstsiddende tøj Betjening Start altid motoren fra sikkerhedszonen Forlad ikke sikkerhedszonen under betjening af maskinen hvis det er nødven...

Page 10: ...ren som vist i step 1 2 3 på Fig 5 Trimmer snøren skal have en længde på max 52 cm og skal altid monteres i sæt Der skal monteres en snøre på hver side af trimmer hovedet Montering af startsnor i holder på styr Fig 7A 1 Træk startsnoren forsigtigt ud af motorblok 2 Monter grebet for startsnoren i holderen på styret Påfyld olie på motor Se afsnit for olieskift Beklædning Ved arbejdet med maskinen e...

Page 11: ...bør følgende forskrifter overholdes Det vil give din maskine en længere levetid Brug haveslangen og spul jord og snavs af Frigør akslen for senegræs m m Stelnummeret må kun tørres over med en fugtig klud da man ellers kan risikere at stelnummeret bliver beskadiget Undgå at bruge en højtryksrenser til rengøringen Rengør med en fugtig klud så alle overflader er rene Overfladen fugtes med en olievæde...

Page 12: ...e machine if it is necessary to leave the safety zone turn off the engine before leaving the zone After striking a foreign object stop the engine immediately remove the spark plug cap and inspect the machine thoroughly for damage Repair the damage before continuing If the machine should start to vibrate abnormally stop the engine and check immediately for the cause Vibration is generally a warning...

Page 13: ...ng the start cord in holder Fig 7A 1 Pull gently the starter cord from the engine 2 Attach the starter grip on the rack of handlebar Fill the motor with engine oil See changing the oil section for more details Clothing When using the machine wear close fitting work clothes hard wearing work gloves ear defenders and non slip boots with steel toecaps Safety zone While the machine is being operated a...

Page 14: ...t Remove any grass etc from the shaft The chassis number should only be cleaned with a damp cloth to avoid unnecessary wear Avoid using a high pressure washer during cleaning Wipe the machine with a damp cloth so that all surfaces are clean Wipe the surfaces down with an oily cloth to prevent rust Always store the machine in a dry clean location Troubleshooting The motor will not start 1 Check the...

Page 15: ...en Brand oder eine Explosion verursachen Nehmen Sie sich in Acht vor Gefahren wenn Sie auf schwierigem Boden arbeiten Stiefel mit rutschfester Sohle und Stahlkappe sind erforderlich Vermeiden Sie lose Kleidung Betrieb Starten Sie immer den Motor in einer Sicherheitszone Verlassen Sie die Sicherheitszone nicht während Sie die Maschine bedienen Wenn es erforderlich ist die Sicherheitszone zu verlass...

Page 16: ...eparaten Motorhandbuch Montage Folgen Sie bitte den Schritten auf die Abbildungen 2 5 1 Fit die underlenkung an der Konsole mit 4 Bolzen Nachher fit die Überlenkung an die Unterlenkung Bitte bemerken das die Scheiben muss innen sein Fig 2A 2 Befestigen Kupplungsgriff am Lenker wie an Abb 2B gezeicht Das von der rechten Seite des Gehäuses kommende Kabel muss an der rechten Seite des Lenkers angebra...

Page 17: ... des Öls durch die Öleinfüllöffnung Verwenden Sie den Schlauch um die Ölwanne zu erreichen 2 Füllen Sie das Altöl um in den Behälter 3 Füllen Sie den Motor mit frischem SAE 30 Öl 4 Prüfen Sie den Ölstand mit dem Messstab Denken Sie daran das Altöl auf sichere Weise zu entsorgen Öl und Ölablassset sind nicht im Lieferumfang enthalten Lagerung Wenn die Maschine voraussichtlich längere Zeit unbenutzt...

Page 18: ...n sol extrêmement dur ou pierreux Il est indispensable de porter des bottes à semelles antidérapantes et gaine en acier Évitez de porter des vêtements amples Utilisation Démarrez toujours le moteur dans la zone de sécurité Ne quittez pas la zone de sécurité lors de l utilisation de la machine Si vous devez quitter la zone de sécurité coupez le moteur avant de quitter la zone Après avoir heurté un ...

Page 19: ...ication du moteur voir le manuel du moteur séparé Montage Veuillez suivre les étapes des figures 2 5 1 Monter le guidon inférieur avec 4 boulons sur la console Après cela montez le guidon supérieur Les entretoises doivent être à l intérieur Comme indiqué sur la Fig 2A 2 Attachez la poignée d embrayage au guidon Fig 2B Le câble venant du côté droit du boîtier doit être fixé au côté droit du guidon ...

Page 20: ...ant la seringue Utilisez le tuyau pour atteindre le carter 2 Transférez l huile usagée dans le récipient 3 Remplissez le moteur avec une nouvelle huile SAE 30 4 Vérifiez le niveau de l huile en utilisant la jauge N oubliez pas d éliminer l huile usagée de manière sûre L huile et le kit d extraction d huile ne sont pas fournis Rangement Si la machine est rangée et non utilisée pendant une période p...

Page 21: ... Indossare sempre scarpe da lavoro ed evitare vestiti larghi Operatività Avviare sempre il motore dalla posizione di sicurezza Fig 9 Non lasciare la posizione di sicurezza durante l utilizzo della macchina In caso di necessario bisogno assicurarsi di aver spento la macchina prima di uscire dalla zona di sicurezza In caso di urto con un oggetto estraneo arrestare la macchina spengere il motore rimu...

Page 22: ...lato destro del telaio deve essere fissato al lato destro del manubrio Fare l equivalente per il lato sinistro 9 Montare le ruote con i bulloni mostrati in Fig 3B I distanziali devono essere tra la ruota e il bullone 10 Montare il coperchio di protezione del motore con i bulloni da 13 mm mostrati in fig 3A 11 Montare la copertura di sicurezza e protezione come mostrato nella Fig 4 12 Montare il fi...

Page 23: ...r arrivare al fondo del serbatoio 6 Trasferire l olio usato in un contenitore adatto a tale scopo 7 Rifornire il motore con olio nuovo SAE 30 8 Controllare il livello dell olio attraverso l apposita asta Ricordarsi di smaltire l olio usato secondo le norme di legge e di sicurezza Olio motore e il kit di estrazione dell olio non sono inclusi Rimessaggio Se la macchina non viene utilizzata per un pe...

Page 24: ...ecifications of the machine directive and subsequent modifications Steht im Einklang mit den folgenden Richtlinien Est conforme aux spécifications de la directive sur les machines suivante E conforme alle seguenti direttive comunitarie e successive mofiche 2006 42 EC 2014 30 EU 2000 14 EC amended by 2005 88 EC Materiellet er udført i overensstemmelse med følgende standarder Conforms with the follo...

Reviews: