background image


14 


Cleaning the tiller 

 
The tiller should be cleaned after use. Use a garden hose to 
wash off soil and dirt. Remove any grass, etc. from the rotor 
shaft. The chassis number should only be cleaned with a 
damp cloth to avoid unnecessary wear. Avoid using a high-
pressure washer during cleaning. 
 

Storage 


If the machine is likely to be stored unused for prolonged 
periods, follow the instructions below. This will ensure 
longer machine lifetime. 


Use a garden hose to wash off soil and dirt. Remove 
any grass, etc. from the rotor shaft. The chassis number 
should only be cleaned with a damp cloth to avoid 
unnecessary wear. Avoid using a high-pressure washer 
during cleaning. 


Wipe the tiller with a damp cloth so that all surfaces are 
clean. Wipe the surfaces down with an oily cloth to 
prevent rust.  


Always store the machine in a dry, clean location. 


Troubleshooting 


The motor will not start 

1.  Check that the safety key is fitted correctly.  
2.  Check that the battery is fully charged and mounted 

correctly in the right side of the battery compartment. 

3.  Make sure to hold the safety switch down before 

activating the clutch handle. 


The blades will not rotate 

1.  Check for stones lodged between the blades.  
2.  Release any stones by removing the blades.  
3.  Check the cables are in good working order and fitted 

correctly.  

4.  Check the belt is in good working order and fitted 

correctly. 

5.  Ensure the belt tensioner is adjusted correctly. 
 

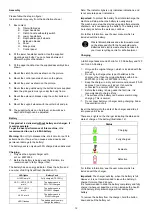
Control panel flashes green (when hold clutch handle) 

1.  The battery is discharged. Set it to charge  
2.  The controller or battery is hot. Let it cool down.  
3.  Connection failed. Reinstall battery and restart. 
 

Control panel flashes orange (when hold clutch handle) 

1.  The blades or gearbox may be blocked. 

Release any stones by removing the blades.  

2.  Start failed. Switch off the machine and start again. 
  

Noise, vibration and precautionary measures 

 
1.   Long-term exposure to noise levels exceeding 85 dB (A) 

are damaging. Always use ear defenders when the 
machine is being used. 

2.  To reduce noise levels further, only use the machine in 

an open environment.  

3.  Vibrations can be reduced further by holding the handle 

firmly. 

4.  To avoid disturbing others, the machine should only be 

used during the daytime. 

5.  Always wear close-fitting work clothes, hard-wearing 

work gloves, ear defenders and non-slip boots with steel 
toecaps. 

6.  Take 30-minute break every 2 working hours. 
7.  A worn belt must be replaced/ serviced by an authorized 

dealer   


Warranty terms and conditions 

 
The warranty period is 2 years for private end users in EU 
countries. 
Products sold for commercial use, only have a warranty 
period of 1 year. 
 
The warranty covers material and/or fabrication faults. 
 

Restrictions and requirements 

Normal wear and replacement of wearing parts are NOT 
covered by the warranty. 
 
Wearing parts, which are NOT covered for more than 12 
months: 

 Blades 

 Cables 

 Belts 

 Switches 


Battery: If the battery is not stored correct (frost-free and 
recharged every 3 months), the durability is only 
guaranteed for 6 months 


The warranty does NOT cover damages/faults caused 
by: 


Lack of service and maintenance  

 Structural 

changes 


Exposure to unusual external conditions 


Damages to the bodywork, deck, handles, panels etc.  


If the machine has been improperly used or overloaded 


Use of unoriginal spare parts. 


Other conditions where Texas cannot be held 
responsible. 


Whether a case is a warranty claim or not is determined in 
each case by an authorized service center. 
 
Your receipt is your warranty note, why it should always be 
kept safe. 
 

REMEMBER:

 The purchase of spare parts as well as any 

request for warranty repair, art. no. (e.g. 900XXXXX), year 
and serial number should always be informed. It can be 
found on the CE-label on the machine! 
 

* We reserve the right to change the conditions and accept 
no liability for any misprints


Summary of Contents for FRZ 5800

Page 1: ...FRZ 5800 Texas A S Knullen 22 DK 5260 Odense S Denmark Version 22 1 Tel 45 6395 5555 www texas dk post texas dk DK Betjeningsvejledning GB User manual D Bedienungsanleitung F Manuel de l utilisateur ...

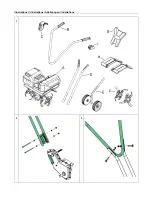
Page 2: ...Illustrationer Illustrations Abbildungen Illustrations Illustrationer Illustrations Abbildungen Illustrations Ilustracje Ilustracije Illustrazioni 1 2 3 ...

Page 3: ...3 4 5 6 7 8 9 ...

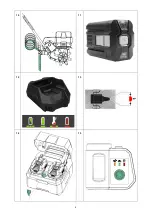
Page 4: ...4 10 11 12 13 14 15 ...

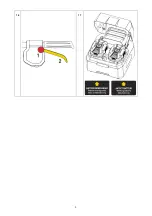
Page 5: ...5 16 17 ...

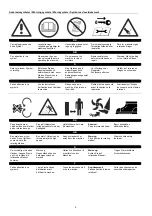
Page 6: ...de sécurité avant l entretien ou la réparation Avertissement Risque de coupure sur les lames rotatives Advarselssymboler Warning symbols Warnsymbole Symboles d avertissement Symbole ostrzegawcze Opozorilni simboli Simboli di pericolo DK Pas på hænderne Lad dem ikke komme tæt på de roterende knive Pas på Objekter kan forlade produktet med høj hastighed Hold tilskuere 5 m væk fra maskinen Advarsel P...

Page 7: ...ndigt at forlade sikkerhedszonen skal motoren slukkes før zonen forlades Stop straks motoren ved kontakt med et fremmedlegeme og inspicer maskinen grundigt for skader Reparer skaden før du fortsætter Hvis maskinen begynder at vibrere unormalt skal du stoppe motoren og undersøge årsagen med det samme Vibrationer er normalt et tegn på skader Sluk altid motoren og kontroller at alle bevægelige dele e...

Page 8: ...igt For at beskytte batteriet mod total afladning vil maskinen standse når batteriet næsten er fladt Maskinen må ikke startes igen efter automatisk standsning da det kan beskadige batteriet Batteriet skal oplades inden arbejdet fortsættes For yderligere oplysninger se betjeningsvejledningen der medfølger batteriet Bortskaffelse af lithium batterier og elskrot må ikke ske sammen med almindeligt hus...

Page 9: ... knappen slippes går funktionen tilbage til langsomt fremgear skildpadde og knivene stopper med at køre rundt Stop Slip koblingsgrebet Drej sikkerhedsnøglen til O Efter 5 minutters inaktivitet lukker hele systemet automatisk ned Fjerne batteri For at tage batteriet ud tryk begge frigivelsesknapper på batteriet ind og træk batteriet ud Illustration 17 Der er plads til et ekstra batteri i motorenhed...

Page 10: ...te sten 1 Start fejler Sluk maskinen og start igen Støj vibration og forholdsregler 1 Længerevarende eksponering for lydtryk over 85 dB A er skadeligt for hørelsen Anvend altid høreværn når maskinen anvendes 2 For at reducere støj bør maskinen bør kun anvendes i et åbnet miljø 3 Vibrationer kan reduceres ved at holde håndtaget i et fast greb 4 For ikke at udsætte uvedkommende for støj bør maskinen...

Page 11: ...e the safety zone turn off the engine before leaving the zone After striking a foreign object stop the engine immediately and inspect the machine thoroughly for damage Repair the damage before continuing If the machine should start to vibrate abnormally stop the engine and check immediately for the cause Vibration is generally a warning of damage Always turn off the engine and ensure that all movi...

Page 12: ...the battery Note The indicator lighs is only indicative indications and is not accurate power indications Important To protect the battery from total discharge the machine will stop when the battery is nearly empty The machine must not be started up again after automatic shutdown as it can damage the battery The battery must be recharges before the work can continue For further information see the...

Page 13: ...o use the reverse gear function hold down the button so that it lights up red at R The button must be held down as long as go reverse When the button is released the function returns to slow forward speed turtle and blades stop turning Stop Release the clutch lever Turn the safety key to O After 5 minutes of inactivitythe whole system will shut down automatically Remove the battery To remove the b...

Page 14: ...and start again Noise vibration and precautionary measures 1 Long term exposure to noise levels exceeding 85 dB A are damaging Always use ear defenders when the machine is being used 2 To reduce noise levels further only use the machine in an open environment 3 Vibrations can be reduced further by holding the handle firmly 4 To avoid disturbing others the machine should only be used during the day...

Page 15: ... sind erforderlich Vermeiden Sie lose Kleidung Betrieb Starten Sie immer den Motor in einer Sicherheitszone Verlassen Sie die Sicherheitszone nicht während Sie die Maschine bedienen Wenn es erforderlich ist die Sicherheitszone zu verlassen dann stellen Sie zuvor den Motor aus Wenn ein Fremdkörper getroffen wurde stoppen Sie sofort den Motor und untersuchen Sie die Maschine gründlich auf Beschädigu...

Page 16: ...aden Verwenden Sie nur das Original Ladegerät mit der Art Nr 90070054 Es wird geraten den Akku vor der ersten Verwendung vollständig aufzuladen Der Akku hat am Ende eine Energieanzeige Drücken Sie die Taste und eine Reihe von LEDs leuchtet auf Abb 11 LED Leuchten Akku Alle LEDs leuchten Vollständig aufgeladen 75 100 LED 1 LED 2 LED 3 leuchten Zu 50 75 geladen LED 1 und LED 2 leuchten Zu 25 50 gela...

Page 17: ...hen Start durch z B Minderjährige zu verhindern bevor Reinigungs und Wartungsarbeiten ausgeführt werden Zum Entfernen des Sicherheitsschlüssels drehen Sie ihn in die Freigabeposition O und ziehen Sie ihn heraus Zum Einstecken des Sicherheitsschlüssels setzen Sie ihn ein und drehen Sie ihn in die Betriebsposition I Nur dann kann der Motor gestartet werden Start Abb 15 16 1 Drehen Sie den Sicherheit...

Page 18: ...nehmen der Messer zu entfernen 3 Zustand und Führung der Bowdenzüge kontrollieren 4 Zustand und Führung des Riemens kontrollieren 5 Einstellung des Riemenspanners kontrollieren Bedienfeld blinkt grün bei gehaltenem Kupplungsgriff 1 Der Akku ist entladen Laden der Akku 2 Der Akku ist heiß Lass es abkühlen 3 Verbindungsfehler Batterie wieder einsetzen und neu starten Bedienfeld blinkt orange bei geh...

Page 19: ...té Ne quittez pas la zone de sécurité lors de l utilisation de la machine Si vous devez quitter la zone de sécurité coupez le moteur avant de quitter la zone Après avoir heurté un corps étranger arrêtez immédiatement le moteur inspectez minutieusement la machine pour détecter un éventuel dégât Réparez le dégât avant de continuer Si la machine commence à vibrer de manière anormale arrêtez le moteur...

Page 20: ...moin a uniquement une valeur indicative et ne fournit pas d information précise sur l état de charge Important Pour protéger la batterie d une décharge totale la machine s arrêtera lorsque la batterie est presque vide La machine ne doit pas être redémarrée après un arrêt automatique car cela peut endommager la batterie La batterie doit être rechargée avant de reprendre le travail Pour plus d infor...

Page 21: ...Lorsque le bouton est relâché la fonction revient à la vitesse d avance lente tortue et les lames s arrêtent de tourner Arrêt Relâchez le levier d embrayage Tournez la clé de sécurité sur O Après 5 minutes d inactivité l ensemble du système s éteindra automatiquement Arrêter Relâchez la poignée d embrayage Tournez la clé de sécurité sur O Après 5 minutes d inactivité l ensemble du système s éteind...

Page 22: ...uées Détachez les lames pour retirer les pierres 2 Le démarrage échoue Éteignez et redémarrez la machine Bruit vibrations et précautions 1 Toute exposition de longue durée à des niveaux de bruit supérieurs à 85 dB A est nocive Veillez toujours à porter des protège tympans lorsque vous utilisez la machine 2 Pour réduire davantage encore le niveau de bruit utilisez le motoculteur uniquement dans un ...

Page 23: ... A Sound power level LWA 93 dB A LpA 88 2 dB A Vibrationsniveau venstre højre håndtag 8 1 m s2 7 4 m s2 Vibration level left right handle 8 1 m s2 7 4 m s2 DE FR Modell FRZ 5800 Model FRZ 5800 Reingewicht kg 27 5 Poids kg 27 5 Vorwärtsgänge 2 Vitessesavant 2 Rückwärtsgänge 1 Vitessesarrière 1 Griff Nicht einstellbar Traiter Non réglable Arbeitsbreite 28 40 60 cm Largeur de travail 28 40 60 cm Arbe...

Page 24: ...lbehør Accessories Zubehör Accecssoires Akcesoria Tilbehør Accessories Zubehör Accessoires Akcesoria Pribor Accessori Art no 91033600100 Art no 91031500100 451224 Art no 91032500100 451224 Art no 91031100100 ...

Page 25: ...irective and subsequent modifications Steht im Einklang mit den folgenden Richtlinien Est fabriqué en conformité avec les directives suivantes Zgodność z wymaganiami dyrektywy maszynowej następujące 2006 42 EC 2014 30 EU 2000 14 EC amended by 2005 88 EC Materiellet er udført i overensstemmelse med følgende standarder Conforms with the following standards In Übereinstimmung mit den folgende Standar...

Page 26: ...26 ...

Page 27: ...27 ...

Page 28: ...28 ...

Reviews: