background image


15 


If the fuel tank has to be drained, this shall be done 
outdoors  


Maintenance and storage 


The engine shall be stopped when carrying out 
maintenance and cleaning operations, when changing 
tools and when being transported by means other than 
under its own power. 


Check regularly that all bolts and nuts are tightened. 
Retighten if necessary. 


The engine must be completely cooled before storing 
indoors or covered. 


If the machine unused for a period of time, please refer 
to the instructions in this manual.  


Maintain or replace safety and instruction labels, as 
necessary. 


Only use original spare parts or accessories. If not 
original parts or accessories is used, the liability is no 
longer applied.   


Replace faulty silencers. 


Miscellaneous 


The motor and gearbox are not pre-filled with oil. 


Factory-fitted control devices, such as the handle-
mounted clutch cable, must not be removed or exposed. 


Only drain the fuel tank outdoors. Gasoline is extremely 
flammable, and the fumes are explosive. 


Ensure that the machine is properly secured when 
transported on a flatbed etc. 


Reduce the throttle during engine shutdown and close 
the fuel valve. 


Due to vibrations, it is recommended to take a break for 
every 30 minuttes use to avoid fatique in your arms. 
 

Identification of parts 

 
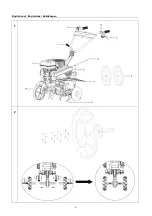
See Fig. 1: 

A. Throttle 

control 

B.  Start switch (on/off) 
C. Clutch 

handle 

D. Gear 

rod 

E. Depth 

skid 

F. Blade 

guards 

G. Tiller 

blades 

H. Support 

wheel 

I. Engine 
J.  Handle for turning the handlebar 
K. Wheels 

 
Assembly 

 
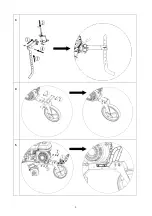
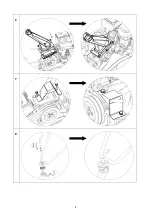
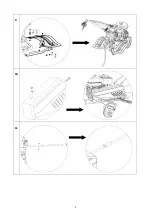
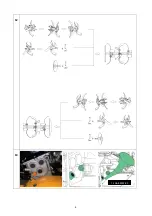
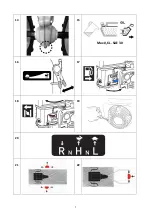
Please follow the steps in figure 2-12: 


2. 

Mount wheel axles on the wheels with the supplied 
bolts, washers and nuts. 


3. 

Mount rear console and depth skid with the supplied 
cotter bolts and pins. 


4. 

Mount support wheel with the supplied cotter bolts 
and pins. 


5. 

Mount the front handle tube with the supplied 
bolts. 


6. 

Mount the lower handlebar. Use the supplied 
bolts. Be careful not to overtighten, so the bracket 
bend. 


7. 

Mount the plate around the gear rod with the 
supplied bolts. 


8. 

Mount the upper handlebar. Use the supplied 
assembly kit as shown. 


9. 

Mount the blade guards using the bolts and nuts 
supplied. Note the blade guards must go over the 
body frame  


10. 

Fit the beltcover to the machine with the supplied bolts 
and washers. 


11. 

Attach the gear rod as shown in the picture with 
cutter bolt and pin.


12. 

Mount the tiller blades using the cotter bolts and pins. 


Fill the engine with oil.  

See changing the oil section for more details. 


Clothing 

 
When using the machine, wear close-fitting work clothes, 
hard-wearing work gloves, ear defenders and non-slip boots 
with steel toecaps.  
 

Add gear oil in gearbox 


There is no oil in gearbox! 

 
The gearbox is not filled with gear oil at the factory.  
 
Fill with gear oil type SAE 80W-90, 1 liter before starting.  
Do not overfill with oil. 
 
Check the oil level (the oil level should just be visible when 
the oil cap is removed (Fig. 13) og add gear oil after the first 
20 and 50 working hours. 
 
For every 100 working hours, the gear oil must be replaced. 
Remove the drain plug (Fig. 14) and let the oil run out into a 
plastic tub or similar. 
 

Tip

: It is recommended to let the tiller blades rotate for a 

while before draining the gearbox. It will make the gear oil 
warm, so it runs out easier.  
Fill with new gear oil (about 1.2 liter) 
 

Starting and stopping the engine 


There is no oil in engine! 


Remember: Always check the oil level prior to use! 

 
Add SAE 30 engine oil, 0.6 Liter before starting first time. 
 
The oil level must reach the edge of the filling hole 
(Fig. 15). Always use SAE 30 oil. Use only unleaded 95 
octane gas. Never over-fill the gas tank 
 
Warning: Stay out of dashed zone, while starting the engine!   
Always start the engine from dotted operation zone.  
See Fig. 21. 
 

Inden brug følges motorvejledningens  
anvisninger for klargøring af motor! 


Summary of Contents for FX 815TG

Page 1: ...Betjeningsvejledning GB User manual D Bedienungsanleitung ACHTUNG DENKEN SIE DARAN VOR INBETRIEBNAHME MOTORÖL SAE 30 UND GETRIEBEÖL SAE 80W 90 AUFZUFÜLLEN VIGTIGT HUSK AT PÅFYLDE MOTOROLIE SAE 30 OG GEAR OLIE SAE 80W 90 FØR START IMPORTANT REMEMBER TO FILL WITH ENGINE OIL SAE 30 AND GEAR OIL SAE 80W 90 BEFORE START ...

Page 2: ...2 Illustrationer Illustrations Abbildungen Illustrationer Illustrations Abbildungen Illustrations Ilustracje Ilustracije Illustrazioni 1 2 ...

Page 3: ...3 3 4 5 ...

Page 4: ...4 6 7 8 ...

Page 5: ...5 9 10 11 ...

Page 6: ...6 12 13 1 L SAE 80W 90 ...

Page 7: ...7 14 15 Max 0 6 L SAE 30 16 17 18 19 20 21 22 ...

Page 8: ... carefully before operating the machine Die Bedienungsanleitung sorgfältig durchlesen bevor das Gerät verwendet wird Advarsel Risiko for flyvende objekter Warning Risk of flying objects Warnung Es besteht Gefahr von herumfliegenden Objekten Hold afstand til personer børn og dyr Keep distance to other people children and animals Abstand von anderen Personen Kindern und Tieren halten Advarsel Pas på...

Page 9: ... Vær opmærksom på mulige farer ved arbejde på vanskelig jord f eks meget stenet eller hård jord Det er påkrævet at bære støvler med skridsikre såler og stålkappe Undgå at bære løstsiddende tøj Betjening Start altid motoren fra sikkerhedszonen Forlad ikke sikkerhedszonen under betjening af maskinen hvis det er nødvendigt at forlade sikkerhedszonen skal motoren slukkes før zonen forlades Stop straks...

Page 10: ...onsol og jordspyd med de medfølgende bolte og splitter 4 Monter støttehjul med de medfølgende bolte og splitter 5 Monter frontbøjle med de medfølgende bolte 6 Monter understyr Brug de medfølgende bolte Pas på ikke at overspænde så beslaget bøjer 7 Monter plade omkring gearstang med de medfølgende bolte 8 Monter overstyret Brug det medfølgende monteringssæt som vist 9 Monter sideskærmene ved hjælp ...

Page 11: ...rdklumper som er svære at jævne ud igen Ved meget tør jord kan det være nødvendigt at fræse to gange over jordstykket Variabel fræsehastighed Denne maskine er udstyret med 2 gear frem på fræserknivene Dette gør det muligt for brugeren at opnå det bedst mulige resultat i forhold til vejr og jordbundsforhold Justering af hastigheder Gearstangen har 5 positioner se figur 20 R Bakgear 62 omdr min 2 Hø...

Page 12: ...mme helt ned i bunden af motoren Fyld den brugte olie på den medfølgende dunk 2 Fyld frisk olie på motoren type SAE30 0 6 l 3 Kontroller altid at olien er synlig og fyldt helt op til kanten af påfyldningshullet Fig 15 Husk at skaffe dig af med den brugte olie så den ikke er til gene for naturen Olie og oliesugersæt medfølger ikke Luftfilteret Luftfilteret skal efterses og renses jævnligt Hvis filt...

Page 13: ...g Vibrationsniveau venstre højre håndtag Usikkerhed 8 1 7 4 m s2 1 5 m s2 Lydtryksniveau LpA Måleusikkerhed 86 1 dB A 3 dB Lydeffektniveau LwA Måleusikkerhed 98 dB A 3 dB Målt på udgangsakslens center Reklamationsretten og generelle betingelser Reklamationsperioden regnes fra købsdatoen og er gældende i 3 år for private i Danmark 2 år i andre lande i EU Maskiner solgt til erhvervsbenyttelse har 1 ...

Page 14: ...t is required Avoid loose fitting clothes Operation Always start the engine from safety zone Do not leave the safety zone while operating the machine if it is necessary to leave the safety zone turn off the engine before leaving the zone After striking a foreign object stop the engine immediately remove the spark plug cap and inspect the machine thoroughly for damage Repair the damage before conti...

Page 15: ... supplied bolts 6 Mount the lower handlebar Use the supplied bolts Be careful not to overtighten so the bracket bend 7 Mount the plate around the gear rod with the supplied bolts 8 Mount the upper handlebar Use the supplied assembly kit as shown 9 Mount the blade guards using the bolts and nuts supplied Note the blade guards must go over the body frame 10 Fit the beltcover to the machine with the ...

Page 16: ... very wet soil as clods of earth will form that are difficult to break up Variable cultivating speed This machine is equipped with 2 gears forward on the tiller blades This ensures the best result no matter in which weather it is being used how however the soil conditions are Adjustment of speeds The gear rod has 5 positions see Fig 20 R Reverse 62 rpm H High speed gear 113 rpm N Neutral 2 positio...

Page 17: ...ringe Use the hose to reach the sump 2 Transfer the used oil to the container 3 Fill the engine with new SAE 30 oil 0 6 l 4 Always check that the oil level is visible and to edge of the fill hole Fig 21 Remember to dispose of used oil in a safe way Oil and oil extractor kit are not included Air filter maintenance Please inspect and clean the air filter on a regular basis If the filter has not been...

Page 18: ...ibration level left right handle Uncertainty 8 1 7 4 m s2 1 5 m s2 Sound pressure level LpA Measure uncertainty 86 1 dB A 3 dB Sound power level LwA Measure uncertainty 98 dB A 3 dB Measured at the center of blade shaft Warranty terms and conditions The warranty period is 2 years for private end users in EU countries Products sold for commercial use only have a warranty period of 1 year The warran...

Page 19: ...tzt werden soll Nötigenfalls entfernen Sie alle Fremdkörper Tanken Sie kein Benzin in geschlossenen Räumen oder bei laufendem Motor Verschüttetes Benzin ist hochentzündlich Tanken Sie nie wenn der Motor noch heiß ist Wischen Sie ggfs verschüttetes Benzin auf bevor Sie den Motor starten Es könnte einen Brand oder eine Explosion verursachen Nehmen Sie sich in Acht vor Gefahren wenn Sie auf schwierig...

Page 20: ... nicht mit Öl vorgefüllt Werkseitig montierte Steuerelemente wie z B das am Griff montierte Kupplungskabel dürfen nicht entfernt oder freigelegt werden Entleeren Sie den Kraftstofftank nur im Freien Benzin ist äußerst leicht entzündlich und Benzindämpfe sind explosiv Stellen Sie sicher dass die Maschine beim Transport auf einem Pritschenwagen o ä gut gesichert ist Schließen Sie die Drossel beim Ab...

Page 21: ...Kontrollieren Sie vor der Inbetriebnahme dass das Gerät auf ebenem Boden steht und das Stützrad heruntergelassen wurden Alle in der Nähe befindlichen Fremdkörper sind zu entfernen Steine Glas Zweige und ähnliche Gegenstände können das Gerät beschädigen Danach alle Schrauben auf festen Sitz überprüfen Starten Sie den Motor vgl nachstehende Anleitung Halten Sie sich von allen beweglichen Maschinente...

Page 22: ...wendungsmöglichkeiten der Maschine signifikant erhöht Untenstehend können Sie Zubehör für FX 815TG erwerben die Liste kann aktualisiert geändert werden Räder enhalten Werden gebraucht wenn Geräte Häufelpflug usw angebaut werden sollen Seitliche Schutzbleche enhalten Sie sollen verhindern dass eng stehende Pflanzen Möhren Kartoffeln usw beim Fräsen mit Erde behäuft werden Sie leisten auch beim Fräs...

Page 23: ...u vermeiden Das Gerät muss an einem trockenen und sauberen Ort gelagert werden Fehlersuche Der Motor springt nicht an 1 Kraftstoffeinstellung kontrollieren 2 Zündkerze prüfen 3 Alter des Benzins im Tank kontrollieren 4 Weitere Hinweise zur Fehlersuche sind der separaten Motoranleitung zu entnehmen Der Motor läuft nicht gleichmäßig 1 Der Gashebel darf nicht auf Schnell stehen 2 Alter des Benzins im...

Page 24: ...ng Strukturelle Veränderungen Ungewöhnliche äußere Bedingungen Schäden an Karosserie Mähdeck Lenker usw Unsachgemäße Verwendung oder Überladung Verwendung von falschem Öl Benzin oder anderen Flüssigkeiten die den in der Bedienungsanleitung empfohlenen widersprechen Schlechtes oder verunreinigtes Benzin das die Verunreinigung des Kraftstoffsystems zur Folge hat Verwendung von nicht originalen Ersat...

Page 25: ...ns of the machine directive and subsequent modifications Steht im Einklang mit den folgenden Richtlinien Est fabriqué en conformité avec les directives suivantes Zgodność z wymaganiami dyrektywy maszynowej następujące Je v skladu z zahtevami direktive o strojih in poznejših sprememb Rispettano le specifiche della direttiva sulle macchine e le sue successive modifiche 2006 42 EC 2014 30 EU 2000 14 ...

Page 26: ...26 ...

Page 27: ...27 ...

Page 28: ...28 ...

Reviews: