background image

v

  Read This First

Preface

Read This First

How to Use This Manual

This document contains the following chapters:

-

Chapter 1—Introduction

-

Chapter 2—Quick Start

-

Chapter 3—Reference

Information About Cautions and Warnings

This book may contain cautions and warnings.

This is an example of a caution statement.

A caution statement describes a situation that could potentially
damage your software or equipment.

This is an example of a warning statement.

A warning statement describes a situation that could potentially
cause harm to you.

The information in a caution or a warning is provided for your protection.
Please read each caution and warning carefully.

Summary of Contents for TPA6030A4

Page 1: ... November 2002 Mixed Signal Products User s Guide SLOU113A ...

Page 2: ...nt that any license either express or implied is granted under any TI patent right copyright mask work right or other TI intellectual property right relating to any combination machine or process in which TI products or services are used Information published by TI regarding third party products or services does not constitute a license from TI to use such products or services or a warranty or end...

Page 3: ... handling or use of the goods Please be aware that the products received may not be regulatory compliant or agency certified FCC UL CE etc Due to the open construction of the product it is the user s responsibility to take any and all appropriate precautions with regard to electrostatic discharge EXCEPT TO THE EXTENT OF THE INDEMNITY SET FORTH ABOVE NEITHER PARTY SHALL BE LIABLE TO THE OTHER FOR A...

Page 4: ...inty as to the load specification please contact a TI field representative During normal operation some circuit components may have case temperatures greater than 85 C The EVM is designed to operate properly with certain components above 85 C as long as the input and output ranges are maintained These components include but are not limited to linear regulators switching transistors pass transistor...

Page 5: ...ook may contain cautions and warnings This is an example of a caution statement A caution statement describes a situation that could potentially damage your software or equipment This is an example of a warning statement A warning statement describes a situation that could potentially cause harm to you The information in a caution or a warning is provided for your protection Please read each cauti...

Page 6: ...4 audio amplifier integrated circuit FCC Warning This equipment is intended for use in a laboratory test environment only It generates uses and can radiate radio frequency energy and has not been tested for compliance with the limits of computing devices pursuant to subpart J of part 15 of FCC rules which are designed to provide reasonable protection against radio frequency interference Operation ...

Page 7: ...ence 3 1 3 1 TPA6030A4EVM Layout and Schematic 3 2 3 2 TPA6030A4 Audio Power Amplifier Evaluation Module Parts List 3 4 3 3 Volume Control 3 5 Figures 1 1 The TI TPA6030A4 Audio Amplifier Evaluation Module 1 3 2 1 Quick Start Platform Map 2 3 2 2 Module Preparation 2 5 2 3 Quick Start Module Map 2 6 2 4 TPA6030A4EVM Connected for Stereo Bridge Tied Load BTL Output 2 8 2 5 TPA6030A4EVM Connected fo...

Page 8: ... 2 2 Typical TPA6030A4EVM Jumper Settings 2 2 2 3 Platform Jumper and Switch Settings for the TPA6030A4 2 4 2 4 Typical TPA6030A4EVM Jumper Settings for BTL Stand Alone 2 8 2 5 Typical TPA6030A4EVM Jumper Settings for SE Stand Alone 2 8 3 1 TPA6030A4EVM Parts List 3 4 3 2 Volume Control VCC 12 V No Load SEDIFF 0 V SEMAX 5VREF 3 5 ...

Page 9: ...plifier evaluation module SLOP365 It includes a list of EVM features a brief illustrated description of the module and a list of EVM specifications Topic Page 1 1 Feature Highlights 1 2 1 2 Description 1 3 1 3 TPA6030A4EVM Specifications 1 3 1 4 Special Notes Regarding the Data Sheet 1 4 Chapter 1 ...

Page 10: ...Quick and easy configuration with the TI Plug N Play audio amplifier eval uation platform J Evaluation module is designed to simply plug into the platform automatically making all signal and power connections J Platform provides flexible power options J Jumpers on the platform select power and module control options J Switches on the platform route signals J Platform provides quick and easy audio ...

Page 11: ...ed stand alone The platform has room for a single TPA6030A4 evaluation module and is a convenient vehicle for demonstrating TI s audio power amplifier and related evaluation modules The EVM simply plugs into the platform which automatically provides power to the modules interconnects them correctly and connects them to a versatile array of standard audio input and output jacks and connectors Easy ...

Page 12: ...VMs have an incorrect supply voltage marked on them The correct supply range is 7 V to 15 V not 5 V to 15 V The EVM and this user s guide refer to the two input pins as HP and LINE and refer to the control pin as HP LINE The data sheet refers to the two inputs as IN2 and IN1 respectively and the control pin as IN2 IN1 See the data sheet for the correct voltages and pin names ...

Page 13: ... is inserted into the headphone jack The SE BTL pin on the TPA6030A4 is designed to switch high when the voltage applied to the pin meets or exceeds 0 8 VCC requiring a minimum of 5 6 V when the power supply is at 7 V This is more than the platform can supply and consequently the automatic SE BTL toggle feature of the TI Plug N Play platform is not fully compatible with the TPA6030A4EVM However th...

Page 14: ...X X Note 4 X Notes 1 X Don t care 2 ON Shunt installed 3 OFF Open 4 Set S2 to ON when signal conditioning board is installed in U1 set S2 to OFF when no signal conditioning board is installed Table 2 2 Typical TPA6030A4EVM Jumper Settings EVM Mode J1 J2 J3 TPA6030A4 BTL OFF X OFF TPA6030A4 SE ON X OFF Notes 1 ON Shunt installed 2 OFF Open 3 X Don t care ...

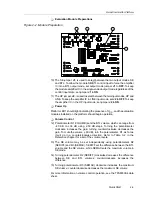
Page 15: ... platform or both may result Figure 2 1 Quick Start Platform Map 6 Signal Conditioning CAUTION Do not insert or remove EVM boards with power applied ICC JP4 F1 VR1 R1 JP3 JP2 JP1 AC DC J2 VCC J1 D1 D2 D3 D4 J2 J3 J4 J5 AC DC In VCC In J1 DC SOURCE LED1 VCC LED2 VDD R2 JP5 IDD B1 U6 POWER SUPPLY U3 U4 U5 U1 U2 Audio Power Amps On Off Conditioning S2 J7 J8 Right Out Left Out JP6 Mode Mute Spk U2 U4 ...

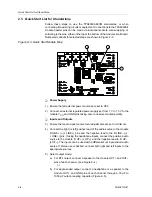
Page 16: ...o align the module pins correctly 3 Use switch S2 to select or bypass the signal conditioning EVM U1 4 Set jumper JP6 to select the Mode control input 5 Remove jumper JP5 Table 2 3 Platform Jumper and Switch Settings for the TPA6030A4 EVM JP5 JP6 JP7 JP8 S2 S3 P N P Platform Off Mode X Hi Note 4 X Notes 1 X Don t care 2 ON Shunt installed 3 OFF Open 4 Set S2 to ON when signal conditioning board is...

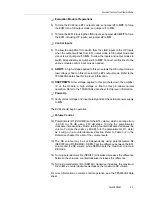
Page 17: ...rm should begin operation Volume Control 12 Potentiometer R1 VOLUME sets the BTL volume which can range from 40 dB to 36 dB using 2 53 dB steps Turning the potentiometer clockwise increases the gain turning counterclockwise decreases the gain To mute the volume 80 dB turn the poteniometer R1 as far as it will go in a counterclockwise direction Refer to Table 3 2 in the Reference chapter for a list...

Page 18: ...aking care to observe marked polarity Inputs and Outputs 3 Ensure that audio signal source level adjustments are set to minimum 4 Connect the right or left positive lead of the audio source to the module R LINE or L LINE pins and the negative lead to the R LINE or L LINE pins If using the headphone inputs connect the positive audio source to the module R HP L HP and the negative lead to R HP L HP ...

Page 19: ...ge or float on this pin allows normal operation Refer to the TPA6030A4 data sheet for trip level information Power Up 11 Verify correct voltage and input polarity and set the external power supply to ON The EVM should begin operation Volume Control 12 Potentiometer R1 VOLUME sets the BTL volume which can range from 40 dB to 36 dB using 2 53 dB steps Turning the potentiometer clockwise increases th...

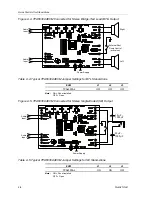
Page 20: ...pply Table 2 4 Typical TPA6030A4EVM Jumper Settings for BTL Stand Alone EVM J1 J2 J3 TPA6030A4 OFF OFF OFF Note ON Shunt installed OFF Open Figure 2 5 TPA6030A4EVM Connected for Stereo Single Ended SE Output Audio Input Audio Input 33 µF 1000 µF 33 µF 1000 µF Power Supply Table 2 5 Typical TPA6030A4EVM Jumper Settings for SE Stand Alone EVM J1 J2 J3 TPA6030A4 ON ON OFF Note ON Shunt installed OFF ...

Page 21: ...rtaining to the layout and schematic of the TPA6030A4EVM Also included is the volume control table for the TPA6030A4 Topic Page 3 1 TPA6030A4EVM Layout and Schematic 3 1 3 2 TPA6030A4 Audio Power Amplifier Evaluation Module Parts List 3 4 3 3 Volume Control 3 5 Chapter 3 ...

Page 22: ...TPA6030A4EVM Layout and Schematic 3 2 Reference 3 1 TPA6030A4EVM Layout and Schematic Figure 3 1 TPA6030A4 EVM Top Layer Figure 3 2 TPA6030A4EVM Bottom Layer ...

Page 23: ...Layout and Schematic 3 3 Reference Figure 3 3 TPA6030A4EVM Schematic V CC RIN1 RIN1 RIN2 RIN2 LIN1 LIN1 LIN2 LIN2 LOUT NC ROUT SEMAX RPV CC GND LOUT LPV CC BYPASS GND CLK VREF SEDIFF VOLUME GND ROUT SHUTDOWN IN2 IN1 ...

Page 24: ...05 8 Panasonic ECJ 2VF1C474Z Digi Key PCC1847TR ND C13 C14 Capacitor 10 µF 16 V B 2 Panasonic ECS T1CX106R Digi Key PCS3106TR ND C10 Capacitor 47 nF 80 20 nonpolarized 25 V 0805 1 Murata GRM216F51E473ZA01D R4 R5 R6 Resistor 510 kΩ 1 10 W 0805 3 Panasonic ERJ 6GEYJ514 Digi Key P510KATR ND R1 R2 R3 Potentiometer 100 kΩ Cermet ST SL thru hole 3 Bourns 33362P 1 104 Digi Key 3362P 104 ND S1 Switch mome...

Page 25: ... 23 4 26 27 33 33 33 26 28 6 24 80 30 80 28 6 31 4 22 27 28 27 31 4 34 19 73 25 73 34 36 6 17 20 23 20 36 6 39 4 14 67 20 67 39 4 42 12 13 18 13 42 44 6 9 60 15 60 44 6 47 2 7 07 13 07 47 2 50 4 53 10 53 50 52 6 2 00 8 00 52 6 55 4 0 53 5 47 55 4 58 3 07 2 93 58 60 6 5 60 0 40 60 6 63 4 8 13 2 13 63 4 66 10 67 4 67 66 68 6 13 20 7 20 68 6 71 4 15 73 9 73 71 4 74 18 27 12 27 74 76 6 20 80 14 80 76 ...

Reviews: