background image

12 

Texi 1501 TS Computerized Embroidery Machine Operation Manual  


automatically. In all other hoops, the design doesn’t rotate 180°. 


4.3 Operation Status 


In  the  operation  status,  you  can  set  the  embroidery  design  origin  (starting  point)  setting, 

embroidery design origin return, offset  point  return, stop point  return,  color changing sequences 

setting, main axis origin return, manual trimming, operation mode changing, embroidering mode 

switching,  embroidery  design  contour,  embroidery  range  checking  and  embroidering  point 

return after a power failure. 


4.3-1 Embroidery Design Origin Setting (Starting Point) 


In  the  operation  status,  move  the  hoop  to  the  required  embroidery  design  origin  (starting 

point). Press   

     key to set origin setting. The hoop walks along the max range of embroidery 

design.  If  the  position  is  insufficient,  move  the  embroidery  design  origin  (starting  point)  until 


satisfied. After the origin (starting point) is positioned, AX/AY coordinates are clear. 


If  current  embroidery  design  is  in  embroidering  process,  it  will  pop  up  a  prompt  box. 

Operate according to the message requirements. 


4.3-2 Offset Point Setting (Highest Point of Hoop Center) 


The offset point is mainly for conveniently embroidering material drawing and releasing and 

appliqué placement. 

Offset  out  of the  hoop  depends  on  the  set  dimensions  of  that  hoop,  and  it  is  moved  to  the 

highest position of the currently selected hoop automatically. 


4.3-3 Return to Origin (Starting Point) 


In the embroidery process, if it is necessary to return to the origin or re-start the embroidery. 

Press 

key and the system will pop up “Terminate embroidering and return to the origin?” 

Press 

  key  and  the  hoop  is  moved  to  the  embroidery  design  origin  and  stop.  AX/AY 

coordinates are cleared. 

Summary of Contents for 1501 TS PREMIUM

Page 1: ...OPERATION MANUAL TEXI 1501 TS PREMIUM ...

Page 2: ...DRIVE 8 PART 4 EMBROIDERY DESIGN 9 4 1 EMBROIDERY STATUS MODE 9 4 2 PREPARATION STATUS 10 4 2 1 Set Embroidery Design Parameters 10 4 2 2 Switching Hoops 11 4 3 OPERATION STATUS 12 4 3 1 Embroidery Design Origin Setting Starting Point 12 4 3 2 Offset Point Setting Highest Point of Hoop Center 12 4 3 3 Return to Origin Starting Point 12 4 3 4 Offset Operation 13 4 3 5 Return to Stop Point 13 4 3 6 ...

Page 3: ...ART 10 PRODUCTION STATISTICS 27 PART 11 MAIN AXIS ORIGIN OPERATION 28 PART 12 LANGUAGE SWITCHING 29 PART 13 EMBROIDERY PARAMETERS SETTINGS 30 PART 14 MACHINE PARAMETERS SETTING 31 PART 15 USER MANAGEMENT 32 PART 16 RESTRICTION RELEASING 33 16 1 LOCK REMOVING 33 PART 17 SYSTEM TEST 34 17 1 INPUT TEST 34 17 2 OUTPUT TEST 34 17 3 MAIN AXIS TEST 35 17 4 MACHINE HEAD TEST 35 PART 18 SYSTEM INFORMATION ...

Page 4: ......

Page 5: ...rotection function If over current protection switch is activated it will reset again after 3 minutes Please don t pile up unnecesary items around the control box during operation Clean the surface of control box and vents regularly to ensure good ventilation and proper cooling of the machine Without authorization from the company please do not modify this product Otherwise the company undertakes ...

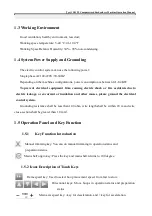
Page 6: ...ue to electric leakage over current or insulation and other causes please ground the electrical control system Grounding resistance shall be less than 100 ohm wire length shall be within 20 m and wire cross section shall be greater than 1 0 mm2 1 5 Operation Panel and Key Function 1 5 1 Key Function Introduction Manual trimming key You can do manual trimming in operation status and preparation sta...

Page 7: ...urrent color needle bar and additional settings and right side displays next needle bar and additional settings Embroidery mode key normally embroidery Embroidery status key operation mode Returning to stop point key Back key Select design and input design Set design related parameters and it can only be operated under embroidery preparation status i e Design Set Embroidery parameter settings i e ...

Page 8: ... to the previous several stitches and continue embroidering automatically after there is a sudden power failure in embroidering process without having to worry about displacement of the embroidery design The equipment s self test function can make testing of the state of electrical equipment and parameters easy for convenient adjustment and maintenance With the main axis stop position adjustment f...

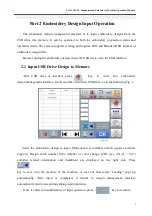
Page 9: ...mory After USB drive is inserted press key to enter into embroidery design management interface It will read the contents in USB drive as in the following Fig 1 Figure 1 Select the embroidery design to input Multi option is available which requires software support Design stitch number ST number of color change CO size X X Y Y andother related information and thumbnail are displayed on the right s...

Page 10: ...ine Operation Manual previous interface Press key to return to main interface 2 2 Delete Designs in Embroidery Design Management In embroidery design management operation interface click the embroidery design to delete Press key to delete design ...

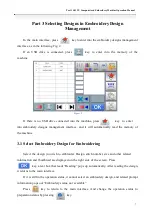
Page 11: ...e and it will automatically read the memory of the machine 3 1 Select Embroidery Design for Embroidering Select the design you wish to embroider Design stitch number size and other related information and thumbnail are displayed on the right side of the screen Press key a text box that reads Reading pops up automatically After reading the design it returns to the main interface If it is still in t...

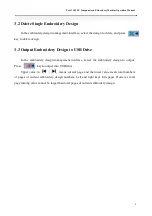
Page 12: ...3 3 Output Embroidery Design to USB Drive In the embroidery design management interface select the embroidery design to output Press key to output into USB drive Upper value in means current page and the lower value mean total numbers of pages of current embroidery design numbers Left and right keys turn pages However total page turning value cannot be larger than total pages of current embroidery...

Page 13: ...atuses i e preparation status operation status Switching between statuses can be done via pressing key on main interface As in the following Fig 3 Figure 3 Preparation Status In the preparation status press key and a pop up appears Enter Embroidering Status Press key to enter into operation status as in the following Fig 4 Figure 4 Working Status ...

Page 14: ... 1 Set Embroidery Design Parameters In preparation status press key to enter embroidery design parameter setting operation i e Design Set as in the following Fig 5 Figure 5 Design Set Modify values according to the embroidery design After modification is completed press key to save modification Press key to return to main interface Parameter Range Description X Y direction magnification power 50 2...

Page 15: ...e When cap hoop or A G hoops are selected the machine will search absolute origin center automatically and stop at center of selected hoop Please pay attention to the hoop movement See Hoop Setting on embroidery range of cap hoop and A G hoops When using the other hoop button the hoop will not automatically center The embroidery range is also confirmed by the software limits setting See Software L...

Page 16: ...mbroidery design If the position is insufficient move the embroidery design origin starting point until satisfied After the origin starting point is positioned AX AY coordinates are clear If current embroidery design is in embroidering process it will pop up a prompt box Operate according to the message requirements 4 3 2 Offset Point Setting Highest Point of Hoop Center The offset point is mainly...

Page 17: ...inue embroidering 4 3 5 Return to Stop Point In the embroidery process after the hoop is moved manually if it is required to return to the stop position of embroidery machine Press key to move the hoop to the stopping point After the key is pressed it is moved to the stopping position automatically and stopped 4 3 6 Set Color Changing Setting The color changing setting includes color changing sequ...

Page 18: ...ue means current page and lower value means max pages of current embroidery design number Left and right keys turn pages However max page turning value cannot be larger than max pages of current embroidery design When the interface is opened for a design that has been previously setup the cursor is started from the last value position of needle bar automatically Press the top left white box in ord...

Page 19: ...dery press the key and it cannot enter into the operation After entering into setting interface displays the max sequin number of the current color change Select the application method A B AB according to requirements of the design Selected background has color change options Input current output number in the input box after the option It can use a max of 9 different combinations When the combine...

Page 20: ... low speed forwarding In stop status press stop key low speed backing and main axis will not move The hoop is backed along the embroidering stitches Press stop key again to stop low speed backing High speed floats embroidering high speed forwarding In stop status press start key the main axis and the hoop will not move On the screen the cross section which indicates needle position will move as if...

Page 21: ...location is not in the place needed try again until satisfied Embroidery Design Trace Contour Operation After setting start point and tracing the design a new option will appear on the right side of the trace icon press key and the hoop will start to move slowly outlining the design with more precision from start point along the contour precise range After the trace contour is finished it returns ...

Page 22: ... min speed once you let go the machine will resume the preset speed 4 6 Switch Control and Indicators of Sequin Machine optional device When sequin embroidery is used ensure sequin using needle bar of the embroidering parameters has been set correspondingly with mechanical installation Off Left Right and Left Right Sequin type is set as Motor The output and lifting motor can use the dial switch to...

Page 23: ... and waiting for automatic control When entering sequin embroidering mode the landing chassis lands automatically and the lower indicator is in green The upper and lower indicators are all on When the switch is in the lower position from middle position the upper indicator is off and lower indicator is in green and the landing chassis is at lower position Press red button dial switch and the outpu...

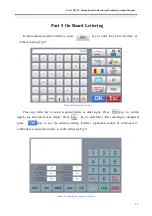
Page 24: ...ing Fig 8 Figure 8 On Board Lettering Press any letter key to select required letters or other signs Press key to switch upper case and lower case letters Press key to clear letter After entering is completed press key to see the lettering setting interface operation cannot be continued if embroidery is operation mode as in the following Fig 9 Figure 9 Lettering Parameters Settings ...

Page 25: ...the letter related parameters After setting is completed press key below to select required letter type 5 types Press key to generate letter pattern On the left upper corner you can see the generated embroidery file Press key to save embroidery file in the machine memory ...

Page 26: ...anual Operation for Color Changing In operation or preparation interface press key to take manual color changing operation The interface will change with the numbers of needle on the machine Press corresponding needle number according to switch color to specified needle bar ...

Page 27: ... TS Computerized Embroidery Machine Operation Manual Part 7 Manual Trimming Either in embroidery preparation or operation status trimming operation can be done Press key on panel to make a manual trimming operation ...

Page 28: ... operation The interface will pop a dialogue Set the current point as hoop origin or not Press key to complete setting The current PX PY coordinates are changed into 0 0 origin 8 2 Automatic Searching for Absolute Origin of Hoop The absolute origin uses hoop limits to detect absolute position of hoop so as to ensure using embroidery recovery in power failure to make accurate embroidery continuatio...

Page 29: ...id if the hoop has not moved after power failure 8 3 Set Software Limits This function is only valid when the hoop setting is set in Other In hoop origin interface press key to select operation The interface pops up a dialogue Move hoop to left top According to the prompt move hoop to left upper corner press key The interface pops up another dialogue Move hoop to right bottom According to the prom...

Page 30: ...nd dimension from absolute origin of hoop to hoop center In embroidery parameter interface press hoop setting key as in the following Fig Set hoop related parameters according to the requirements of the job After setting is completed press key to save setting Hoop Setting Diagram X Size X Center size Frame center Y Center size Space Origin Y Size ...

Page 31: ...on is only used to generate statistics and clearing statistics operation Check the process information on main interface The first is production quantity of current embroidery file and the latter one is total stitches of the current embroidery file Click statistics once to check the number of thread breaks ...

Page 32: ...ual Part 11 Main Axis Origin Operation This function is only used for main axis position stops It can be operated as one of the two panel button According to requirements it can be operated as by following Press key to reset main axis to 100 degree zero position ...

Page 33: ...hing In the main menu interface press key to enter machine parameter settings To make language switching operation press key menu will change to show all the different language the machine has click and select required language The system is switched to the selected language automatically ...

Page 34: ... commonly used parameters to meet the operation requirements In the main menu interface press key to enter into embroidery parameter interface Click parameter content to be modified and press or key to make modifications After modifications are completed press key to save modifications and return to main menu interface automatically See Attached List I on related definitions of embroidery paramete...

Page 35: ...on Manual Part 14 Machine Parameters Setting The machine parameters should be used by professional technicians only Don t make modification without permission from a certified technician in order to avoid causing damage to the machine and abnormal operation ...

Page 36: ... Operation Manual Part 15 User Management The user management should only be used by professional technicians Don t make modification without permission by a certified technician in order to avoid causing damage to the machine and abnormal operation ...

Page 37: ...of use is expired the system is locked automatically and prompts to release restriction by inputting passwords as in the following Fig Click Remove Passwords box and a figure keyboard is popped up Press the keys and input passwords 8 digits obtained from the supplier to remove lock Press key to remove restriction and continue usage ...

Page 38: ...check whether the output is valid If the corresponding equipment output has no action the current output may have a fault Please check and make adjustments Hook test Press the key once and the hook takes alternative action between extracting and retracting Press once for extracting one more time for retracting to its original position Trimming test Press the key once trimming motor is taking alter...

Page 39: ... default value is 12 pulses Press key to start back and forth movement Main axis test Press key to start rotation in speed of 100 rev min Press Up and Down keys to modify the main axis speed and check whether the current rotation speed is consistent with actual rotation speed Within 5 rev difference for 1000 rev QEP test press key to test main axis encoder line number and zero position 17 4 Machin...

Page 40: ...ocess do not power off The update is completed in about 3 minutes and the system is advanced to the main operation interface automatically Updates may clear current embroidery file Please complete current embroidery before you update Shortcuts to update program After the machine is powered up and displays 1 INIT USB OK press key twice and press key twice immediately The upper part of display displ...

Page 41: ...e machine parameter setting menu interface press key to enter into IP setting interface The IP set for the machine must set with the same number segment as the LAN IP otherwise it cannot be linked i e the first 3 number segments shall be identical and the last address cannot have a conflict ...

Page 42: ...SB OK press key 3 times the system will re initialize After the system initialization is completed a buzzer will sound tick tick and tick three times continuously the system will enter into the embroidery preparation interface This is used for conditions where the system cannot be operated due to accidental self locking or default setting recovery ...

Page 43: ...k several stitches after trimming to prevent run out 1 1 3 Moving Frame After Trim Move hoop or don t move after trimming Yes Yes No Hook Motor Speed Hook stepper motor speed adjustment The larger the value is the faster the speed is 5 1 5 Trim Function Use trimming function or not Yes Yes No Embroidery Parameters 2 Needles in a Head Current embroidery machine used needle bar number N 1 15 Sequin ...

Page 44: ... embroidery is skipping the stitch to be divided into two stitches to take embroidering 6 5mm 6 5 8 5m m Auto Speed Down ST The stitch to take deceleration embroidering 2 0mm 2 0 9 0m m Stitches Value The number of stitches to take stitch variation adjustment 5 5 20 Speed Down at Jump Decelerate current speed in continuous jumping 70 60 90 Sequin Max Speed Max rotation speed in sequin embroidery 5...

Page 45: ... Yes when taking embroidery design head and tail continuous embroidering Yes Yes No Auto Back to origin position Return to start point or not after embroidery design is completed Set as No when taking embroidery design head and tail continuous embroidering Yes Yes No Repeat Embroidery Continue embroidering or not after embroidery design is completed No Yes No Back Steps of L S Start automatic back...

Page 46: ... power input 3 Controller or spindle motor damage 4 Encoder is not connected 1 Check spindle controller or power wire 2 Check spindle motor input power 3 Replace controller or motor 4 Connect encoder properly Reverse rotation of spindle 1 Reverse connection or encoder A B 1 Adjust phase wire of encoder A B Over time for color changing 1 Color changing motor does not rotate 2 Mechnical part seizing...

Page 47: ...onnecting rod to in place 2 Replace approaching switch Tinsel needle error Tinsel needle bar setting error Re set color changing sequences X limit error X direction limit Manually moving hoop on contrary direction X limit error X direction limit Manually moving hoop on contrary direction Y limit error Y direction limit Manually moving hoop on contrary direction Y limit error Y direction limit Manu...

Page 48: ...44 Texi 1501 TS Computerized Embroidery Machine Operation Manual ...

Reviews: