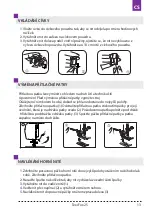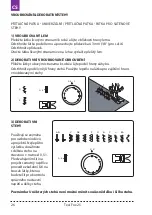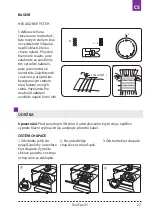
VKLÁDÁNÍ CÍVKY
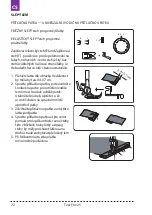
VÝMĚNA PŘÍTLAČNÉ PATKY
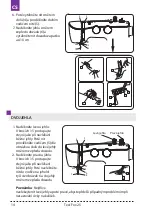
NAVLÉKÁNÍ HORNÍ NITĚ
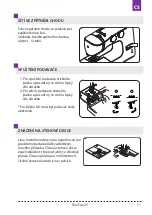
1.
Vložte cívku do cívkového pouzdra tak, aby se nit odvíjela po směru hodinových
ručiček.
2.
Vytáhněte nit do zářezu na cívkovém pouzdru.
3.
Vytáhněte nit doleva podél vnitřní pružiny, ujistěte se, že nit nevyklouzne z
výřezu cívkového pouzdra. Vytáhněte asi 10 cm nitě z cívkového pouzdra.
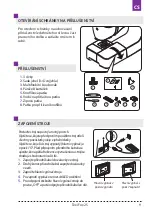
Přítlačnou patku lze vyměnit s ohledem na druh šití a techniku šití.
Upozornění: Před výměnou přítlačné patky vypněte stroj.
Otáčejte ručním kolem k sobě, dokud se jehla nedostane do nejvyšší polohy.
Zdvihněte přítlačnou patku (1) Odstraňte přítlačnou patku stisknutím páčky pro její
uvolnění, která je na držáku patky vzadu (2). Požadovanou patku položte pod držák
- hřídelkou pod drážku v držáku patky. (3). Spusťte páčku přítlačné patky a patka
zapadne na místo do držáku.
1.
Zdvihněte posuvnou páčku horní nitě do nejvyšší polohy otáčením ručního kola k
sobě. Zdvihněte přítlačnou patku.
2.
Nasaďte špulku na kolíček tak, aby nit vycházela ze zadní části špulky.
3.
Vytáhněte nit do vodiče nitě (1).
4.
Veďte nit přes napínač (2) a vytáhněte směrem nahoru.
5.
Navlékněte nit do posuvné páčky směrem zprava doleva (3).
6
KNOWING
YOUR
SEWING
MACHINE
Removing or replace the bobbin case
1. Refer to page 4 to remove the Extension table, raise the needle by turning the hand wheel
toward you, then open the shuttle cover.
2. Take out bobbin case holding the latch.
3. When installing the bobbin case, the pin on the case should fit into the gap of the shuttle race.
Threading the bobbin case
1. Install the bobbin into bobbin case. Make sure the thread unwinds in the direction of arrow.
2. Pull the thread into the groove in the bobbin case slot.
3. Now pull the thread under the tension spring and into the delivery eye.
NOTE: Leave about 10cm (4 inches) of the thread hanging out of the bobbin case. When
you pull the thread, the bobbin should spin clockwise.
Changing the presser foot
1. Turn the hand wheel toward you to raise the needle to its highest position.
Raise the presser foot.
2. Press the lever on the back of the presser foot holder. The presser foot will drop off.
3. Place the presser foot so the pin on the foot lies just under the groove of the holder.
Lower the presser foot holder to lock the foot in place.
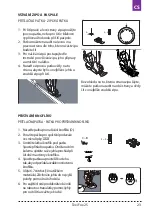
Be sure to disconnect the power supply before operating the machine.
Attaching the seam guide(optional)
Attach the seam guide in the slot as illustrated. adjust according to
need for hems pleats etc.
Gap
1
Texi Fox 25
13
CS
Summary of Contents for Fox 25
Page 1: ...MULTIFUNCTIONAL SEWING MACHINE 2 A L K J I H G F E D C B 3...
Page 2: ......
Page 5: ...Texi Fox 25 5 CS...
Page 172: ...RU 1 2 3 1 2 3 4 5 6 7 8 9 Texi Fox 25 172...
Page 173: ...RU 10 11 12 13 14 15 16 17 Texi Fox 25 173...
Page 175: ...RU 192 193 193 194 194 194 194 195 195 195 196 196 198 Texi Fox 25 175...
Page 193: ...RU 1 A 2 3 4 5 6 H 3 9 2 3 Machine Setting Texi Fox 25 193...
Page 195: ...RU 4 10 1 2 2 3 D 1 4 S S Machine Setting 10mm 3 8 Wrong side of fabric Texi Fox 25 195...
Page 196: ...RU 4 1 2 3 4 1 2 5 6 Texi Fox 25 196...
Page 197: ...RU 1 3 4 1 2 2 4 6 Texi Fox 25 197...
Page 198: ...RU Texi Fox 25 198...


