EN
REVERSE STITCHING
SEWING WITHOUT FEED DOG
MARKS ON THE NEEDLE PLATE
Reverse stitching is used for reinforcing
the ends of the seams. Press reverse
stitch button and sew 4-5 stitches.
(Using foot control, press pedal with
pressing reverse stitch button).
Lines on the stitch plate help to guide
material evenly. The numbers on the needle
plate indicate the distance between the
center needle position and the indicating
line. The numbers in the front indicate in
Millimeters. The numbers in the back indicate
in inches.
1.
Open hook cover.
2.
To switch of feed dog, press
down the lever and move it to the
direction of arrow as illustrated.
3.
To raise the feed dogs, press
down the lever and move it to the
direction or arrow as illustrated.
For ordinary sewing, move the lever to
the left. This raises feed dogs to their
highest position. For most sewing, the
lever should be in this position. For
darning of free motion embroidery or
whenever fabric is to be moved by hand, move the lever to the right to lower the
fabric feed dogs.
* Feed dog must always be up for normal sewing.
4
2
1
3
KNOWING
YOUR
SEWING
MACHINE
Converting
to
free
-
arm
sewing
Your machine can be used either as a flat-bed or as a
free-arm model.
With the extension table in position, it provides a
large working surface as a standard flat-bed model.
To remove the extension table, hold it firmly with both
hands and pull it off to the left as shown. To replace,
slide the extension table back into place until it
clicks.
With the extension table removed the machine
converts into a slim free-arm model for sewing
children’s clothes, cuffs, trouser legs, and other
hard-to-reach places.
Presser foot lifter
There are three positions for your presser foot.
1. Lower the presser foot to sew.
2. Raise the lifter to the middle position to insert or remove
fabric.
3. Lift it to its highest position to change the presser foot or to
remove thick fabric.
Reverse sewing lever
As long as you are pressing down this
button while sewing, the machine will feed
the fabric backwards.
Dropping the feed dogs
1. For dropping the feed dogs, press down
lever and move it to the direction of arrow
as illustrated.
2. To raise the feed dogs, press down the
lever and move it to the direction or arrow
as illustrated.
* Feed dogs must always be up for normal
sewing.
5
1
2
3
KNOWING
YOUR
SEWING
MACHINE
KNOWING
YOUR
SEWING
MACHINE
Seam guide line
The numbers on the needle plate indicate
the distance between the center needle
position and the indicating line.
The numbers in the front indicate in
Millimeters.
The numbers in the back indicate in inches.
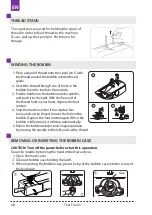
Setting spool pins
The spool pins are used for holding the spool of thread in order
to feed thread to the machine.
To use, pull up the spool pin. Push down for storage.
Winding the bobbin
1. Place a spool of thread on the left spool pin. Pull
the thread out from the spool and place it through
thread guide as shown in illustration. Put end of
thread through the hole in bobbin as shown.
2. Push the bobbin wider shaft to far left position, if
it is not already there. Place bobbin onto the
bobbin wider shaft with end of thread coming
from top of bobbin. Push bobbin winder shaft to
the right until it clicks. Hold onto end of thread.
3. Start machine. Bobbin will automatically stop
turning when completely filled. Push shaft to the
left to remove bobbin and cut thread.
Texi Fox 25
67
Summary of Contents for Fox 25
Page 1: ...MULTIFUNCTIONAL SEWING MACHINE 2 A L K J I H G F E D C B 3...
Page 2: ......
Page 5: ...Texi Fox 25 5 CS...
Page 172: ...RU 1 2 3 1 2 3 4 5 6 7 8 9 Texi Fox 25 172...
Page 173: ...RU 10 11 12 13 14 15 16 17 Texi Fox 25 173...
Page 175: ...RU 192 193 193 194 194 194 194 195 195 195 196 196 198 Texi Fox 25 175...
Page 193: ...RU 1 A 2 3 4 5 6 H 3 9 2 3 Machine Setting Texi Fox 25 193...
Page 195: ...RU 4 10 1 2 2 3 D 1 4 S S Machine Setting 10mm 3 8 Wrong side of fabric Texi Fox 25 195...
Page 196: ...RU 4 1 2 3 4 1 2 5 6 Texi Fox 25 196...
Page 197: ...RU 1 3 4 1 2 2 4 6 Texi Fox 25 197...
Page 198: ...RU Texi Fox 25 198...


