ES
PRECAUCIÓN: No deje la máquina en funcionamiento desatendida. Después de su
uso, no olvide retirar el cable de alimentación. Siga el mismo procedimiento antes de
limpieza y mantenimiento.
PRECAUCIÓN: Cuando se desconecta la máquina no se tira del cable, sino se agarra
la clavija
PEDAL DE ARRANQUE (PEDAL)
BRAZO LIBRE
ELEVACIÓN DEL PIE PRENSATELA
Para comenzar a coser, es necesario presionar el
pedal. La velocidad de la costura se regula a través del
pedal. Cuanta más presión apliquemos al pedal, más
rápido coserá la máquina.
Para acceder al brazo libre, deslice la mesa tal
y como se indica en el siguiente dibujo.
Una vez retirada la mesa, accederemos al
brazo libre, que nos permite coser elementos
difícilmente accesibles (perneras, mangas,
etc.).
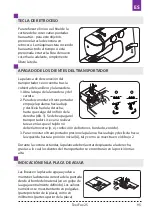
Disponibles tres posiciones del pie prensatela
1.
El pie siempre debe estar liberado durante la
costura.
2.
El pie debe elevarse (hasta la posición media), para
eslizar por debajo el material cosido.
3.
EL pie lo puede levantar a la tercera posición más
elevada, agarrando la palanca, con el objetivo de
colocar varias capas de materiales, o para sustituir
el pie.
3
2
1
3
5
4
7
6
8
9
KNOWING
YOUR
SEWING
MACHINE
Power line cord/foot control
Make sure that the sewing machine is turned off (the
power switch is set to “O”), and then connect the plug
of the power line and into the appliance inlet and your
wall outlet.
The foot that comes on your sewing machine
is called zigzag foot and will be used for the
majority of your sewing.
Setting up your machine
Bu
sure to wipe off any surplus oil from needle
plate area before using your machine the first
time.
Power/light switch
Your machine will not operate until the power/light switch is turned on. The same switch controls
both the power and the light.
When servicing the machine, or changing needles, etc., machine must be disconnected from
the power supply.
NOTE
:
When foot control is disconnected,
the machine will not operate.
Always disconnect the machine from power
supply by removing the plug from the wall-outlet.
Sewing speed can be varied the foot control.
The harder you press on the control, the faster
machine runs.
Accessories
1. Bobbins (3pcs)
2. Needle 3 pcs and twin needle 1 pc
3. Multi-function screwdriver
4. Seam guide(optional)
5. Ripper/Brush
6. Buttonhole foot
7. Guide presser foot
8. Zipper foot
9. Button fitting foot
Power/light
switch “OFF”
Power/light
switch “ON”
4
2
1
3
KNOWING
YOUR
SEWING
MACHINE
Converting
to
free
-
arm
sewing
Your machine can be used either as a flat-bed or as a
free-arm model.
With the extension table in position, it provides a
large working surface as a standard flat-bed model.
To remove the extension table, hold it firmly with both
hands and pull it off to the left as shown. To replace,
slide the extension table back into place until it
clicks.
With the extension table removed the machine
converts into a slim free-arm model for sewing
children’s clothes, cuffs, trouser legs, and other
hard-to-reach places.
Presser foot lifter
There are three positions for your presser foot.
1. Lower the presser foot to sew.
2. Raise the lifter to the middle position to insert or remove
fabric.
3. Lift it to its highest position to change the presser foot or to
remove thick fabric.
Reverse sewing lever
As long as you are pressing down this
button while sewing, the machine will feed
the fabric backwards.
Dropping the feed dogs
1. For dropping the feed dogs, press down
lever and move it to the direction of arrow
as illustrated.
2. To raise the feed dogs, press down the
lever and move it to the direction or arrow
as illustrated.
* Feed dogs must always be up for normal
sewing.
Texi Fox 25
94
Summary of Contents for Fox 25
Page 1: ...MULTIFUNCTIONAL SEWING MACHINE 2 A L K J I H G F E D C B 3...
Page 2: ......
Page 5: ...Texi Fox 25 5 CS...
Page 172: ...RU 1 2 3 1 2 3 4 5 6 7 8 9 Texi Fox 25 172...
Page 173: ...RU 10 11 12 13 14 15 16 17 Texi Fox 25 173...
Page 175: ...RU 192 193 193 194 194 194 194 195 195 195 196 196 198 Texi Fox 25 175...
Page 193: ...RU 1 A 2 3 4 5 6 H 3 9 2 3 Machine Setting Texi Fox 25 193...
Page 195: ...RU 4 10 1 2 2 3 D 1 4 S S Machine Setting 10mm 3 8 Wrong side of fabric Texi Fox 25 195...
Page 196: ...RU 4 1 2 3 4 1 2 5 6 Texi Fox 25 196...
Page 197: ...RU 1 3 4 1 2 2 4 6 Texi Fox 25 197...
Page 198: ...RU Texi Fox 25 198...


